We're sorry, an unexpected error has occurred

Alright - I’m aware that this problem has been reported a couple other times in the forums - seems like a known issue that isn’t solved yet. But I wanted to make sure and post my experience anyway, see if we can work through it.

I’m trying to engrave a design of mine on PG material, trying to use the Photo Engrave setting. I really, really wanted to do something with higher LPI, maybe a couple passes even, to get a nice, rich, deep engrave for a highly detailed piece. So at this point, I’m trying a raster image. I can load the artwork into the GFUI, but I keep getting the error “We’re sorry, an unexpected error has occurred” after very long wait times (up to 20 minutes).

Things that I have tried:

  • Rebooting Computer
  • Rebooting Glowforge
  • Rebooting GFUI
  • Updating Browser
  • Rebooting Browser
  • Using different browsers (also updated)
  • Logging in/out of glowforge account
  • Using different materials (PG & non-PG)
  • Moving artwork to different positions/locations on the bed/material
  • Running a different print first (successfully), then retrying
  • Retrying over and over and over again each time it fails

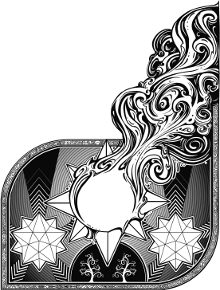
When this all failed, it seemed to me that I must be choking the software with a large or complicated file (or both). Full disclosure, the file I’m attempting to engrave is pretty busy, by design - Like I said, I want to see some gradated engraving and small details in hi-res. Also, since it’s going to be my escutcheon, it’s size is determined, and it’s pretty big:

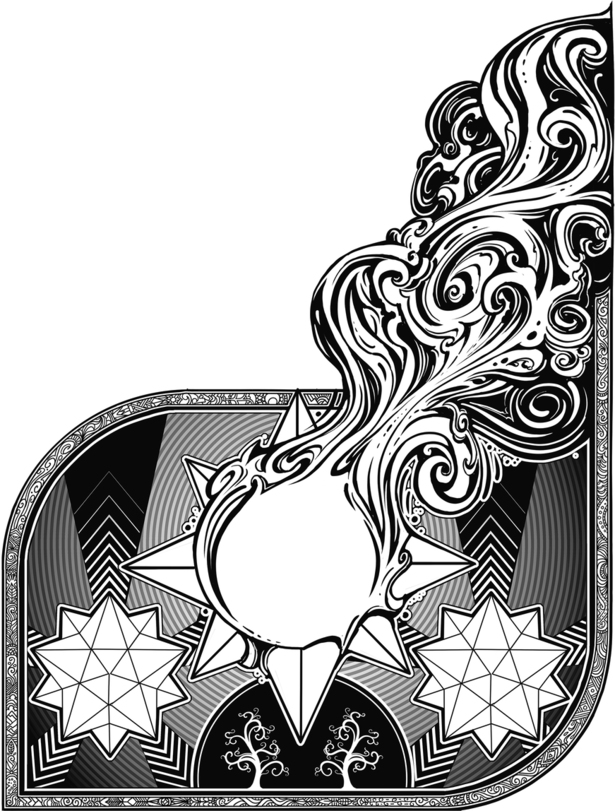
So, realizing that it’s probably the image, I started the slow, depressing, cascade of steps of making the artwork smaller, less detailed, smaller in size, etc. to see if I could get it to work. This is painful, because what I want from the glowforge, what I hoped I was getting, is a laser cutter than can cut/engrave the highly detailed pieces I’ve been so excited about, to the accuracy is claims it can achieve (1355 LPI!?!? Really?! I’d take half that). I tried:

  • Decreasing image size to exactly what was needed and no bigger
  • Changing file types (JPG, PNG, TIFF, and SVG), transparent BG and white BG
  • Decreasing resolution of image

At this point, I’m still getting the same error, and I’ve degraded my artwork further than I wanted already, so I try:

  • Vectorizing artwork, Export SVG
  • Splitting layers apart so there’s one simple engrave layer without any gradation, and one raster that has the gradation

Still can’t get past the error message. Finally, with no recourse, I switch over to Manual Engrave and start lowering the print quality settings. After 8 hours or so of toiling with it, I finally get past the error message at 225 LPI and about 90 Pattern Density.

So I must have been correct that I was choking it with this image, giving it too many operations. Forgive my ignorance as I’m new to this, but what can I do? It’s so exciting to see “THE 3D ENGRAVE” from Glowforge, which has so much detail and depth, but to not be able to replicate it. I know that my image is larger, but is there something I can do to get the Software to handle an intricate piece of work and print it at hi-res?

To be clear, the result isn’t bad - I’ll move over to post the results in a non-support fashion in a minute. But I was just hoping to get a bit more depth and detail out of it. To pump those print settings up a bit and see what it can do. Any ideas? Am I being a whiner?

5 Likes

One thing that can help is to resample the bitmap at 600 or 300dpi. You might be able to bump the LPI up then.

1 Like

Just resample your artwork into oblivion, then the pathetic Glowforge hardware and software might be able to handle it.

3 Likes

There’s no value in resolutions higher than 600dpi since the laser burn width & any lpi over 340 will overlap more than the distance between dots.

4 Likes

Interesting. (Not idiotic at all.) Why do you suppose the Glowforge is able to engrave at thirteen-hundred and whatever LPI then?

I expect it’s either to help with the 3D engrave (although the current implementation doesn’t seem to be quite what they’ve been demoing results from earlier this year).

Or because they can and bragging rights.

2 Likes

Forgive me for not totally understanding: is this different than lowering the resolution (with a proper downsampler)? The image was already down to 300dpi and that didn’t help. It’s also grayscale and 8/bit (or, the version I was trying to print, the one I attached here may be different).

Maybe take it down to 100 DPI?
This might work… Looks just as good.
85c7c7ac3be4baeda4ee583b9e9377e3bf34a4ca

This is a really cool design for an escutcheon. It would be good to have a chart or reference page to give some boundary situations for engraving, so that we know that if the file size is beyond such and such, or resolution and size is such and such of a combination, it won’t work or will take so much time. That is no fun to spend so much time trying to find the current engraving limitations.

I am running up against this phenomenon at the moment. I started with an 11000+ node svg, just to see. 20 minutes and no signs of choking nor processing. Stopped it. Started simplifying. Upload, wait, no indications that it will work or not. Saved as a bitmap with 600 DPI but a 4.5x4.5" image. No good. 300 DPI, no good.

And now to top it off, even after a log off and power cycling the Glowforge, I’m still getting the 0:00 timer in the user window at top right, silently mocking me as I try to load a new design but the Print button looks active but in fact isn’t.

Too many cancels or something. Going to shut it off and cooks supper.

6 Likes

No. You were at the mercy of the size (& therefore the buffer size constraints I’d expect - or app issues based on everyone’s reports on issues they’re experiencing tonight). Lots of people use 1200dpi or higher - with high res cameras the norm now many software packages default to much higher dpi settings than you need for lasers. They’re good for photos or “retina” displays but unnecessary for the print or laser world.

And I believe you can actually see some differences at the higher LPI settings on anodized aluminum as opposed to wood or acrylic.

1 Like

I heard that the constraints cap engraves at 3 hour print times, did I understand that correct? It seems like, since I lowered settings so gradually, I would have eventually gotten through the error message with a print time of, say, 2.75 hours or something (assuming such a constraint was my problem), but my eventual print only took 1.3 hours.

Now that I read that back, I think I’m oversimplifying the issue.

1 Like

That’s true. Since you’re not really burning any substantial material the beam footprint is smaller than materials like wood or acrylic where you’re burning lots of material away. You can get similar results with a second higher power pass as you get with higher LPIs.

That doesn’t seem likely, because Glowgorge Guardian @jamesdhatch just explained to us that anything over 600 is only for bragging rights.

Don’t quite know how to explain this…increasing the LPI doesn’t seem to make much difference to the way an image is engraved once you get past a fairly low number. (Seems to be in the 195-225 LPI range.)

The higher resolutions on the LPI are burning over areas that have already been burned as the beam moves up a shorter distance. So the resulting engrave gets a little more charred, and a little deeper, but the coverage for the engraving is exactly the same as it is at about 195-225 LPI. (And I know someone can probably calculate the exact LPI number for full single coverage given the size of the spot of the beam…I’m not going to take the time to do it.)

So when you’re interested in creating a burn pattern, you can get the same pattern at the lower (195-225) LPI values that you do at 340 or higher. 340 LPI and higher just get darker and deeper, and take a heck of a lot more time. And generate a tremendous amount of additional data for the buffer to have to deal with.

So for larger surface area engraves, I will reduce the LPI to about 195 or 225, and then, if I absolutely want to have it be charred black, I can run the engrave part a second time without changing any settings after it finishes the first round of processing. It’s still faster than upping the LPI value. (That introduces a factor of four to the time required, if I recall what Dan said about it once. Might be wrong…don’t quote me.)

When you get into the draft settings for LPI (extremely low end - under 125) you will start to see gaps in the coverage, so you don’t want to go too low with it. But since no one likes to wait around forever for their engraving to finish, it makes sense to run it at the lowest LPI that gives you complete coverage.

The extremely high LPIs really do eat deeply into the material, and they’re useful if you are trying to actually carve out material. My thinking was that gets used during the 3D engraving process. (And I use them to carve out channels for seating butt joints.)

The laser will pick up tremendously small detail at 300 PPI. It really doesn’t improve the image resolution to go larger than that, because the beam is a fixed size. And too much pixel data can bog things down again.

So for larger surface area engraves, I start with 300 ppi on the raster image, and 225 LPI for the engrave, and generally the interface doesn’t have trouble accepting it. If it’s still too much, I’ll drop the LPI to 195 and try again.

Don’t know if that will help or not, but it generally works for me and even though I don’t do a lot of engraving myself, I’ve checked a lot of problem files that couldn’t be loaded until the LPI and PPI were dropped down to manageable levels.

9 Likes

Thanks so much for that thorough response! I’m really interested in how more passes will affect engraves, too, so I’m gonna go do some testing immediately.

3 Likes

They advertised 1000LPI but the machine uses metric belts so it can never get exact inch units.1354.66666667 is the first value > 1000 with 400 step motors, 30 tooth GT2 pulleys with the stepper drivers in x8 mode. They can go up to x32 mode but that would make the waveform file much bigger and reduce the maximum engrave time even more.

Don’t forget they advertised 1/2" variable focus but they use 11mm (.433) [I think that was actual, might be 12mm, can’t remember off hand]

Glowforge likes to round and redefine words.

2 Likes

They still are here.

“Completely Internal — Lens moves internally up and down inside the head to focus on materials up to 0.5” (13mm) thick”

Right now focus only goes up to .433". I wonder what the issue could be that is preventing them from enabling the full .5".

2 Likes

Yes I mentioned that in another thread. The GF works in metric units, they only get converted to inches or obscured in the GFUI. 0.433" is 11mm so they are 2mm short.

The Z motor has a limit switch so I don’t think they have uncertainty where it is like X & Y. I wonder if they simply mounted the head too low with respect to the crumb tray. If that is the case I can’t see it being fixed. If it isn’t the case I don’t understand why it isn’t fixed already. It is a very simple thing to drive the motor up and down 13mm from a limit switch. It can either move that far or it can’t.