Got my day-one Pro on Wednesday, PG pack won’t be here until next week, so I’m making do with random scraps I have around. I’ve found one step in the order of ops that confuses me:
Lay material in bed, close lid
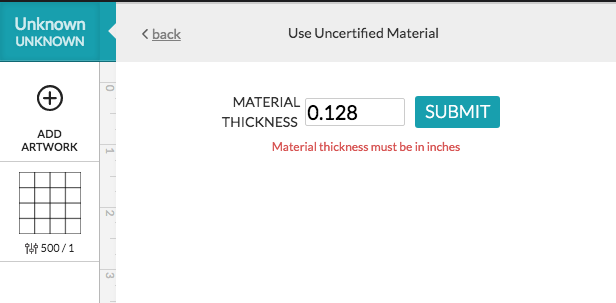
Manually enter measured thickness of, say, 0.2" (“This helps get the best photo of the bed” it says)
Lay out design, set parameters (note that focus is already set to 0.2")
Press Print
Head moves over and fires the red parallax laser at the material
But why? I already told the software the thickness, which was auto-inserted into the focus height. So why take the time to re-measure? What’s it doing with that extra data point?
And a follow-up question: When using non-PG materials, do we want to set the laser focal point at 0.2" for this material, or to 0.1" (halfway down)?
The thickness you enter is for the head camera for better placement of your art. The red distance finder is for laser focus. Two different jobs. If you screw up the first the second gets done anyway and you get a good cut but it may not be paced perfectly if you were significantly off with your measurement.
Not sure on the laser. On the thickness, I measure the thickness of the object, then put the actual thickness in, no matter the material. I’d use a different if I wanted to defocus, but for most things I don’t want to. If I’m not putting in the exact thickness, it is because I can’t make that thickness work. (Yes, I’ve cheated at put .5 inch items on the honeycomb with .43 focus. It hasn’t cause serious problem other than messing with alignment a little.)
I’ve noticed that if you enter a value that is greater than your material thickness, it will fail quickly when attempting to send the job. No error message though. I haven’t focused on reproducing the issue precisely yet so I might be off.
So I think if you put 0.2 and it measures 0.18 at the point it chooses then no print. So center of the material is safer from a software point of view and seems like it maximizes the power density over the full depth. Maybe.
Ohhhh, I see. So the Focus value that I see is initially based on the value I enter, but could be (and probably is) overwritten by the red laser value?
But wait, if the focus value is rewritten by the red-laser value, how does someone set a defocus value, since the red-laser measurement is taken after Print is pressed?
Oh, good question, must be a composite of the two? The idea of the head rangefinder is that someday we’ll get multi or continuous adjustments. This is not happing now, one sample and done.
If only we had some manuals or videos explaining any of this. This is cr*p that we all have to rely on word of mouth, trial and error to know how anything works.
The first thickness number that we enter is used for two things from what I’ve seen - it focuses the lid camera at the correct distance for design placement purposes on the material, and it automatically populates the correct Focal Point fields in the various operations assuming a “surface of the material” Focal Point. (default)
Those values in the operations can be over-ridden on a case by case basis, so you can actually have a focal point at the surface of the material for one operation and set it at a different point (halfway or above the material) for a different operation in the same overall print. It lets you do things like defocus an engrave, and not change the focal point for the cut on the material. (Have tested this - it pauses the print, refocuses, and resumes.)
The red blip, from my understanding, is a triangulating measurement taken internally for the software to determine the actual thickness of the material…eventually there will be more than one measurement taken so that the beam can focus on curved surfaces, but for the time being, there is just one measurement taken before the print starts. (It can still track up to about a quarter of an inch variance though…I’ve seen it cut through some warped material that I was expecting it to get hung up on.)
I think we all agree that that’s true. Still trying to understand what the software does with that measurement, considering that the user has entered manual values in two locations (thickness and focal height) prior to the red dot auto-measure event.
YMMV, but I have never seen this behavior (5mo PRU, 1mo Basic).
As far as I know, the manual material thickness is only used to set the apparent focus for the lid camera to aid placement, as shown here…
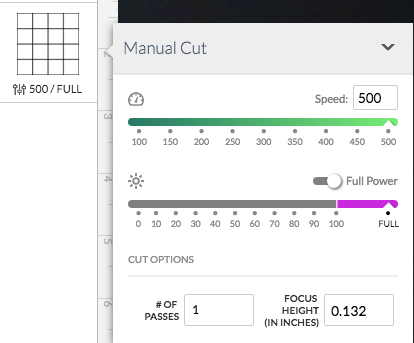
The actual focus of the laser is based on the red diode laser spot at a single location (for now), and can only be adjusted in the manual cut/score/engrave settings (as opposed to the material settings).
In this case, the focus height was pre-populated based on my non-PG material setting of 0.128" (but would have still auto-focused as per the red dot). To force a defocused operation, I changed it to 0.132"
So what happens if you enter a drastically different value in the material thickness - the red beam overwrites the populated focus value? Brb. Going to test.
Note that we don’t focus the lid camera differently with the thickness number: we use the height to dewarp the image so that the preview is correctly aligned with the cutlines. We basically add that number to the bed height to determine how close the surface of the material is to the camera.
When people have alignment problems, it’s often some tiny bump of something raising up the material just a bit, so it’s closer to the camera than the thickness measurement would indicate.
Working around this is one of the biggest improvements we’ll make to camera alignment. We’ll do it by making a quick surface height measurement with the red dot laser before we dewarp.
I am confused about how the focus measurement interacts with the focus height in the settings dialogue.
You say @takitus is exactly right when he says if you set it manually it will override the measurement. Why does it still take the measurement then?
Do PG settings only have the ability to focus at the measured surface height?
Do manual settings only have the ability to focus at the specified height?
Does simply switching from the PG preset to the filled in manual settings change how it focuses?
It seems like the correct operation would be to adjust the focus height by the difference between the entered thickness and the measured thickness. That allows a PG setting to say focus above the surface for optimum low res engraving and still have that same offset when the material differers from its nominal thickness.
Similarly a user setting would behave the same way. If I enter 0.125" as my thickness but set the focus to 0.2" I am intending to be 0.075" above the surface. If the measured thickness is actually 0.12" then I would expect it to focus at 0.195 so it is still 0.075" above the surface.
It would be better to be “focus offset from the surface” as that is what you actually want to set and can default to 0. Having it as an absolute height and then having an entered material thickness, a measured material height and an entered focus height is confusing. And why does it still measure it when you enter a focus height? Does it ignore that measurement?
I’ve had something happen with the red laser that could become an issue down the road. When I had several pieces to engrave that were located around the bed, the red light seems to go to the middle of everything and take a “snapshot”. When this occurred over a “bare” spot (no material under the light), it immediately threw up the error message. I would appreciate if there might be a way to manually select the spot that the light takes the measurement from, even if it was only available after the initial check failed to detect material (“Would you like to select where the pointer should go?”).