I will be receiving my gf today and would like to know which softwares work best with it. Want to try and get familiar with some before it comes so I can start right out of the gate! Thank you!
2 Likes
Welcome! Inkscape and Gimp are both free and very powerful to accomplish what you need. Gimp will modify pixel graphics very well and while you can include pixel graphics in Inkscape it does not do much with that, but does very well with vectors, ans will do things like even out a curve for scrolls or arrangement of parts.
There are a lot of videos about each but just playing and trying all the buttons was my preferred method of learning.
3 Likes
Read this. All of this. It’ll save you a lot of questions and headaches:
5 Likes
Weclome @Darplifarmhouse. I know a bunch of Menefees in Missouri.
So many to choose from. I use Inkscape for most of my projects. I use OnShape for 3D modeling that can get sliced for vectors.
3 Likes
First piece of software is a vector editor: Inkscape, Adobe Illustrator, Affinity Designer or CorelDraw. Inkscape is free. If you’re on a Mac, Inkscape can be difficult to get installed and working properly, however, Affinity Designer is only $50 and is designed for Macs.
If you want to engrave photos/drawings/non-vector artwork, you’ll probably want to touch them up in something like GIMP or Photoshop. Don’t overlook MS Paint for simple stuff, but it has its limits.
Useful software you don’t have to install includes an online box generator like boxes.py.
It is best, at least when starting out, to use Chrome as your web browser. The other browsers will work, but sometimes there are minor issues with them. So until you know what is supposed to happen, I’d stick to Chrome.
And of course, read the tutorial sections listed above. It may help you pick your vector editor and it will definitely teach you some of the basics on how to use it.
5 Likes
I tend to use Inkscape because it’s free and relatively powerful.
Start simple.
- Create circles of specific sizes, squares, etc.
- Learn how to save a very simple single object design as an SVG file.
- Learn how to use the snap tools to align and merge objects.
- Learn the boolean operations under the Path menu.
- Create text. Remember to convert all text objects to line paths so that the GF can recognize it.
- Import simple black and white images into your design.
Whichever program you use, just keep it simple. Try to learn one thing at a time. Don’t run until you can walk. Do the same with the GF app interface. Simple steps. Identify what you understand and what you don’t. It will save a lot of Problem and Support postings.
4 Likes
Thank you for the info! Guess my FIRST question should have been how the heck any woman on here was able to carry that huge heavy box to the table to set up lol. I made my first two cuts a few hours ago and it was a lot easier than expected. Of course I still have lots to learn but thank you all again for the reply!
2 Likes
That’s pretty interesting since only menefee’s we know down this way has been family. Doesn’t seem to be a common name here.
1 Like
I’m getting some things figured out now but I can’t for the life of me get figured out how to slice. Like say I have a wood round. I want to add a cutout image towards the bottom of the wooden round but can’t make it to where it cuts off so it’s aligned and cuts it to where it curves with the wooden round.
Sorry, but I’m not understanding what you are asking.
One important thing to know is that when you use the word “slice” on this forum people are immediately going to think you want to take a 3D object, like a statue, and slice it like a loaf of bread. I’m pretty sure that is not what you mean.
I think what you are asking is, if I have a round piece of wood and I want to engrave an image on it, or I want to cut things out of it, how do I do that? Also, the image/file I am using is squarish, but I want to modify the bottom of the image/file so that it follows the curve of my round piece of wood.
We need more information to answer that question. Don’t worry, everyone, especially when they are learning, leaves out necessary info. It’s just part of learning around here.
Do you want to go right up to the edge, absolutely no border? That’s simple, just load your file into the glowforge UI (GFUI) and position it so it hangs over the edge of the round piece of wood. The laser will engrave/cut the part of the file that is not on the wood, and it will make an extremely bright light when it does this, but it won’t harm anything.
If you want a border between the edge of the round piece of wood and your image/file, then your image/file has to be modified in the vector editor you are using. To help you we need to know what editor you are using and if you are modifying a raster image, a vector file or a combination. It is generally easiest for us if you upload your file. A note on uploading files - if you zip the file and then upload it you’ll avoid a whole host of potential problems.
Finally, one of the easiest ways to slice off part of an image is to use a clipping path. The GFUI doesn’t do clipping paths, so that is a no go.
2 Likes
One thing to remember as well - and this is probably obvious but it goes to a question I think about all the time. I spend a lot of time in AutoCAD drawing very specific parts to cut for different things. Yes, you can and will do amazing things with the GF and it’s a great tool. But I spend a lot of time thinking “How do I craft this individual piece”? I’m a woodworker, so I typically think in pieces and construction techniques. When I got this all I could think of is the amazing stuff I could do with it and how easy it would be to build stuff now that I have it. And for the most part that’s true - I can create amazing stuff, just still in pieces. 
Of course I can cut with extreme accuracy (remember kerf!) and engrave now, so that’s pretty awesome. You’ll see some of the amazing things people have built on here and wonder how you can do that too - just remember it’s all about pieces!
I don’t know if this helps - but learning the software is crucial to getting good results. Inkscape seems to be the most supported here because so many people use it - take time to invest in that one and learn it. Gimp is good too because it’s free and you’ll want the ability to clean stuff up before engraving.
1 Like
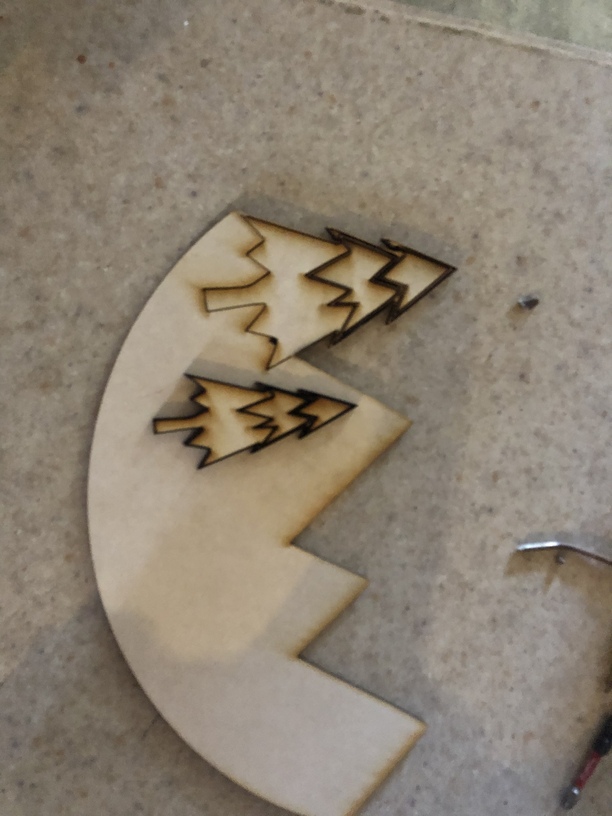
Yes I wanted to go right up to the edge following the circle shape with no border. I figured out how to do that in Inkscape. Sorry I’m learning the new names and processes. ![]() Pretty sure my brain is on overload. I came from a circuit so the terms there are far different than the ones in Inkscape and Gf. Also I was trying to cut out some trees but got a double…maybe even triple line in some places. What am I doing wrong?! Those aren’t cut out of that bigger half moon piece just sitting on top. image|375x500
Pretty sure my brain is on overload. I came from a circuit so the terms there are far different than the ones in Inkscape and Gf. Also I was trying to cut out some trees but got a double…maybe even triple line in some places. What am I doing wrong?! Those aren’t cut out of that bigger half moon piece just sitting on top. image|375x500
I too love the woodworking side and figured this would help knock out bigger pieces in less time. Man was I wrong for the most part…it’s waaaay more brain wracking for me it seems. Think my biggest thing is learning the terminology and putting that with what it does. I know I haven’t even scratched the surface yet but overloading my brain trying lol
Yes and no. I’ve done a couple of things with the passthrough slot and while it’s handy to be able to go 19 inches wide by however long you want, you’re limited to 1/4" at best for thickness. So unless you’re willing to cut multiple parts of the same size and glue them together, you’re stuck.
More complex pieces - absolutely. I just did a few frames for prints my wife and I are getting and cutting / engraving trees in the frames was a breeze - something I’d never have the skill or patience for on a scroll saw. Also did things like build an acrylic top for a fish tank with a cool cutout for the top, etched with a neat fish I found. In that case, it was perfect as I could cut exactly the sizes I needed / wanted without waste.
Kerf is def a consideration - look for lots of convo’s here about that. I’m creating a geometric frame right now and had to recut hundreds of pieces because I didn’t compensate for kerf properly. If you need gnat’s ass dead on - figure out kerf!
Those trees have a pointy line at the third and two-thirds part of the tree. The arrow is pointing at the first (the one a third of the way up) pointy line.
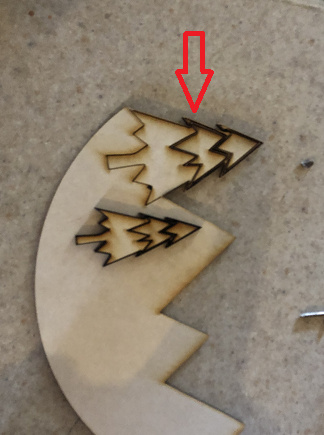
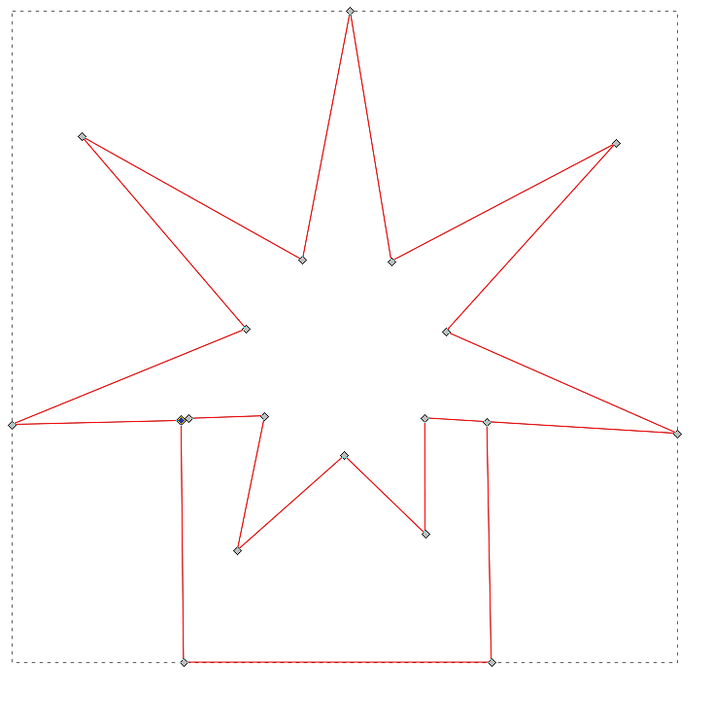
The glowforge is cutting the line. What to do to fix it depends on what your goal is. If you just want a tree with no pointy lines in it, you would need to union the three parts. Here is a very simple example of an object with your problem.
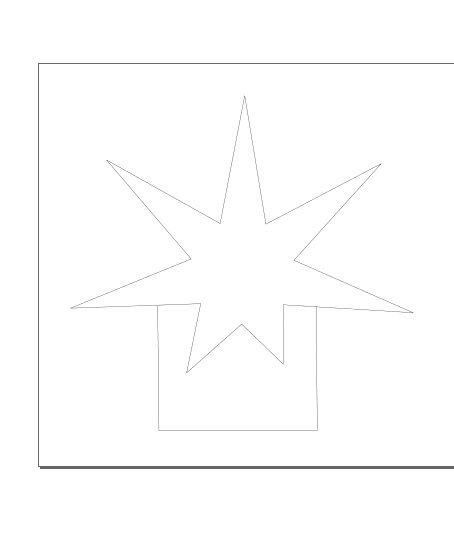
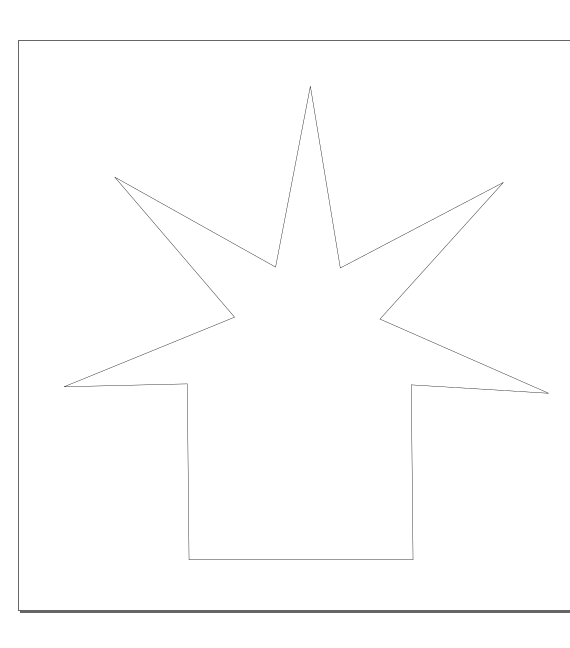
The glowforge is going to cut that into two parts the starry part and the rectangular part. If I select the entire thing and go to Path->Union in Inkscape I will get just the outline.
Warning: Inkscape will only do a boolean operation (union, difference, exclusion, etc…) on two paths. If one of the objects is not a path, but is a group or something, it will refuse. If you try and do something in Inkscape and nothing happens look at the bottom of the Inkscape window - it will tell you why it did nothing (see below). It took at least one of us, one of us who knows better, many, many months to figure that out.

If what you want is the pointy line to score the material (make a line, but not cut all the way through) you need to make it a different color than the lines you want to cut. Click on the edit paths by node tool and you’ll see this:

Double click on the star where the rectangle meets the star and create a node in the star (the new node is the blue one):
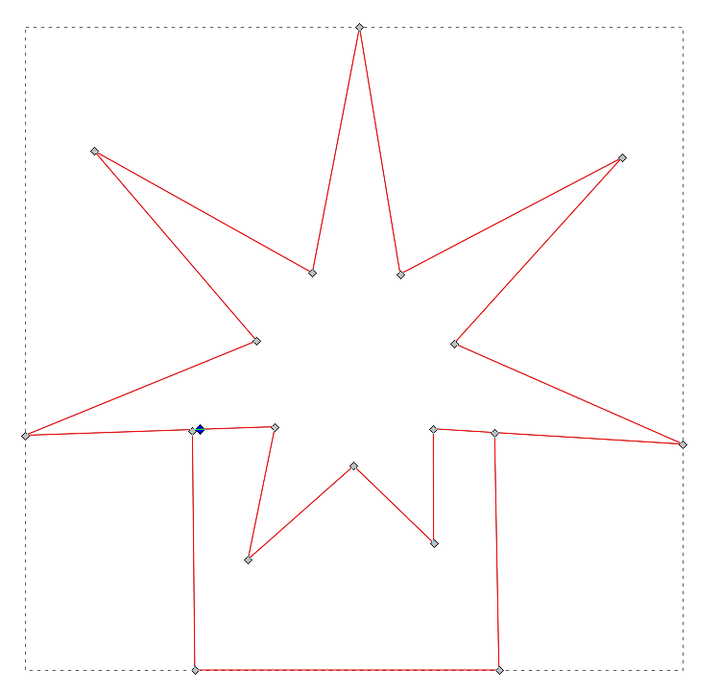
Click on Break Path at Selected Node and it will make two nodes. Drag the outside one to cusp the node to the rectangle’s node:
Do the same thing to the other side. Now you can either leave the two nodes unconnected, or you can also cusp them to the other two nodes. The reason you can do either is the laser cuts about .004" to either side of the lines - that material exits via your exhaust hose. So any two lines within roughly .008" of each other are “connected” in the final product. At any rate, you will have the bottom part of the star (or the first pointy line in your tree) separate from the outline. Now you have to select just that part and make it a different color. You will have to select everything and click on Path->Break Apart in order to just select the center line thing. Better yet, just select the outline and make it blue. Black comes before blue in the GFUI list of operations and I like to do my scores before my cuts.
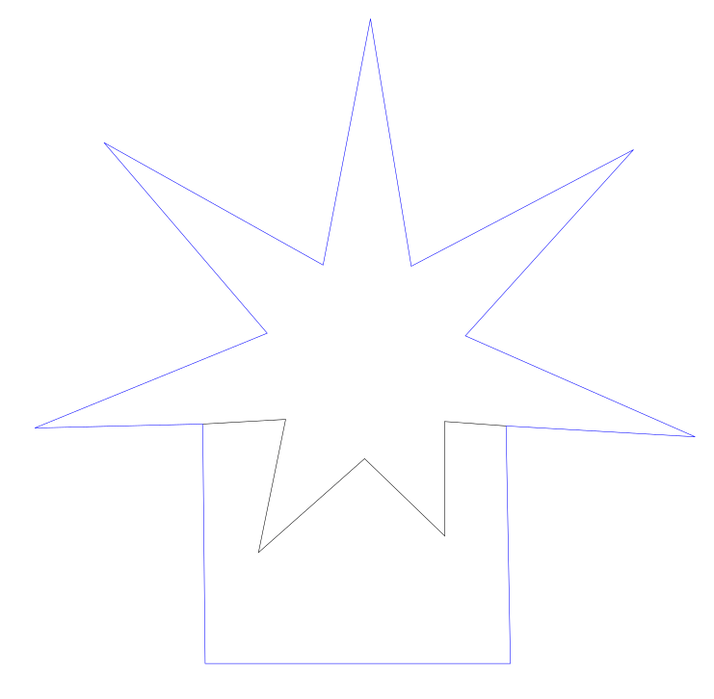
If you load this into the GFUI you will have two cut operations. Change the first cut (the black one, or the center line) to score. You will wind up with the blue line cut and the black line just a mark in your material.
2 Likes
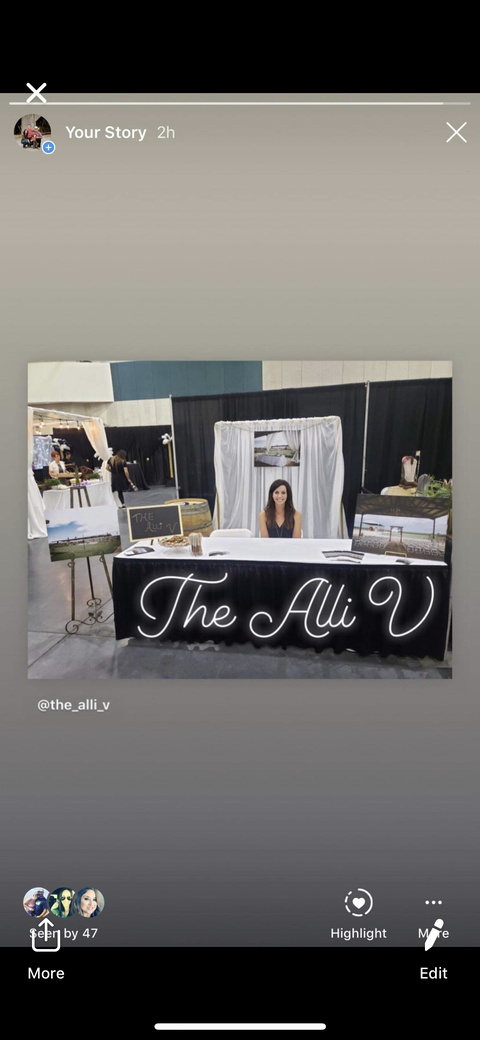
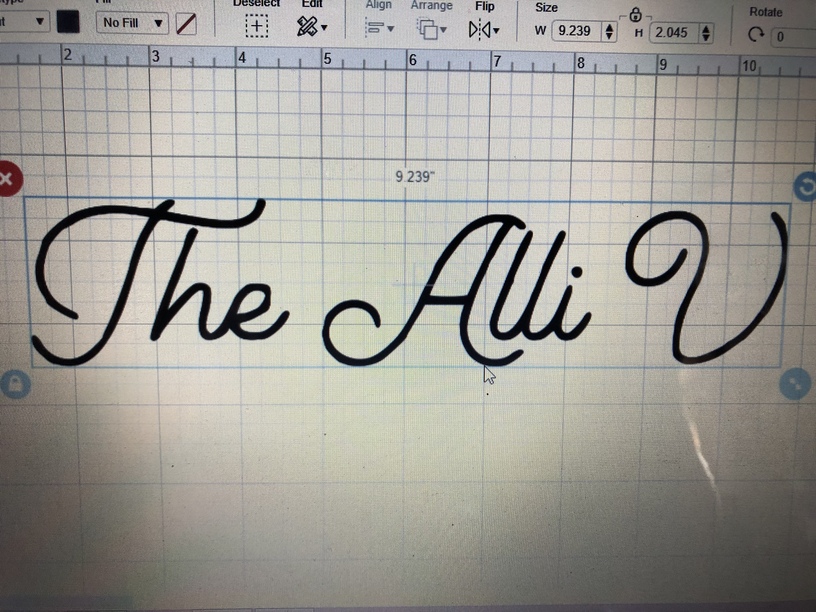
Kind of figured that out. Thank you so much for all the helpful info! I have yet another question. I have a client who wants this exact font but I cannot figure it out. I need to extract it from this picture so I can cut it. I’m able to easily do it in my Cricut software but can figure it out on the gf or even Inkscape
You have it in the second picture. You could either trace it and do a vector fill engrave or just engrave the raster image. Obviously, I’m not understanding what you want. Again.
If you mean you want to figure out what font that is, I don’t know of anyway to do a reverse font search. You could ask Alli, or Alli’s graphic artist. Or ask on a font forum. There are a lot of font geeks out there.
1 Like
For some reason I’m unable to get that second picture over to Inkscape or gf. So I’m having to figure out how to extract that banner from pic 1 over to Inkscape to extract that font or banner so I can cut it out. Just the writing.
I would crop out everything except the banner and then use one of the photo editing tools to remove the background (or you could try this online tool, it works pretty well: https://www.remove.bg/g/individuals). Then import it to Inkscape and use the trace feature.
2 Likes
I tried it but still nothing. Would I be able to print that second picture out and put it in the gf to copy then cut?