Warning extreme TL;DR ahead. If you are a normal, sane person run away. For readers who fall between sane and stark raving mad I’ve broken the following novel into chapters so you can pick and choose what to read.
- Backstory - why I did this and why I documented it.
- Bowl Design - near step-by-step instructions for turning an icon into a svg file for a scrollsaw style bowl and things to consider in creating your design.
- Glitter Glue Inlay - Settings and lessons learned about using glitter glue.
- Cutting the Bowl - Lessons learned about asymetrical designs and complicated base designs.
- Assembly - Glue versus double-sided tape
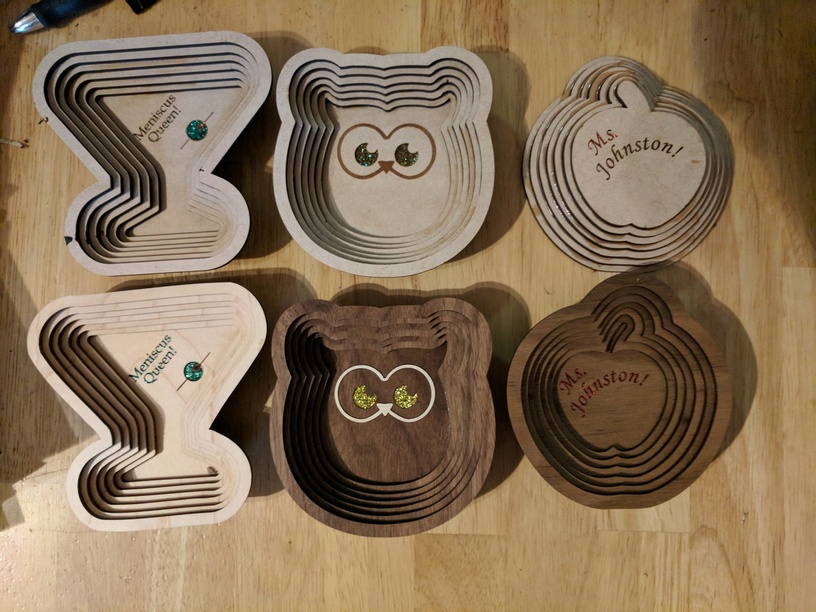
I used the following icons to create the above:
Apple by Mello from the Noun Project
Martini Glass by Arthur Shlain from the Noun Project
olive by Rafa Goicoechea from the Noun Project
Owl by Alina Oleynik from the Noun Project
**
Backstory
**
Last year a teacher friend of mine received a chocolate bar for her birthday. For the next four months I was reminded that only a monster would give someone a chocolate bar for their birthday. She had started a cleanse the day after her birthday. But at the time I thought, “well this makes next year incredibly easy: apple.” But of course @Jules goes and posts these bowls she made and suddenly the apple needed a gift bowl.
Jules mentioned the bowls could be engraved, but I thought meh?? Then @bill_laba posted a project that used glitter glue and ding-ding-ding we have a winning combination.
The design process was so simple I decided two other people “needed” a bowl. I remembered something I believe @cynd11 wrote about the paper cutter community: there are very few designers, nearly everyone cuts pre-existing patterns. For someone without any design experience but who wants the experience of designing something themselves I think this would be a good place to start learning.
**
Bowl Design
**
First the design process. If you are not already registered at the noun project do it. Download the svg of an icon you want to turn into a bowl. Some tips:
- You want a simple shape without arms/legs. A pumpkin is good. A saguaro is probably not going to work.
- Keep it simple.
I’ll use the Martini Glass as an example. First I open it in Inkscape, of which I’ve done about ten hours of tutorials and about three times that just trying to use it: so a rank beginner. There may be a better work flow, but this worked. If you’re using Adobe Illustrator (AI) you probably already know how to do this.
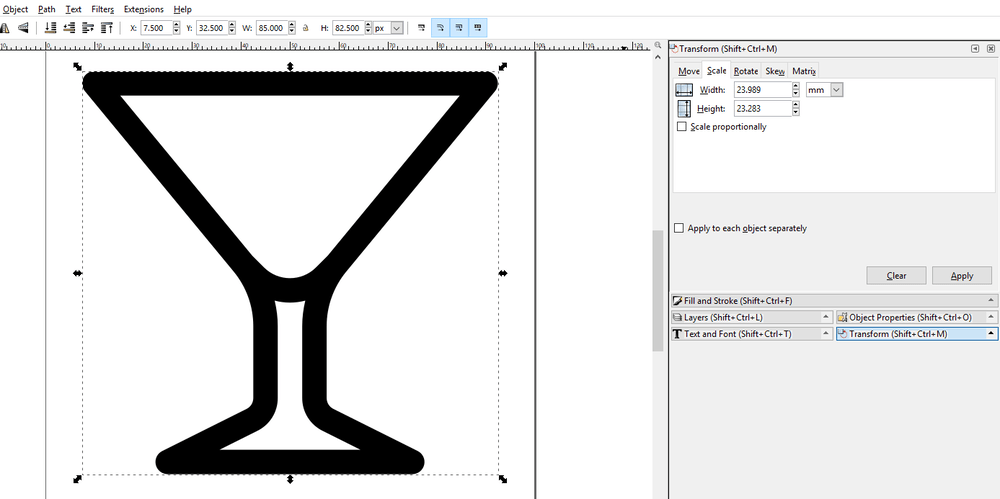
Do a Ctrl+A (so that everything is selected) and then go to Object and click Group. Some icons come grouped and some ungrouped, but it does no harm to group something that is already grouped. Select the icon, open the Transform window (see to the side of the picture above. If your Inkscape doesn’t look like this, well I’m a rank beginner so you’ll have to google it), click the scale tab, click the clear button, change the unit of measure drop-down list to either mm or inches and click the Scale proportionally checkbox. Now comes the part where you have to do math: how big do you want the bowl to be? The top of the bowl will be wider than the base (hint we’re working from the base out, so you need to know either how tall or how wide the base needs to be) so figure accordingly.
Hint: If you want it to fit on a piece of ![]() hardwood you should be thinking 2.5-3 inches for the base; if you use plywood you can go much larger.
hardwood you should be thinking 2.5-3 inches for the base; if you use plywood you can go much larger.
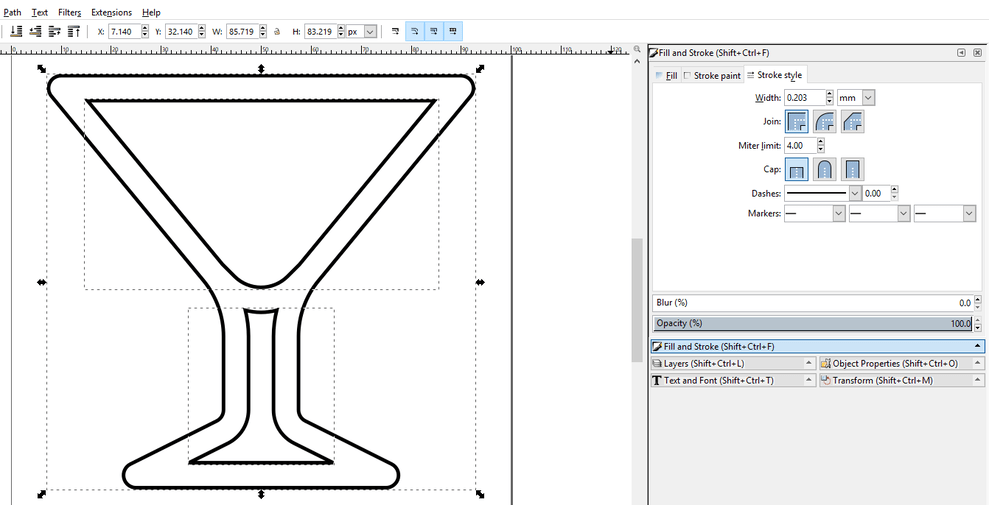
Once you’ve completed your maths enter in the width or height you want and click the Apply button. If all you want the icon for is the outline continue. If there is something inside the icon you want to save (for example in the owl bowl the face) make sure the icon is selected and go to Object and click Ungroup. With the outside of the icon selected go to the Fill and Stroke window and select the Stroke paint tab. All of the icons I’ve worked with have undefined fills, strokes and stroke styles. Click the flat color button. On the Fill tab click the X or no paint button. If you click the no paint button on the Fill tab before you define a stroke color your icon will disappear.
Now comes the cool part. With the outside of your icon selected go to the Path menu and click Break apart. You should wind up with something like this:
Now just delete everything but the outline (don’t delete interior features you want to keep of course.) With only the outline selected go to the Edit menu and click Copy (or just do a Ctrl + C). DON’T PASTE. Go to the Edit menu and click on Paste In Place. This lays the copy right on top of the original. WITHOUT CLICKING ANYWHERE ELSE go to the Path menu and click on Outset. This expands the copy by approximately two pixels iirc. Do this four more times (for a total of five Outset commands). Five Outsets is a little less than 3mm or 1/8". This outline is your first cut line on the base half of your design. Do a copy of the outer outline, do a paste in place and then outset it five times. This will be your first score line. Select the first cut line (the middle one) and on the stroke paint tab change the Blue value from 0 to 255.
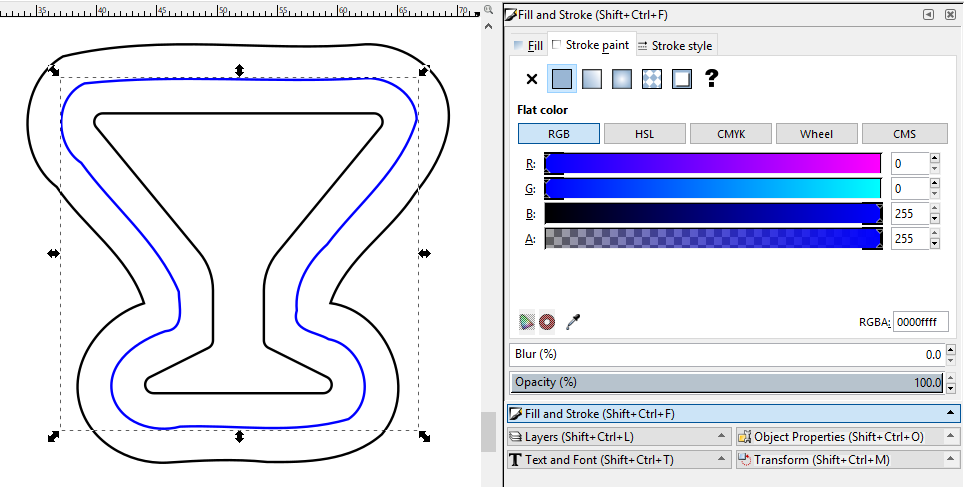
Note: in the bottom corner of the Stroke paint tab is a box titled RGBA. It should now read 0000ffff for blue. Black is 000000ff. As has been noted in several other places the Glowforge User Interface (GFUI) orders all engraves and then all cuts in order from smallest color number to largest. If you didn’t know, the RGBA box is the hexadecimal (base 16) number for the color. Hex uses the numerals 0-9 and the letters a-f to count things. 0 is zero, 9 is nine, A is ten and F is sixteen. So the number 000000 (black) is smaller than 0000ff (blue). If you want to order things in the glowforge manipulate these numbers. You can type in the RGBA box, so you could type 000001, 000002, and just keep going, but it is easier to make bigger jumps so you can actually see the different colors. Also, if you leave gaps in your color numbering and latter want to change the order you can just change the color number without having to renumber all your other colors.
Design Note: The martini glass was the worst icon I used for this. You can already notice the blobby nature of Outsetting (at least in Inkscape, AI may be better???) This panicked me at first when I saw it in the apple: my stem is going away!! As it turns out once assembled your bowl takes its shape from the bottom layer and not its rings. This is the reason why I advised against shapes with arms or legs - they’ll disappear into the body right quick.
Design Note 2: The Dynamic offset in the Path menu is really cool, but it has two giant drawbacks. The first is you can’t define how large to make the outset (at least I can’t figure out how), you have to do it by eye with the help of the pointer coordinates in the lower right hand corner of the Inkscape GUI. This may be better for some people except for drawback two: dynamic offset starts to add artifacts you can’t delete in the outer rings. The glowforge cuts these mystery lines marring your bowl.
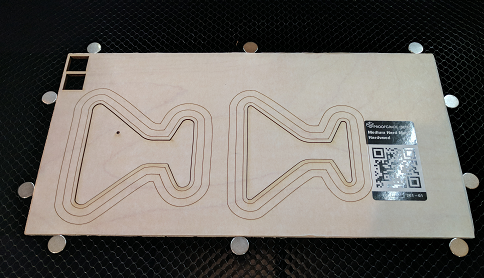
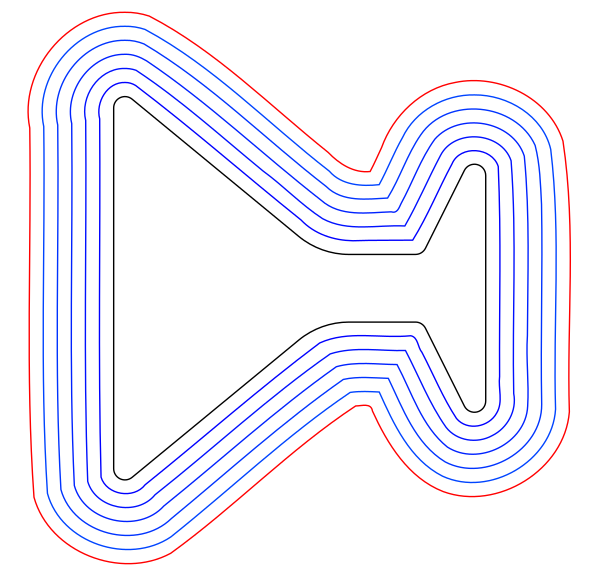
Continue copying and pasting in place and Outsetting by five until you have the base outline and seven more outlines for a total of eight. They should alternate in color: black, not-black, black… In the image below there are only seven outlines, that is because the inner most one has been deleted (we’ll get to it in a moment.) Also, before I started I had rotated the image 90 degrees thinking if I left it vertical it might grow taller than a ![]() hardwood board (it didn’t.) That is why the image below is rotated - an unnecessary precaution.
hardwood board (it didn’t.) That is why the image below is rotated - an unnecessary precaution.
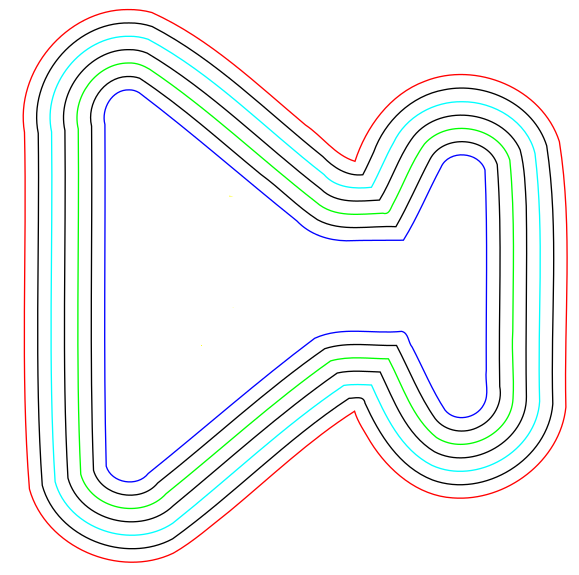
Click outside the design so that nothing is selected. While holding the shift key click on the inner seven outlines. This will select them all at once. Either do a Ctrl+C or go to the Edit menu and click Copy. Move your mouse pointer well away from the design and either do a Ctrl+V or go to the Edit menu and click paste (not paste in place.) Move the copy so it doesn’t overlap with the original design. If you accidentally click somewhere, or only drag some of the copied outlines around don’t panic. Delete your copy and go back to the start of this paragraph.
Here is the trick that makes it all come together. Change the black, not-black order of the seven copied outlines. The not-black outlines will be cut and the black outlines will be scored. The scores are to make assembly easier - they are essentially the outline of the next ring.

About the inner most black outline in the original group (not pictured.) Any embellishments you want to make to the bottom of your bowl need to go inside this black outline. Once you have placed your text, olives, eyes, beak, etc… either delete it or change it to a unique color and remember to ignore that color when you go to cutout your bowl pieces.
You do not have to order your colors like I do in the images above, but you do need to alternate between black and a not-black color. If you go with only two colors be warned that the glowforge will cut from the outside to the inside. If you cut from the inside to the outside, the inside pieces drop first. With absolutely perfectly flat material, that is heavy enough to ignore the air pressure from the air assist, this is a moot point, but not much is perfectly flat. That said, I’ve never had any sort of catastrophic, or even minor, failure from cutting outside to inside.
**
Glitter Glue Inlay
**
I waited until my first draft board attempt to enable the engraving. I took the default settings for a dark engrave, nudged them up a little and printed. I squirted some glitter glue over the Ms. in Ms. Johnston, wiped it off with a scrap piece of acrylic and let it dry. It looked great. This is soooo easy. You can see it below:
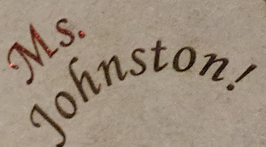
To fill an engrave with glitter glue you leave the masking on the material and squirt glitter glue over the engraved area. It piles up in a mound.
Then using a piece of scrap acrylic as a squeegee wipe off the excess.
The glitter glue will take several hours to dry.
After my first draft board iteration life interrupted and I didn’t get back to this project until much closer to the gifting date. No worries. I knew the martini glass was going to be a little more complicated so I did it in draft board first. I was worried about the olive. I wound up making some adjustments to the design of the olive, but it went swimmingly. I filled Meniscus Queen! with some blue ice glitter glue and it was a total fail. What!?!?!? The engrave was partially filled with some clear-ish glue, no glitter and no blue. Clearly the glitter glue was to blame, but there were parts of the text with no glue. So I went back to my initial test of red glue and looked at it closely: it too was only partially filled. From a distance it looked great, but up close it had issues. I did a series of tests using increasingly deeper engraves. You need a fairly deep engrave for small text. I wound up with the following settings for ![]() walnut hardwood:
walnut hardwood:
- Speed: 850
- Power: 100
- LPI: 340
And for ![]() maple hardwood:
maple hardwood:
- Speed: 725
- Power: 100
- LPI: 340
I used the above engrave settings for the owl’s eyes and for the olive. For the pimento in the olive they were fine. The body of the olive (the green part) was way deep. I didn’t take a measurement as time was pressing, but to me it appeared that the depth of the text was shallower than the depth of the olive. The owl’s eyes were probably deeper than necessary, but they weren’t as deep as the olive. If you are doing a large area of engraving consider different settings for text and large areas. Also, the blockier the text, the better as it will probably fill better.
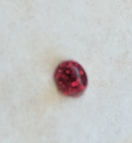
Originally I had planned on the apple and the martini glass and ordered the appropriate glitter glue colors. The owl bowl was a last minute addition to the fun so I went to Michael’s and bought their store brand of glitter glue. The following fail came on the heels of the Meniscus Queen fail, before my depth experiments, but still why aren’t the eyes yellow?
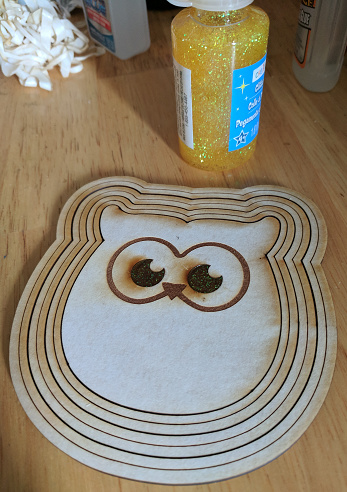
Is it because the engrave depth is too shallow and the dark brown is showing through the lighter yellow glue? Does the glue suck? Both? I suspected the glue as the mounded glue on top of the off-white masking wasn’t very yellow. I found some Stickles yellow (as part of a six pack that also had a lighter blue) on Amazon. If the Stickles yellow didn’t do the trick my backup plan was to cut out the eye in white paper, glue it to the bottom of the eye and then place the glitter glue on top of the paper. Success without having to use the paper trick!!! The only downside is now I have nine bottles of Stickles. And what exactly does a middle aged man with no children or nieces do with a bunch of glitter glue?? Clearly, this is all dan’s fault.
My advise on glitter glue: don’t use the Michael’s stuff, stick with the Stickles and stay away from the Ice line of Stickles as it sucks for inlay.
**
Cutting the Bowl
**
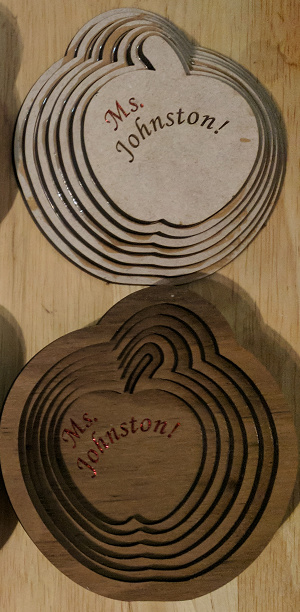
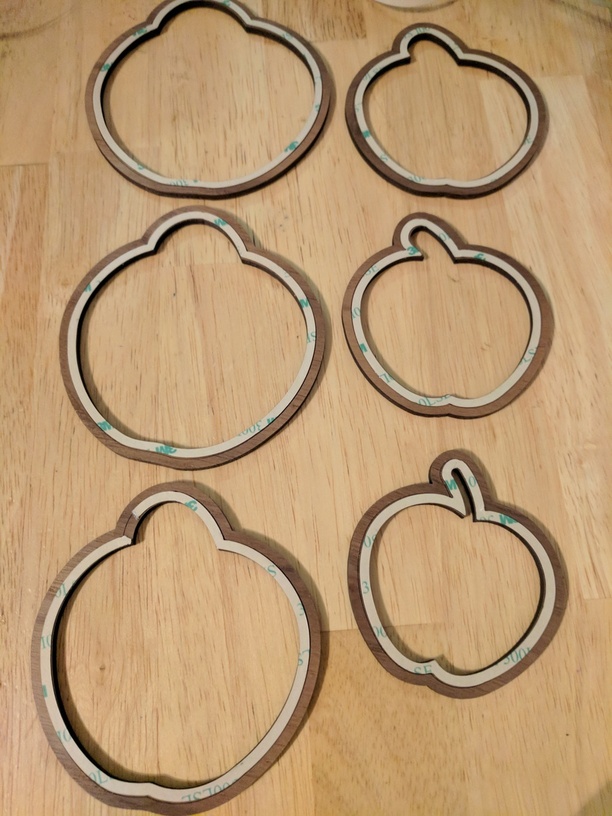
In my designs (see above) the left-hand side contains three rings and the innermost piece is the bowl’s base. The right-hand side contains three rings and its innermost piece is scrap. If you are only going to make a bowl, no engrave on the bottom, set the black lines to score and the not-black lines to cut. Press the glowing button and skip ahead to assembly.
For the rest of us there are two things to take under consideration: is the outline of the base symetrical along one axis and how complicated are we getting with the glitter?
The apple is not symetrical, but it does have an uncomplicated single color glitter inlay. So why did I engrave Ms. Johnston on the bottom of the draft board apple bowl?
When you score and cut the material the bottom side is facing up at you. The first time I engraved the apple bowl I did the engraving, the scoring and the cutting all at once. When I went to assemble it, oops! If the base is symmetrical (the base, not your design) you don’t have an issue. If it is not you have two choices: do a mirror image of your engrave so you can do it all at once or set the engrave step to ignore, do your scoring and cutting, remove your material, flip over the base, set your score and cuts to ignore, configure your engrave settings, align your design over the base and press the glowing button. There are two caveats here. If your engraving requires multiple steps like the martini glass or the placement of the engraving has to be in a precise location you’ll have to mirror the engraving. As my apple bowl design was a single step and placement wasn’t important I went with remove and flip.
The martini glass, and the owl, are symmetrical along the vertical axis. This means that as far as the bowl’s base is concerned there is no such thing as a bottom side and a top side - so you don’t need to worry about mirroring your text or other design features. The martini glass, however, does have a complicated olive. The olive consists of a pimento that needs to be red, a body that needs to be green and a toothpick that is a default engrave. The trick is not getting your chocolate in the peanut butter (if you don’t get the reference google Reese’s peanut butter cup commercials.) So I made the pimento engrave one color, the olive and text another color and the toothpick a third color. I wasn’t as worried about engrave order, but I did color code them in order. [The original olive icon I started with needed some modifications in Inkscape; they were fairly simple but are beyond this tutorial.] I engraved the martini glass in multiple steps.
-
I engraved the pimento, scored the black lines and cut the blue line (the innermost piece). Everything else I set to ignore.
-
I have a set of picks I bought at Home Depot for a pre-laser project. They work, but the dental picks people mention using would work better. I used a pick to remove the bowl’s base. I filled the pimento with red glitter glue, squeegeed it with a piece of scrap acrylic and put it back in the glowforge.

If you are using draft board or plywood and are reasonably careful, you won’t move the large piece of material when removing and replacing the base. If you’re using a smaller piece of material like ![]() hardwood I recommend a combination of being careful and magnets.
hardwood I recommend a combination of being careful and magnets.
-
Next, I set everything but the text/olive body to ignore and engraved the olive and text.
-
I used the pick to remove the bowl’s base and filled in the olive with green glitter glue. The very top of the olive wraps around the pimento. I was careful here and squeeged that glue towards the top and squeeged the rest of the glue towards the bottom. I left the text unfilled as it was off in a corner minding its own business. When designing you need to keep in mind, how am I going to build it? In this case, how am I going to use multiple colors of glitter glue in such a small space? What order of operations will work?
-
Finally, I set the text/olive engrave to ignore, I set the toothpick engrave to the default dark setting and I set the rest of my colored lines to cut (but not the blue one!)
-
The bowl cut, I removed the material from the glowforge, filled in the Meniscus Queen! text with blue glitter glue and squeegeed it. Then I removed the masking from all of the rings and the bottom of the base. I left the masking on the top of the base overnight and didn’t remove it until the next day. The glitter glue is wet - try not to disturb it.
When I made the owl in draft board I engraved the eyes and the face/beak, along with scoring and cutting all in one step. The eyes are far enough away from the face/beak engrave you should be able to squeegee out the glitter glue without dragging it into the face/beak engrave. It worked fine. When I made the final piece, I did it in two steps, the eyes first, remove and replace the base and then engrave the face/beak and make the final cuts. I’m prone to making mistakes, especially in the physical world, and figured better safe than sorry. I balanced the chances of me making a squeegee error with jostling the material when removing/replacing and for me decided the squeegee error was more likely and less recoverable.
**
Assembly
**
When I started this I wasn’t particularly worried about the glitter glue (que the universe chuckling) or the designing. I had been planning on scoring for placement long before I knew scoring would be a selectable option. Way back when I figured if ![]() can cut a line all the way through it can cut a line just a little bit into the material and this would open up all sorts of great things. When I saw the bowls made by Jules it clicked that programs like Inkscape have an outset feature and that learning it would be a simple matter of googling. Initially the Inkscape work took some time, there were false starts, but only because of my lack of experience with it. My main concerns, and they were minor, was sizing. I figured a couple of iterations with cardboard and one in draft board to catch any unknown unknowns and I’d be ready for final materials. There were a couple more hiccups than that, but overall these bowls weren’t the most daunting of challenges. Then I glued my first draft board apple together. To date my experience with glue has been on non-wood materials where if any squirts out the edges, wipe it off and you’ll be fine. With wood you wipe it off, sand it and finish it. The nature of a scrollsaw style bowl, however, presents some issues.
can cut a line all the way through it can cut a line just a little bit into the material and this would open up all sorts of great things. When I saw the bowls made by Jules it clicked that programs like Inkscape have an outset feature and that learning it would be a simple matter of googling. Initially the Inkscape work took some time, there were false starts, but only because of my lack of experience with it. My main concerns, and they were minor, was sizing. I figured a couple of iterations with cardboard and one in draft board to catch any unknown unknowns and I’d be ready for final materials. There were a couple more hiccups than that, but overall these bowls weren’t the most daunting of challenges. Then I glued my first draft board apple together. To date my experience with glue has been on non-wood materials where if any squirts out the edges, wipe it off and you’ll be fine. With wood you wipe it off, sand it and finish it. The nature of a scrollsaw style bowl, however, presents some issues.
The overlapping ring structure makes wiping glue away difficult and sanding it away at best tedious and time consuming and at worst impossible. Add in that I’m using pre-finished ![]() and why do I want to sand it and then refinish??? My first attempt I knew I was using too much glue, but I wanted to see how bad it would really be. It was awful (the apple bowl.)
and why do I want to sand it and then refinish??? My first attempt I knew I was using too much glue, but I wanted to see how bad it would really be. It was awful (the apple bowl.)

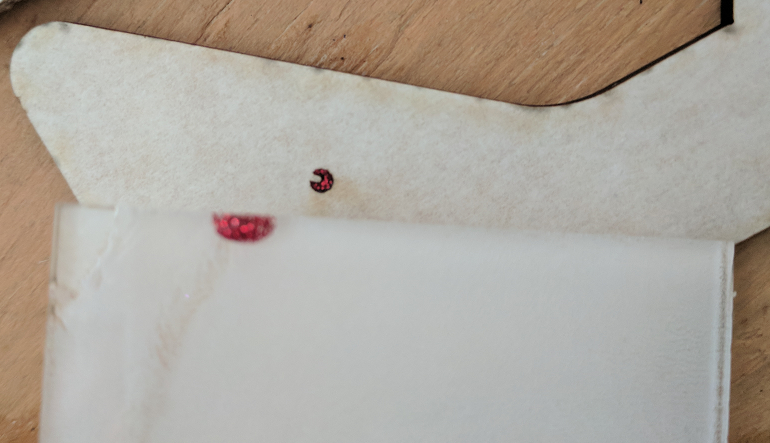
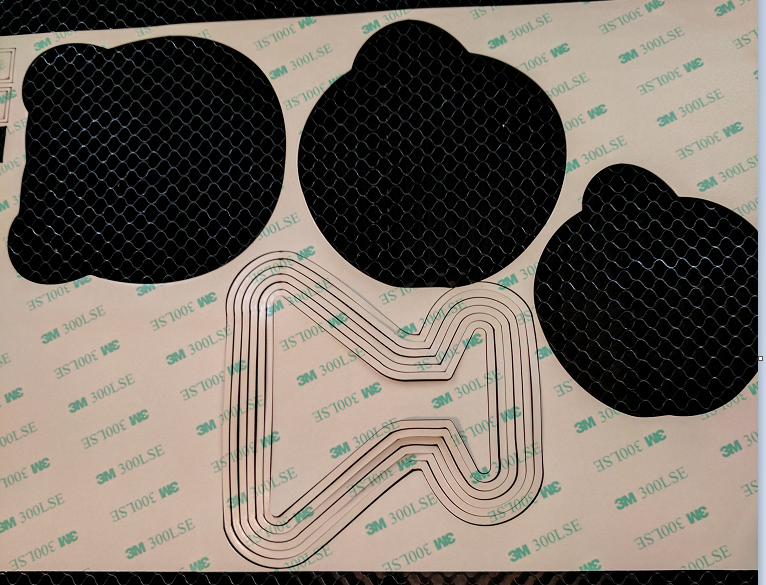
For my second attempt I used cotton swabs to apply a very thin layer of glue in strategic spots as well as cotton swabs to wipe away any excess. Still not acceptable as the red arrows show. I switched from a clear Gorilla Glue formulation to a crystal clear Loctite formulation. Same result. Neither of these glues was a CA glue, but it was Saturday and presentation day was Thursday. I could go buy some CA glue and see if it was invisible, but then it occurred to me you can laser cut double-sided tape. In the same Amazon order as my six pack of Stickles (see above) I purchased two sheets of 3M 300LSE double-sided tape. We use something similar where I work in instrument assembly. Last year I learned some of the finer points of handling and applying double-sided tape from our guy who knows his stuff. Most of what he told me I ignored and/or wasn’t relevant. The tape at work comes kiss-cut from a die, but before the design is finalized it is laser cut. I feel like the price I paid on Amazon was very high, but I needed it now and I didn’t need much of it. If I continue using it in the future I’ll shop around starting with the sign material suppliers recommended by jbv and smcgathyfay.
Note: The black arrows above are because of the strange artifacts introduced from using the Dynamic Outset feature in Inkscape. The final martini bowl I re-created using the Outset command. It also created some artifacts in the owl bowl, but didn’t do any damage to the finished output.
I googled for a MDS and found a 3M web page that said this particular product was exempt from MDS requirements. The seller’s description said it was paper, adhesive and polyester. That sounded safe enough to me. My biggest fear was the polyester component would melt into an usable mess. It didn’t. As I didn’t have a lot of spare material and time was pressing, rather than make a cutting template to determine the perfect settings I went with extrapolation. 25 power and 400 speed made it through the paper backing and at the corners, kinda all the way through. Doubling the power was a little better. 400 speed, Full Power, 1 pass and it was cut. Also, I was still alive and the laser hadn’t blown up or disintegrated. Yeah!
The right hand side of the designs above may also be used as the cut files for tape. So I copied the right had side of each design and pasted it into its own Inkscape svg file. I did the owl first and made all of the lines black. The glowforge cut them from outside to inside. I had forgotten this feature. The air assist blew the outside rings up, up, up but not into the laser head. Like a Hollywood popcorn film there was tension, there was drama, but in the end it was all okay. For the martini glass and the apple I re-ordered the colors so the glowforge cut from the inside out. The air assist barely affected the martini glass rings, but it did lift the apple rings. It didn’t lift the apple rings nearly as bad as the owl though. We’ll get to why there are two apple shaped holes cut in the tape later.
Note: To the glowforge those are different shades of blue in the file.
There is a very long thread on these forums about what happens to the inside diameter of a ring if it is heated. Imagine a ring of metal and then you heat it with a blow torch. The answer to what happens is that both the inside and outside diameter increase: the ring grows larger and the hole inside it also widens. The exact opposite seems to happen when you laser cut this double-sided tape. The affect is small, but the tape is considerably more flexible than a metal ring: short answer you can make it work if you stretch it a little.
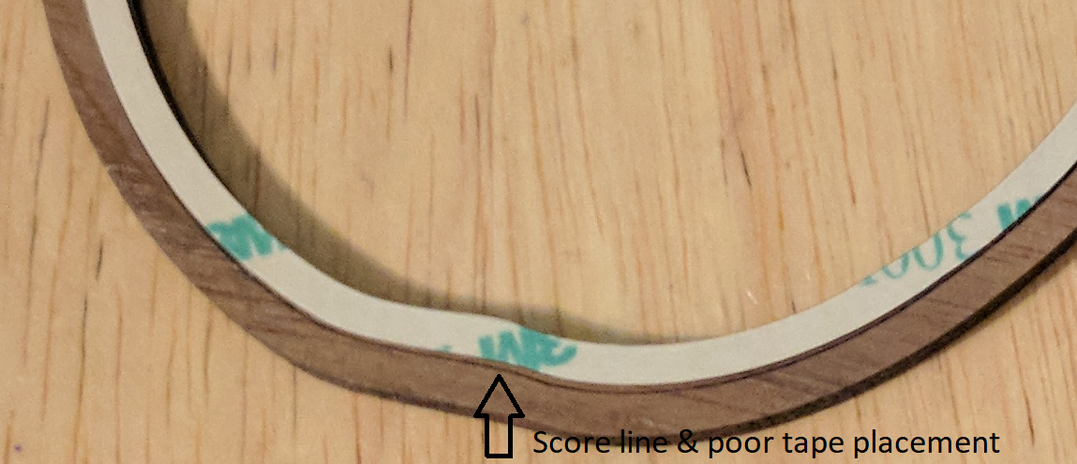
USE THE SCORE MARKS! The tape fits between the inner ring and the score mark. I cut the tape with the paper side, the side with the green printing facing up. The masking on the flip side is polyester. The settings I used created a fair amount of flashback on the polyester masking. As the flashback weakened the masking without cutting through it this turned into a feature when I went to peel it off.
I started with the owl. I kept remembering our tape guy saying how difficult a large ring of tape was to place perfectly. So I cut the widest ring into more manageable sized pieces. It was hard to place these smaller pieces, I wrecked one and it took a long time. On the second ring I tried it all in one go. Much easier. For me the key was to start at some kind of point or corner. If you can place the point/corner perfectly you wind up with a good start in two directions. Then gently work your way around the piece very lightly tamping it down. The tape will stick just from the force of gravity, but it can also be pulled up again when necessary. In spots where it hung over the edge I was able to push it back with my thumb (because it seems to have shrunk it wants to sneak over the edge.) Once I was happy with the placement I pressed down hard on it. The smaller the ring the harder placing the tape became, which was the opposite of what I was expecting. The wider rings are less defined, more blob-ish in shape. The narrower rings have sharper features and for me it was harder to perfectly place the tape around these features. Remember that only the rings have tape/glue applied to them; the base sticks to the narrowest(bottom) ring.
With the owl, once I had all of the tape rings applied I removed all of the paper backings and then placed the widest ring on a flat surface. I placed the next widest ring on top of it using the score marks as a placement guide. To do this, I used the middle and ring fingers of both hands to hold the widest ring on the table. The index finger and thumb of each hand held the ring I was trying to place. My grip provided me a stable platform to line up the top of the ring to the score marks. The ring I was placing was held at an angle to the table and then I gently lowered it down using the top edge as a pivot point. This worked very well for me. For the martini glass and apple I removed the paper backing from the widest ring and placed the next widest ring. Then I removed the paper backing from that ring and placed the third ring. And so on. I suspected from the very start this would be the way to go (it is), but as I had three bowls to tape together I wanted to try both options.
I’m a guy; I really don’t have fingernails and I suspect this is a handicap when trying to get a start on peeling off the backing from the tape. The extreme narrowness of the tape ring adds an extra level of difficulty to the task. On the apple I wound up pulling the paper backing away instead of the polyester backing and had to cut out a duplicate ring (on all the other rings I peeled away the polyester backing without error.) As each ring in the tape cut file is a different color I set the five rings I didn’t need to ignore and cut me a new ring without re-cutting all of the rings. The same thing started to happen on my re-cut!?!. I wasn’t going to cut out a third ring. I thought. Why did I pay all of that money for handmade Japanese kitchen knives? So I could fillet off the backing of double-sided tape of course! For those of you not in the know, Japanese knives use a very thin blade compared to European style kitchen knives. Heck, it is a thin blade compared to utility knife razor blades. With the blade held nearly parallel to the tape I sliced into the backing and … great success and relief was achieved. Relief that I would not need a manicure to go with my newly acquired glitter glue collection. I used the knife to slice into the paper backing on the back of all the apple pieces as well as both backings on the martini glass.
Hey dummy, why didn’t you just place the tape when you pulled off the paper backing? Is your OCD so bad you couldn’t stand to have one tape ring with the polyester backing left on? My OCD isn’t that bad, but it’s close. It would have caused me discomfort, however, I will direct your attention back to the glitter glue chapter. For a ring that is symmetrical along one axis like the martini glass or owl it does not matter which backing you remove first. This doesn’t apply to the asymmetrical apple; you have to remove the backing that was face down in the glowforge first.
My adhesive-orientated issues with these bowls is primarily a factor of size; bigger would be easier. If the rings were an inch wide I could easily have applied glue that wouldn’t have been squeezed out the edges or alternatively placing the tape would have been a lot easier. But these rings are about 5mm in width, leaving less than 2.5mm of width for the adhesive. When placing a ring on top of another, especially when using glue, you are going to have some slippage unless a good jig is used. The slipping will rub glue out from under the adjoining area. The dried glue will be very noticeable when looking at the finished product. Perhaps a CA or some other type of glue would be invisible against the wood. If anyone with knowledge of these things has read this far presumably they’ll add a comment to this thread. Even with being careful, there are still some spots where you can see a little-bitty piece of tape peeking out from an edge. Unlike the glued bowls where it was noticeable by anyone, you need to squint and look for the tape. Cutting the tape a fraction of a bit narrower and taking more time could eliminate this as would some pre-trimming with a pen knife. Also, the world has become a bit blurrier in the last couple of years. Maybe if the global community came together to fix this, make things crystal clear again like objects used to be, I would have had perfect placement. In the meantime I’m in the market for a bench mounted magnifying glass. Still, the tape thing was a good solution for me.
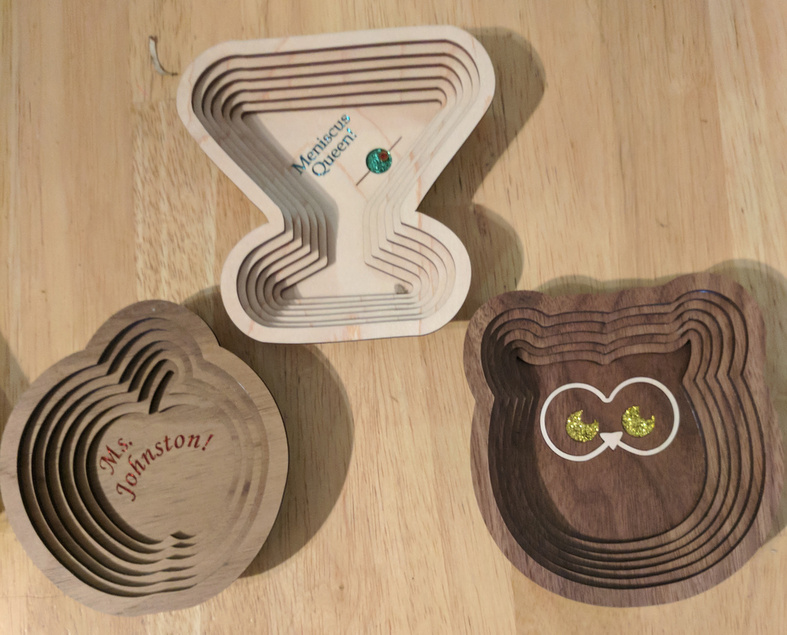
Draft board on top - ![]() hardwood on bottom. The face/beak around the glittery owl eyes is
hardwood on bottom. The face/beak around the glittery owl eyes is ![]() maple veneer inlaid in the walnut.
maple veneer inlaid in the walnut.