I am having issues with mine go way off alignment. My scree shows one thing , then when it prints it is over lapping or cutting off on edges. Also will not let me set thickness for unknown wood.
Have you run the calibration routine? And are you using the Set Focus tool? You don’t need to set the thickness if you use Set Focus.
2 Likes
I’m so sorry to hear that you’re running into trouble. I’d like to take a look at a specific print, so that we can review the alignment on your Glowforge, and ensure that it is performing within specification.
We’d like to have you try a few troubleshooting steps for us:
- Turn off your Glowforge.
- Check for small pieces of debris or dust.
- Check the lower door to make sure it closes all the way. It may require some force to open, but open it, wipe any dust off the edges, and close it all the way.
- Remove the tray and clean any dust or debris from the surface underneath. Pay careful attention to remove all debris from the four dimples where the tray rests.
- Check the lid to make sure it closes all the way. Small particles of material, such as dust or debris, can prevent it from closing completely.
- Check the surface your Glowforge is on to make sure it’s flat. Ensure it is not twisted slightly and that there is no debris propping up one side of the machine.
- Turn your Glowforge back on.
- We included an extra piece of Proofgrade Draftboard with your materials shipment for troubleshooting. Place the Proofgrade Draftboard in the center of the bed and print the Gift of Good Measure using the default settings.
- When the print finishes, leave the lid closed and wait until the fans stop and the picture updates. Without moving your artwork or your material, take a screenshot of the Workspace to show us the difference between the artwork placement and the actual print placement. Make sure to include the rulers in your screenshot and show as much of the bed as possible.
- Mac: Press Shift-Command-4 and click and drag a box around your image. You’ll find the screenshot file saved on your desktop.
- Windows: Click on the Start Menu and type “snipping tool”. Open the Snipping Tool > New then click and drag a box around your image. Click the Save icon and name and save your file.
- Send us the screenshot along with the date and time of the print, and we’ll investigate.
Once we can review the logs from this print, we’ll send over the next best steps.
In regards to the trouble you are hitting when entering in the thickness for materials that are not Proofgrade, does the same trouble occur if you utilize the Set Focus feature?
I urge you to run the lid camera calibration program if you haven’t already and utilize the set focus tool. Also, check to make sure your honeycomb tray is seated properly.
I have tried these things, this a brand new machine. Litle upset that it shows one thing on computer and then does something else. Is there a way a can text a picture to you to show you what ist is doing?
I’m so sorry for the trouble.
I’ve extracted the logs to investigate the problem you reported and I noticed there have been a lot of errors related to the autofocuser. That would impact focus, as well as the bed images, which in turn affects visual placement and visual print alignment.
The first thing I’d like to check is these windows on the bottom of your print head to make sure they’re clean.
- The bottom of the printer head

Additionally, depending on the thickness of that material, you may need to print without the crumb tray to get that material to the right height.
Can you tell me about how thick is the material you’re printing on?
About 1 inch to 1.5 thick. It also won’t let me set past .5.
If your item is 1" to 1.5" thick, you must remove the honeycomb tray and then raise the surface up to be in the 1/2" focus range. You can’t set past 1/2" since that is the maximum distance away from the lens it can focus. Have a look at this tool for seeing if your material is in proper range for the laser: No-Math Focus Ruler
1 Like
Thank you for providing this information. Would it be possible to send over the photos my colleague Pip inquired about?
Also, the advice @dklgood provided is correct, removing the crumb tray when printing on the material you are utilizing may help to reduce the errors you’re seeing.
Once we can review the images you provide, and take a look at a print with the crumb tray removed, we’ll send over the next best steps.
You can send them over to your colleague. I have treied removing the crumb tray also
Thank you for updating us about trying printing without the crumb tray. The photo that we still need from you is of the bottom of the. printer head,
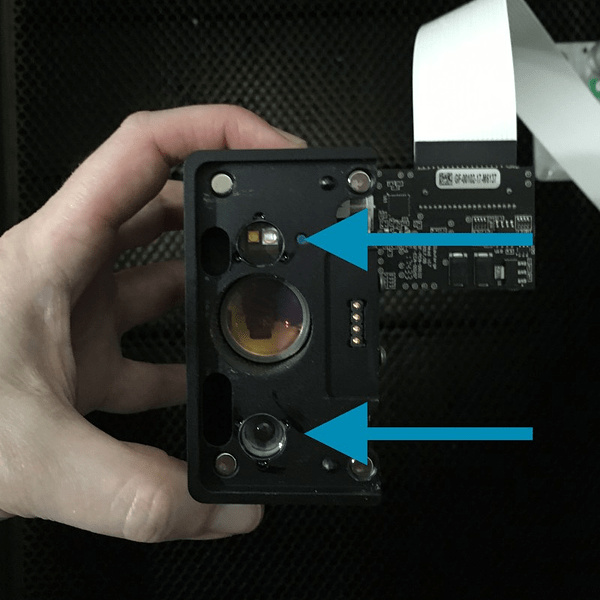
to ensure that the printer head windows are clean. Could you please post a photo of the printer. head like this one, as well as close-ups of the two windows (pointed to by arrows)?
I look forward to reviewing them.
Now it seems to better, but have another issue. It doesn’t seem to be engraving that well.
I’m sorry to hear you’ve hit another roadblock with engraving.
Based upon the alignment issues you’d initially brought up as well as your current problems with engraving, I think it’d be very helpful to get a good at your optical components to see if there’s any issues there.
I would like to check over just a few more things. Could you do the following for me?
Please send photos of all your cleaned optical components, with special attention to any damage you might find:
- Both windows
- The printer head window, on the left hand side of the printer head

- The laser window on the inside left of the Glowforge

- The printer head window, on the left hand side of the printer head
- The printer head lens
- Both sides of the lens, top and bottom

- Both sides of the lens, top and bottom
- The mirror inside the printer head

- The bottom of the printer head
Once we have those pictures, we’ll follow up with next steps.
Where does that blue printer lens go? I didn’t see that.
That’s the lens removal tool, with the lens sitting on top of it ready to reinsert.
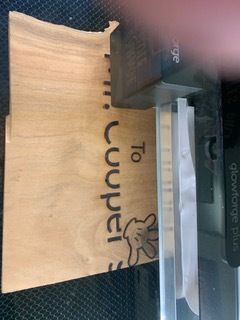
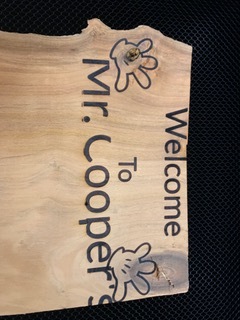
I cleaned all the lens and ran it , was going so well until the last word, , then it over lapped again.
In order to help troubleshoot this issue further with you we need to take a look at your Glowforge optics.
Please send photos of all your cleaned optical components, with special attention to any damage you might find:
- Both windows
- The printer head window, on the left hand side of the printer head
- The laser window on the inside left of the Glowforge
- The printer head window, on the left hand side of the printer head
- The printer head lens
- Both sides of the lens, top and bottom
- Both sides of the lens, top and bottom
- The mirror inside the printer head
- The bottom of the printer head
Once we have those pictures, we’ll follow up with next steps. Thank you!
I thought I had it figured out, but another issue came up… So when I bought this,I was told I could use a piece of wood up to @inches. It says under .5 use tray, 1. to 2 no tray, but the problems seem to be with 1 inch or between those mesurements. I think the laser is knocking the wood
The surface to be engraved must be within .5" of the lens as that is the focus range. You can put a 2" piece of material in the Glowforge and your focus height will be .001. If you put a 1" piece of material in the Glowforge without the tray, you must elevate the surface to engrave such that it will be between 1.5" and 2" off the floor of the Glowforge which brings it into the focus range.