This is just a checklist item, but how have you been moving your job? I (almost) always only move things once selected with the arrow keys, because I’ve been bitten by accidental resizes. Also, 12x20 artboard/canvas and a physical jig?
1 Like
Basic
Ctrl+A and arrow keys - pretty carefully. Also, 12x20 artboard in Illustrator, but what do you mean by a physical jig? To keep it in play on the bed, I use magnets.
1 Like
Went for the print again this morning on my last piece of PG Walnut. Aaaaaand…
…it did it again. ![]()
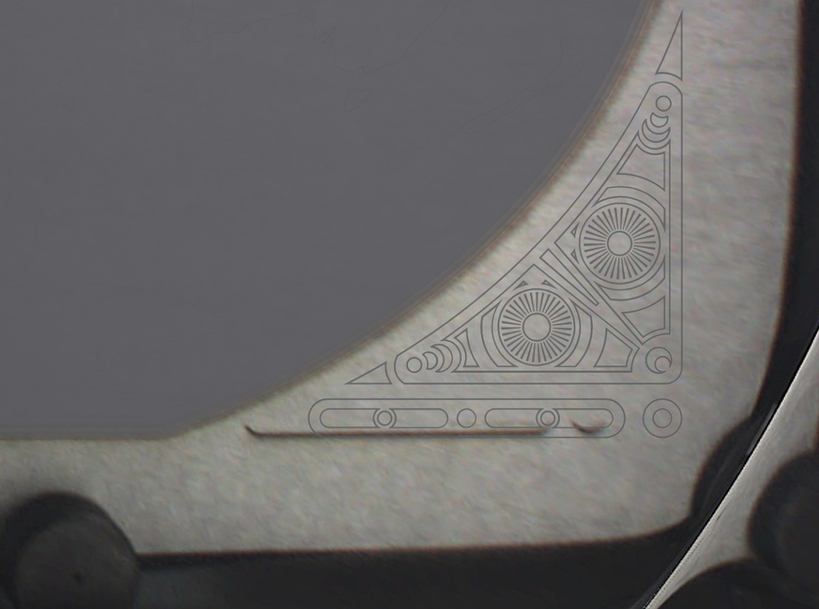
I know people are saying “stay out of that corner” but in the case of this project, it’s not really feasible. The project can’t be shrunk down any more than it is without losing functionality and detail.
Grrr…Ok, I guess I’ll just flip it over and pray.
2 Likes
Have you tried breaking it up in a different way? I’m really not sure what is going on here, but maybe have all four decorative corner elements be the same color/step or the right corner elements the same color/step or the lower ones…
I’ve done similar things without issue.
1 Like
In this case, I did bundle the two right corners (top&bottom) but they were still separate operations. It didn’t help. I went back and edited the file, and now I’m trying having the bottom and top corners on each side as one operation.
The problem is, before when I tried this, the GF was overloaded and error-ed out - can’t handle that much design. But I realized when I did that before, I had bundled the bottom right and left corners together, forcing the laser head to run the entire length of the board for each line that only occurs in the corners, so maybe, if I bundle the sides together, the head won’t have to do so much traveling, and it will be able to handle it. Crossing fingers.
1 Like
Hopefully Support can get back to you soon with why it’s losing alignment in that corner. I think previously a couple of people had issues with Pro machines where it was bumping into the door. It’s a bit unfortunate that this wasn’t caught during testing, it seems to be a design or manufacturing problem happening with multiple units, not just a weird one-off. I predict they’ll end up replacing it.
1 Like
And hopefully to us too, instead of just closing the thread.
2 Likes
Magnets.
That looks like its off in exactly the same way as before. Which, unless I’m mistaken, is not really what other people having corner problems seemed to be experiencing - they seemed to be getting more random-looking, warped distortions. This looks like its just starting in the wrong area? Or maybe it would be distorted like theirs if youd printed more of the design. I dont really know anything, I’m just full of theories.
I’ve begun cutting back on the amount of magnets I use just in case, though the evidence is against the theory that they’re interfering. In this picture, due to the fisheye effect, the magnets look big and doubled up, but their pretty weak and they’re not interfering with other cuts or in other spots, so I dunno…
1: That corner seems to be the devil for a lot of people
2: Don’t adjust anything that requires precision inside the GF UI. Set everything up in your file and only use the UI to eyeball your entire design.
3: Support may replace your unit if your alignment is that far off, I had a similar problem in that corner and my machine started overlapping printed areas on top of each other.
4: Christmas tacos are delicious.
The post processing image can be off on the screen by up to 1/4" in the corners, and the whole file will continue to process just fine if you continue without shifting anything on the screen, or closing the file.
What will happen is that the engrave area currently grayed out will also print at what appears to be a 1/4" too far to the left, but the relationship between the different parts remains constant.
The first picture in this thread shows a real placement issue, because the actual burning of the oval and the corner embellishments overlaps. That might have happened because the images were moved after the operations started or it might have been the rare corner issue. No way to tell after the fact.
But the second picture you posted doesn’t show us anything, because you did not begin the second operation (the map area) to show where it was going to print on the board. It might have come out just fine. You stopped the print when it looked like things were out of alignment.
So my suggestions would be:
-
Take all the magnets out of there, you don’t need them, and if they’re really strong magnets, they might be affecting the head because you are getting really close to them with that large print. Get them out of the machine entirely.
-
Work up a smaller print to test the printing in that corner. Just a little rectangular cut with a centered circle engraved in the middle of it will do. Place that file in the front right corner and see how it looks, alignment-wise, on the screen.
Then engrave the circle and Ignore the Cut. See where it prints and look at the post operation image. If it is far off - do not touch anything on the screen, just set the engraving to Ignore and the Cut to process.
Look at the image again on the screen, see if the cut and engrave look like they are aligned right underneath the screen image. (They probably won’t be.)
But then open the lid and look at what actually happened with the engrave and the cut. They should be aligned just as you created them.
Basically, you can’t trust the post processing image. By creating everything together in the file though, it should maintain the relationships perfectly, despite the fact that the image on the screen looks wonky.
-
If they still don’t line up, your machine has a problem and support is going to have to look into it from their end. Make note of the time and time zone that you ran the file and let them know what it is so they can research it.
-
And only after you convince yourself that your eyes are lying to you should you take a shot at your big file…it will keep you from wasting more Proofgrade.

Unless I’m misunderstanding the process, this is what @ryanjpedersen is doing. He isnt moving anything once the glowforge starts “printing”. Which should mean everything keeps the same relationship, but its not…
I think he stopped it before it finished because it clearly started in the wrong area. I think its that grey line and half circle. Its in the same (wrong) spot as the first pic he posted.
When he did that the second time (not the second picture) it was working until he got hit with the scanning problem.
(unrelated and really unfortunate timing)
But on the third attempt (second picture) I think he stopped the print too soon.
Because of the size, this one is going to be problematic anyway…maybe it would be a good idea to run it on some cheap BB or something first to work out the issues. (I’d suggest cardboard as an alternative, but that tends to flame up worse than wood, and is a little more fiddly, so didn’t want to complicate the issue by having to adjust settings on top of everything else.)
What @Jules said about cardboard. I’ve had one fire in my GF, it was corrugated, and especially on super detailed cut sections. I have pretty much sworn it off now that my local lumber guy can sell me 5’ by 5’ 1/8 BB for 15$ and will even cut it down to 12"x20".
I don’t know what rights issues you might have, but if you post the source image, others would almost surely try it and see if we get similar results…
The first picture in this thread shows a real placement issue, because the actual burning of the oval and the corner embellishments overlaps. That might have happened because the images were moved after the operations started or it might have been the rare corner issue. No way to tell after the fact.
There is a way to tell: I simply did not move the images between operations. As I said in the post, I touched nothing, moved nothing, and even refrained from breathing on the machine or walking with heavy footfalls around it. It is definitely this rare “corner issue” or something very similar.
But the second picture you posted doesn’t show us anything, because you did not begin the second operation (the map area) to show where it was going to print on the board.
In fact, if you look closesly at the picture, I did do the map operation first. It’s just hard to seen the lines because they are almost directly under the GFUI image. @erin is correct, I noticed that the corner embellishments were off again and were going to overlap the oval, so I cancelled the print to try and salvage my last precious PG walnut sheet.
Take all the magnets out of there, you don’t need them
I might start doing this most of the time, but I started putting magnets in because of a previous issue I had that may have turned out to be the material moving. Since Walnut doesn’t sit snug on the Crumbtray, it seems in special danger of shifting during print, especially with aggressive cutting laser head movement required in the continents.
Basically, you can’t trust the post processing image. By creating everything together in the file though, it should maintain the relationships perfectly, despite the fact that the image on the screen looks wonky.
This is what I’ve maintained from the start, I apologize if I wasn’t clear - you’re so helpful and I don’t mean to waste people’s time. I learned long ago that as long as things are aligned in the OG artwork, and you don’t touch things after they’re setup, you can trust the relationship between elements.
2 Likes
Oh bummer… it’s really hard to follow when threads run long, i thought you were shifting to align dots in the first one. My bad. 
Well, you might have to wait to hear from support on the issue then, it might be a problem with the machine.
If you don’t want to run a test with a smaller file to see if it’s still happening in that corner, which might point to a problem with the file, just tell them the times that you tried the runs so they can see if they get any useful data from their metrics.
I’m sorry. 
1 Like
You’re a shining beacon of joy and aid in this community - thanks for you help!
3 Likes
I just hope it’s not the machine…that’s such a hassle. 