Cont. I'm Puzzled - Chipboard and Photo Paper

Extending the discussion from:

I picked up some all-purpose chipboard from Dick Blick (All-Purpose Chipboard | BLICK Art Materials). This isn’t archival quality but it will do really good for testing. (Related: I’d really like Eska Board, but it’s impossible to find and their USA Sales doesn’t seem to reply… ) I ordered enough of the .10" and .05" to meet the $35 minimum for free shipping. Seventeen sheets total of 28x44" chipboard, weighing 40 lbs - shipped for free. They must have one helluva deal with the FedEx folks.

I have a Logan Mat Cutter with a straight cutter on it and this stuff isn’t impossible to cut, but it takes more effort than you standard matboard (or double-ply matboard for that matter). I’m sure it will wear out some blades but blades are cheap. The .10" described material, calipered out at .102" - not too bad! I haven’t calipered the .05" described material.

First, I needed to do some testing.

_DSC7901

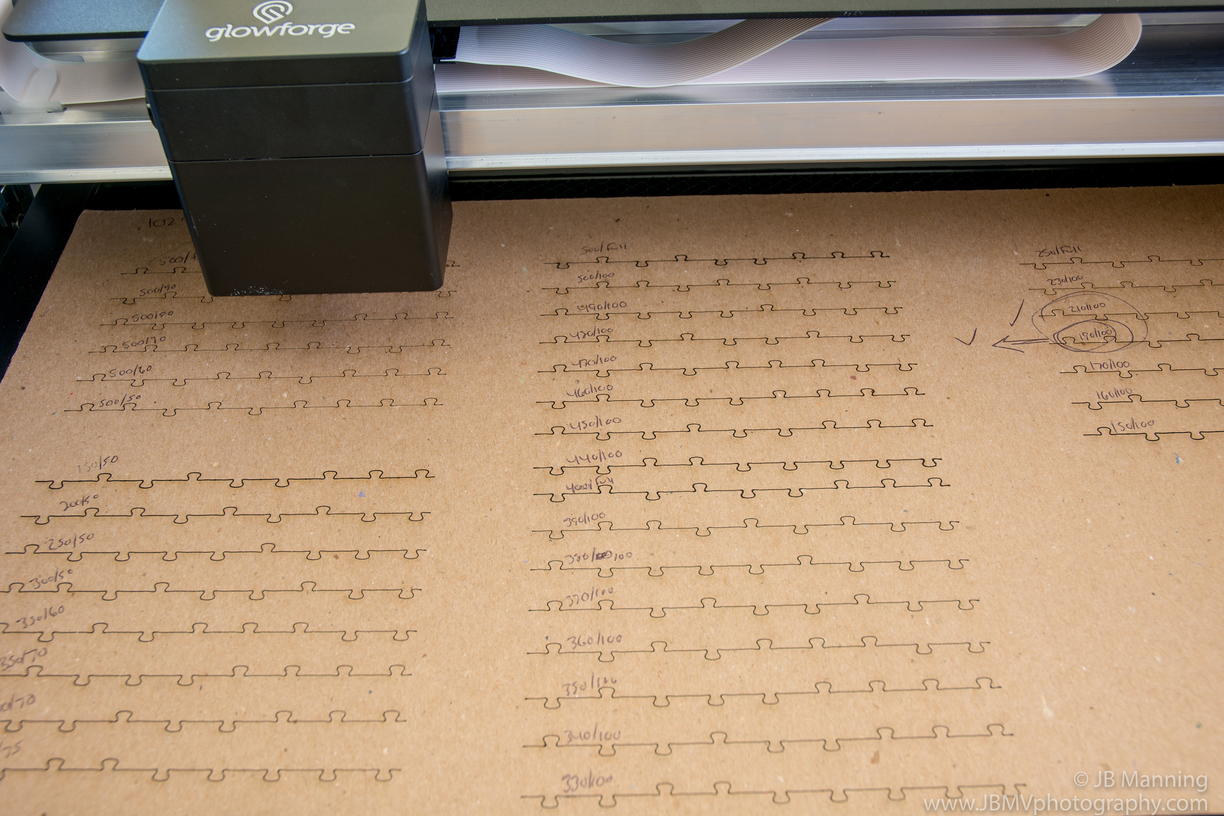
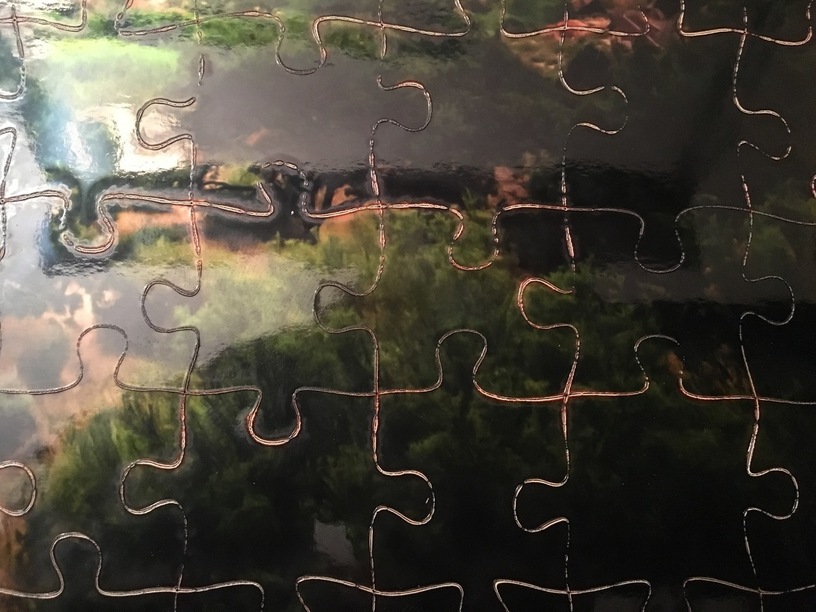
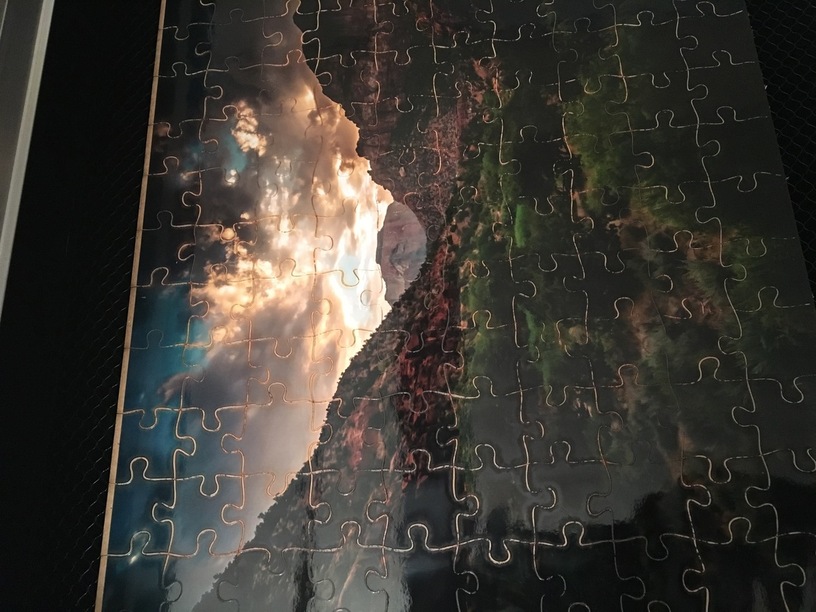
There is definitely a difference between “100 precision power” and Full Power. Full power really gets after it! I’m using this material unmasked and Full Power was leaving a little too much surface char and side char. I ran through a bunch of settings to see what would work best for getting through but leaving the material in as good of a condition as possible. Ultimately, I settled on 190/100 for through cuts. I’m going to refine this a little bit and feel that somewhere in the 180’s will make a perfect cut. It cuts very nice where it’s at, just barely kissing through with my photopaper on. But, a hair slower might make it easier to disassemble. Or maybe the Glowforge is just too damn good :wink:

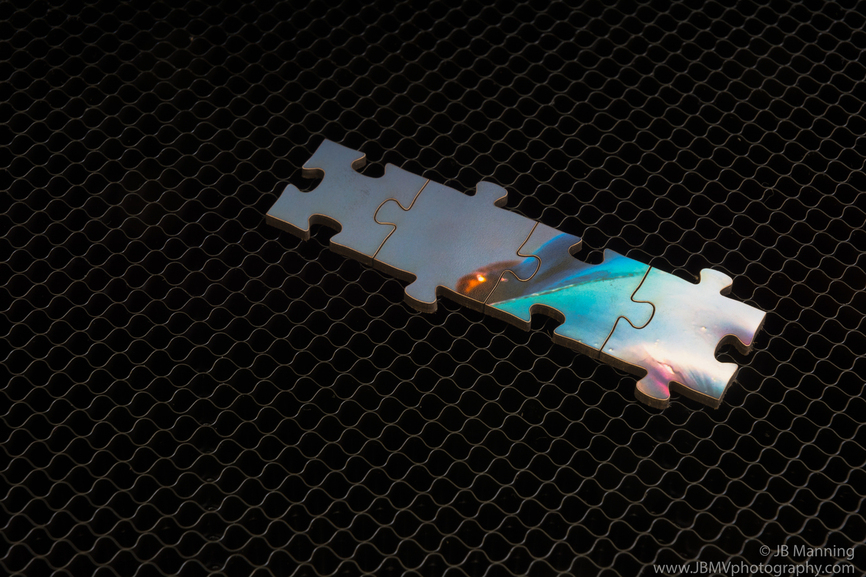
I have a bunch of prints laying around so I grabbed an 8x10" and hit it with 3M Photo Mount adhesive. A very light layer across the width, and then another light layer that runs across that first spray. I let it sit for about 90 seconds and adhered it to chipboard. No problemo.

The chipboard and photo mount calipered at .106". My calipers are cheap - but the paper oughta be a hair thicker than that.

I used the same 190/100 cut settings and used no mask on the photo paper. I don’t remember if I had a sealant put on these photos or not but the paper picked up zero smoke stain. I’m going to switch adhesives next week so my cut settings may need to change. The 3M stuff is great for doing this on a small scale - but for larger prints, it just costs too much per square foot.

The puzzle template came from:
http://www.wolfiesden.com/Laser/PuzzleCreator.asp

Regarding that template - it lays everything out nice in rows and columns that are groups and compound paths. I uploaded it “as-delivered” initially but the Glowforge really wanted to jump all over in making the cuts.

I separated out the rows and columns and assigned them different stroke colors. The Glowforge still didn’t run each consecutive line like I was hoping, but it turned out just fine.

70 Likes

Wow, that looks like it came out great. Thanks for sharing your settings; this is something I’m going to want to try! :smiley:

3 Likes

Very thorough write-up! Thank you for sharing your work!

5 Likes

What I’m super stoked about is that it doesn’t appear that I’ll need masking for these. One - you don’t have to weed every single dang piece. Two - it lowers the production cost considerably. Three - it’s less steps to a final product.

5 Likes

Yes … no masking is huge! Will make awesome gifts!

So cutting puzzles image-side up works best? Was that a spray-on 3M adhesive? Have you tried Crescent Perfect Mount? How much “slop” are you finding between puzzle pieces after they are cut?

edit: I see there is another post about this that addresses some of these questions.

I haven’t cut image side down. This was literally the first puzzle I ran through it. Image side down I think will work very nice, maybe even nicer, but it will be important to have a sacrificial element beneath and perfect cut settings to eliminate any flashback off the honeycomb.

Yes, this was the 3M/Scotch Photo Mount (spray) adhesive.

I’m not sure how to describe slop per se… they fit together very nicely. I can pick up assembled, interlocked pieces just fine.

I haven’t put the puzzle back together (only a couple of small sections) and I don’t know if I really want to.
:slight_smile: One problem with the puzzle generator is that the interlocks and pieces are definitely not unique and will fit into several different places. I’m planning to draw more coordinate puzzles for my images (corresponding better to elements, colors, etc.) but the generator is great for testing.

5 Likes

Glad to know that 3M Photo Mount spray will work - i think i’ve got some of that around here somewhere. :slightly_smiling_face:

Does it have much odor? I noticed the birdhouse I did out of cardboard is a bit whiffy. (I guess the birds won’t mind.)

3 Likes

Well, I wouldn’t sniff the glue…

:wink:

Very minimal odor, in my opinion. I just took a big whiff of the cut pieces and I don’t smell anything now at all.

Of course, the Glowforge is far quieter than I anticipated. And the smell isn’t nearly as bad as I thought. Even the acrylic is “whatever” and it’s fine in a few minutes.

Maybe I’m just senseless. :open_mouth:

8 Likes

Great job and great pointers!! Thanks for sharing!

giphy

3 Likes

This is just a guess from cutting other stuff, but if you can dial in the settings just right, cutting upside down might leave a kerf so thin it’s hard to believe. And barely tough whatever your sacreficial layer is.

Want to try!

3 Likes

I don’t find the Glowforge to be loud… until I get a phone call. Then it seems loud.

4 Likes

Even then it doesn’t seem bad. I’m able to have a normal phone conversation standing right over it.

You are probably running the exhaust out a window, and not through 18’ of rigid ducting with a booster fan!

My hard-surface floors and walls with no windows probably don’t help either. Certainly doesn’t seem as loud as our little hand-held Dyson… that thing shrieks!

4 Likes

You would be correct. Included hose just dropped out the window giving the jasmine a constant breeze.

1 Like

I guess the purpose of testing is to stay consistent. I didn’t. This is actually a metallic photo paper that I cut upside down with a piece of thin backer board on the honeycomb (and mounted to the same chipboard). I probably had the speed a hair low (dropped to 180) and I could see pin holes in the sacrificial paper.

Some of the cuts came through really nice and you can barely see that a cut is there. Other parts (the majority) seemed to ablate some of the photo paper leaving more chip visible.

18 Likes

Love that metallic effect! :grinning: (Gosh, you’ve got some gorgeous papers.)

When I ran cuts to test for focal point, I pretty consistently saw a much narrower kerf on the underside than I did on the top, when the FP was set on the surface of the material.

That shows a very narrow kerf on a few of the pieces, which I would expect, but a lot of them look pretty wide - do you think that’s because the paper was metallic and reflecting the heat around so a wider path got ablated? (Just mildly curious. It’s unexpected.) :slightly_smiling_face:

Great job on it again.

1 Like

The metallic paper is incredible. It needs the right lighting (diffused instead of accent/point lighting) but you get that right and it’s phenomenal.

I believe the way that they make it is with a very thin Mylar layer just beneath the paper surface that accepts the pigment. Even though it’s a very, very thin layer of it - I think Mylar is kind of melty, isn’t it?

Here I make stuff up. So, in this case, you’re needing enough power to cut through all of the material, but Mylar is sensitive to the power used to cut it. Perhaps 2 passes of faster and lower power would work better with this particular type of paper. From a production standpoint, that’s not a great alternative.

I haven’t really considered using this paper for my products - just another print I had laying around. But, if I could get all of the cuts like the clean ones, a “metallic” series would be cool and worth an upcharge.

5 Likes

WOW!:glowforge::grinning::thumbsup:

1 Like

Yeah, mylar is melty…my only exposure to it is sealing bags by melting it together. Maybe the two faster passes at lower power would work better for that.

I would be worth experimenting with for sure. Wow! is right.

1 Like