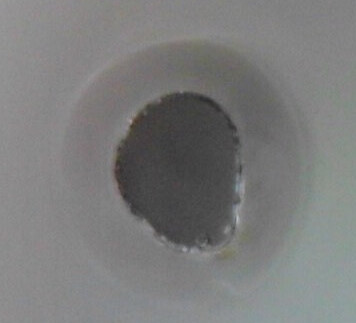
I am interested in cutting the smallest diameter pinhole possible. I tend to use OmniGraffle on the Mac for my design work. I’ve created a zero length line and the Glowforge says that there are no graphics in the file. From there I tried to make a small diameter circle. I made the smallest diameter circle possible in OmniGraffle and cut the attached hole. (Proofgrade thick clear acrylic). Note that the hole is not symmetrical. My sense is that the system is actually cutting a tiny circle and hitting the end of the arc at the same location as the start of the arc and therefore cutting a little bit extra. I’m going to try reducing the arc length (270° instead of 360°). I’m wondering if anyone can tell me a way to make a true pinhole without using a circle?
I’ve read that thread. They are seeking to drill a 1mm diameter hole in a ball. I’m seeking to drill a pinhole in a planar sheet. The above image shows a pinhole about 100 microns in diameter.
I like the x idea. The goal will be to cut about halfway through with each cross hatch. At the point where they cross we should get all the way through the material.
You’re on the right track…use an almost complete arc. We played with that a few times a couple of years ago, and if you leave a tiny gap (that basically the start and end point will complete), then you can get a near perfect result. (Not 100%, but I don’t know that perfect is possible at that small a diameter.)
Acrylic has it’s own issues, especially thick acrylic. You’re going to be fighting the additional melt at the start/end point. And possibly fire.
Do you recommend a different material that is well controlled? Wood is too variable. I need waterproofness for my application. Don’t think I can drill glass…
@bwalker000: I wonder if this could be done as an “engrave”? A single tiny SVG dot with the correct DPI setting might do the trick? The goal would be to get the laser to fire just once and make a tiny hole. The Glowforge specs say: "Glowforge engraves at about 1000 dpi , with a spot size of about 0.008”.
If you need waterproof, the thinner the sheet of acrylic you use, the better your success is going to be. I’ve also cut some very small stuff in 10 mil mylar stencil sheets… I have to see if I can find that file…definitely got it down to 1.4 mm and it could probably go smaller. The cut sometimes has to be punched out, but it punches pretty clean.
The machine can go very small (like in writing a phrase on a grain of rice) but you need to watch what material you use. Mylar is excellent, and has the advantage of being flexible.
If you scroll down a little in the following thread, you can find where I made a “mesh” of tiny holes in acrylic. You could just as easily make just one hole. I engraved, not cut.
I made a pattern of X’s with varying speeds and powers. I used 2mm thick clear acrylic with the mask removed from both sides. I was afraid that the mask might cause some inconsistency.
The photo shows the pinhole I achieved for my best test case (speed 200, power 60, basic model Glowforge). Taking the image into ImageJ I find that the hole diameter is 64 microns.
I think that I can do better, but my final design will use black acrylic, so I’m going to wait until I receive that before calibrating further.
It’s impressively round too! I kind of thought the X approach might result in something vaguely X shaped or square’ish, but that’s a lovely tiny little circular hole.
I find this cool and interesting, just as yet another sweet thing you can do with a laser But I’m curious what you’re going to use these tiny pinholes for?


 partial arc? Curious if you found a good solution.
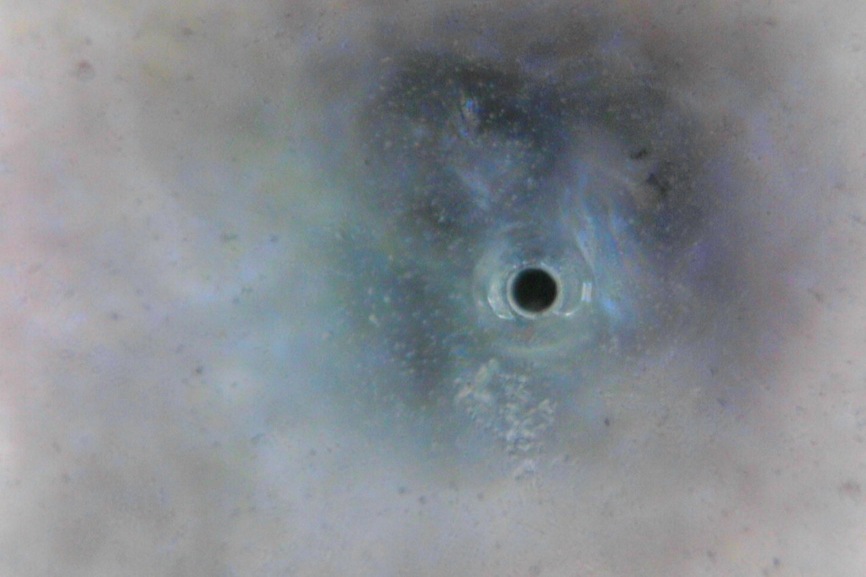
 But I’m curious what you’re going to use these tiny pinholes for?