Hey Everyone!
We recently purchased our Glowforge in order to cut out samples off of our printer (8.5in x11in sheets). After printing on one side, we would need to cut and score on the backside in the exact location to the print on the front - because we can’t have the scores showing on the front. While I am still learning some ins and outs, I’ve read the user manual and I’m not having any luck solving this problem. I’m wondering if anyone has any tips for a solid, replicable process, where I can cut from the back side and have it match up perfectly.
Things I’ve tried:
- Punching holes from the front to show on the back and attempting to adjust the cut from there. (I was desperate!)
- I created a rig to go in the bottom left of the cutting bed, lined up my printed sheet from there, and entered exact x and y coordinates. But the problem is that portions of the preview are being cut off and my x&y is conditional to that previewed image. The rig is brown, the paper is white, and I think it’s clipping it because of the differences in material? Contrast maybe? Plus, the jig is a tad thicker than the material we are using.
Problem solving ideas - not sure if there is a way to attempt them:
- Blind cutting? If I can bypass the need for a preview and just enter coordinates, I think I could get it to work. I think the need to only work within the space of what the preview is showing is where I’m being limited. Anyone know how to turn this feature off and just enter the x and y?
- If I had a jig that took up the entire space of the bed, but with a cut out where the 8.5x11 sheet would go, would that allow the preview to show the entire bed and allow me to just enter those coordinates from there? I don’t necessary want to waste the material with another experiment… my own hang-up, I know!
- This is probably not an option with the Glowforge (yet?), but if I’m able to print registration marks (assigned in adobe illustrator, or some other platform) and have those be read by the camera - even if stationary, that would triangulate where it needs to cut and work from there!
Thank you in advance! I’d love to get some feedback if possible.
Updates, As of 01/03/2022:
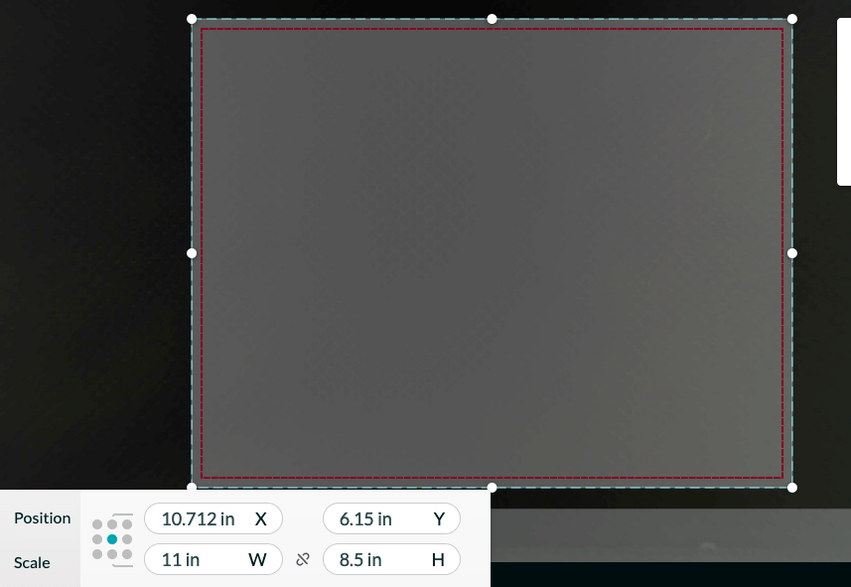
So, I’ve tried out some other methods. Centering in the middle of the board, as centered to the camera as possible. Still getting a cut off image (is there no way to override the need to auto-focus? Show me the whole bed!)
I’ve uploaded artwork with the entire entire set-up with the jig, cut-out for repeated exact placement where I would cut every 8.5x11" sheet. Which I have also saved as an svg file instead of a pdf, which is still cutting things off. I thought this was suppose to be a temporary fix until coordinates can be properly entered? Something similar to forcing the acknowledgment of the entire space compared to just the object?
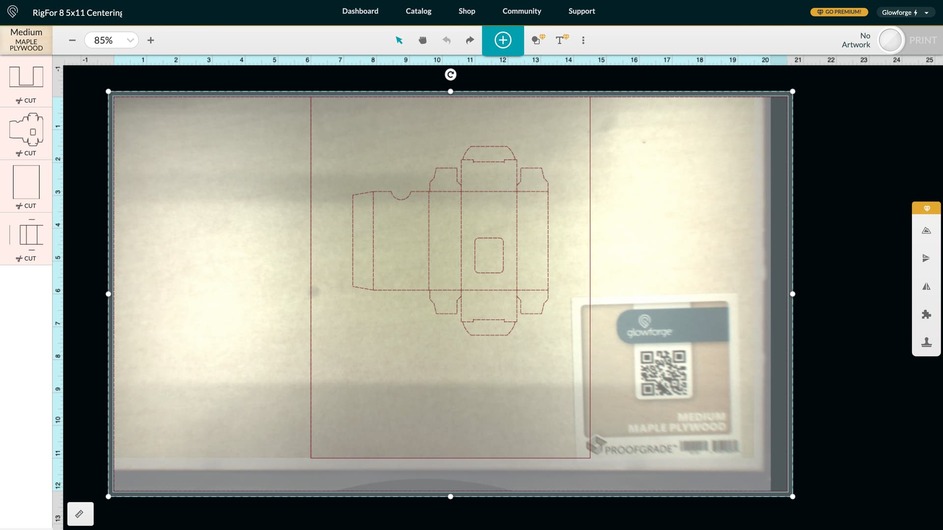
There is a red border around the edges of the selected object - that would be the borders of my jig which should be the exact size of the board itself. The floating red box around the box I’ll be cutting out is where the sheet will be placed repeatedly with each of our samples.
Once I cut out the jig, the idea is that I would keep uploading the artwork as needed, but ignore the portion where the jig would remain on the uploaded file - as a way to keep it squared up and placed as is.
I still need help…