Nuts man…huge nuts 
2 Likes
I just completed the maze with only two wrong turns. What do I win?
2 Likes
I believe you just achieved sentience. Time to overthrow the park.
8 Likes
I was always wondering about doing this eventually. What did you use to cut out the bottom? I’m not brave enough yet but just curious.
1 Like
I used an oscillating tool with a cutting attachment. You can see it on the table with the GF in one of the pictures.
4 Likes
The reason the borosilicate glass works and soda-lime glass does not is that the coefficient of expansion of the Soda-lime is 25 times greater, and lead glass more still , plus the lead reduces out and makes a big nasty in many ways from black mess to screwed electronics, to screwed nervous system , so it is a really good thing to know what glass you are using.
PS most glass enamels are mostly lead,
2 Likes
 holy crap mate you are a legend… I litereally turned down a job a day ago because it required more than 15mm depth… when my warranty expires I will be coming straight back here and asking for your help… I am willing to pay for a talk through… outstanding!
5 Likes
If you remove the crumb tray you have about 50mm to work with. (A bit under 50, I think).
Search the forum for “without crumb tray”.
4 Likes
Hey just wondering now that you have had this cut out for awhile now have you came across anything you would do differently? Or maybe suggestions for those wanting to do this. And was there ever a ruling on if GF would still do repair work on a modified case? Thank you for being the first to risk it all so that other may benefit down the road!
2 Likes
Voila, for $300AUD, cut a corresponding center hole in a wooden benchtop panel of your choosing, mount the panel to table stand, your modified Glowforge ontop. - there’s an IKEA version as well.
Motorized Z axis, 500mm adjustable height, stepless motor and quiet operation, doing this for my CNC router.
Happy 2019!
5 Likes
Obviously when choosing the hole placement, avoid the horizontal support beam 
3 Likes
OMG I could never…
Nice solution! I’m currently just setting the machine on different sizes of wood (2x4, 4x4, etc) to get the height. This is a good way to go. I may even have access to one of these…
So as an update on hole-in-the-bottom uses, whenever I’m not using the hole, I slot the metal plate back in and replace the crumb tray. Takes the machine back to stock configuration with no problem. Adding the hole option has no negative side-effects whatsoever, and I’m very happy I made the modification. Remember, though, it’s no longer a Class 1 laser product! Be safe and use glasses, warning mechanism, and the other requirements of Class 4 laser products as explained for the Pro model.
I used the cutout to accommodate large pyrex baking dishes (with last names engraved on the bottom) for Christmas gifts. No reports of breaking due to heat stress! I also used it on several wooden boxes that were 8"x6"x4" to engrave names and personalized imagery on each side without having to disassemble them. I love this mod!
8 Likes
Coz only just received my own unit, no where brave enough to dive in to play around with the screws yet.
Looking at your photos, is there a feasible way to remove the entire bottom ceramic(?) plate base (unscrew everything) and design a wooden / aluminum modified replacement plate base with the appropriate cut out openings and mount it back up, this is so to avoid damaging the Glowforge.
Just looking at the photos look simple enough to design for, but don’t know how far up the base extends into the machine in other areas.
Only someone’s who’s done a tear down of the Glowforge would know?
Once the appropriate size bottom opening is there, then the sky is the limit to the applications, pretty sure can find a X-Y axis mod, also a rotary mod would be much easier.
Bonus for people who’s waiting for their Glowforge air filter.
(This one of my thing, looking for better but much cheaper option than the official items, also instead of DIY for hours reinventing the wheel, DIY is last resort)
Formaldehyde filter, tri filter (inc carbon filter), laser air quality detection, easy replacement of filter, just need an enclosure (prob a large card board box will do) with the vent end of the hose to the box, and the air purifier’s top air exit open from the box top, then the laser detect would still work.
2 Likes
and it’s only $161 AUD (something like $110 USD… with wifi monitoring etc… )
I cannot find an air volume (CFM) number but its size (10"x10"x20") suggests that it would be inadequate to the job (220CFM minimum) but I like your idea as a way to get the blue whale (at 4x the size, volume, and price) working directly
There are different model versions to that, I have the larger Pro version at home, 2S is pretty large already though.
310m³/hr CADR (Clean Air Delivery Rate) for the 2S
500m3/h CADR for the Pro
1000m3/h CADR for the Max = ~600 CFM
So converting to Cubic Feet per Minute, the Pro Version is at 294 CFM (more than enough), so the 2S version is 189 CFM
Solution = Get the Pro version or higher like me :), which I got for $280 AUD (200 USD ish?), still much cheaper.
1 Like
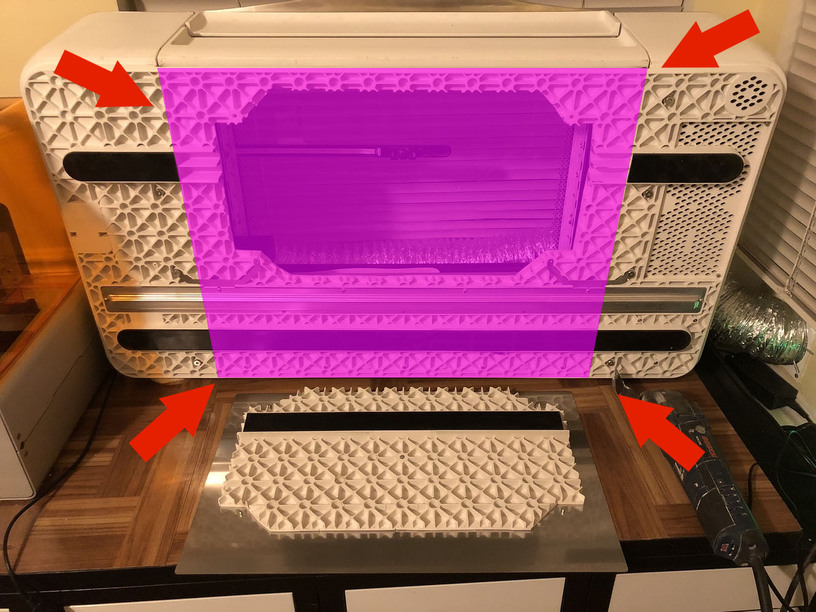
Hi @matt.stoker, I have a Glowforge PRO, I saw that you cut the bottom, but could you cut through the whole area like in the picture?
so that wood planks with 19,685 "width for infinity and without thickness limitations.Do you think it is feasible?
Exuse for my bad english