Dispatches from the front (Pre-release Report) - Cut Calibration

So one of the first things I usually do on a laser is to run calibration projects on them. But the Glowforge is a bit different from what I’m used to with Proofgrade materials and auto-magic settings for cuts, engraves and scores. When I got the PRU I followed the directions in the user manual (figured I should since it would be embarrassing if I broke someone else’s machine or reported a “problem” only to get a “we mention that on page 7 of the user manual” response to a support request :stuck_out_tongue_closed_eyes:). Then I started using Glowforge Proofgrade settings on some of my non-PG materials. Things worked pretty well.

But I’m interested in dialing the settings a bit tighter. I think the power/speed settings are a bit on the warm side (extra “laserness”) and they result in a bit of flashback.

I created a cut calibration pattern for the GF. It has 14 speed settings from the almost max 190 in/min down to 5 in/min.

I also wanted to measure the kerf I got. The file is a set of 1/2" squares. The idea is that it cuts at the different speeds until it cuts all the way through. I use 100% power as there’s usually no benefit to going slower with lower power except sometimes when full power results in too much burning and a couple of lower speed lower power passes will make for a cleaner cut. Generally I stick with full power and adjust speed.

On 1/8" Baltic Birch I had been cutting using the recommended Proofgrade 1/8 maple plywood setting of 100%/27in per min.

My calibration tool shows that something between 70 & 80 in/min cuts well - 3 times faster!

I set the squares in my design file to 14 different colors. There are 2 rows of 7 squares. Uploaded to the GFUI and I hit my first issue. The GFUI places small thumbnails of each color on the left of the screen. You click on each and set the operation and the parameters (power, speed, lpi, passes, focus distance). Unfortunately only 7 thumbnails fit on my screen at normal zoom in Chrome. Since I also have the cut line and the legend text engrave, I could only see 5 of the 14 cut boxes.

I’ve asked Support if there’s a way to scroll the thumbnails so I can get to the lower ones but while waiting for an answer, I went ahead by reducing the zoom in my browser to 33% and set each box in order. Note: I did find that I could scroll with my Logitech BT mouse as well as with the laptop’s trackpad. Also can scroll using the wheel for scroll wheel mice. When you click on a thumbnail it highlights the square being set. To avoid the issue where the GFUI’s pop-up settings box covers the template so you can’t see that highlight, move either the template or the viewing window over to the right so there’s room for the pop-up and the template and the pop-up doesn’t obscure the boxes. When you do that you can then more easily set the values - you can also drag the thumbnails into the right order if you want to do that. Hit Print and got the one on top.

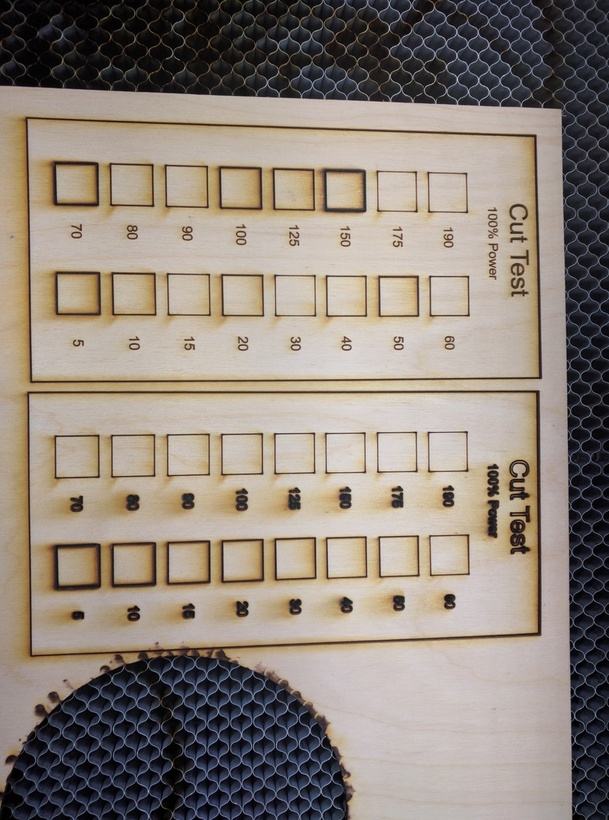
You can see the cuts don’t seem to match the labels. That’s because the order in the UI was not the order of the boxes in the file. It wasn’t top down by column or even side to side. In fact, the upper left box was cut 3rd and the lower right was 14th. The 1st cut was actually the 4th box in the 2nd column. :slightly_smiling_face:

I copied the order down on a piece of paper so I could go back to the UI and change the settings. The bottom picture shows the results.

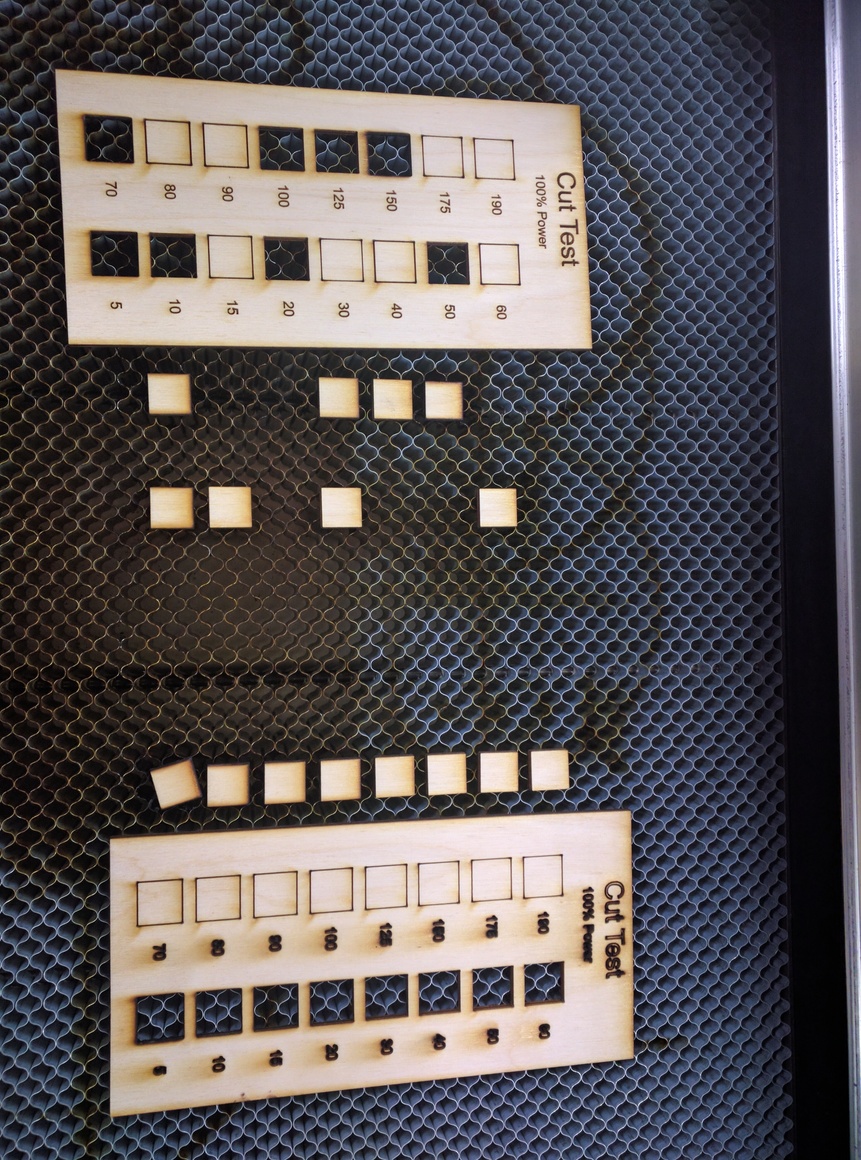
Notice the squares that fell out when the calibration rectangle was lifted. The second one (bottom) was just as expected. The squares for 70 and 80 in/min popped out with just a touch of pressure.

Success! Now I can dial in settings as needed for different materials. The kerf for 1/8" Baltic Birch at 100% power and 70 in/min is .0035in - the squares are 0.495" and the empty squares are 0.502". Pretty freaking good. :slightly_smiling_face:

Interesting view of the flashback damage due to higher power. Seen here:


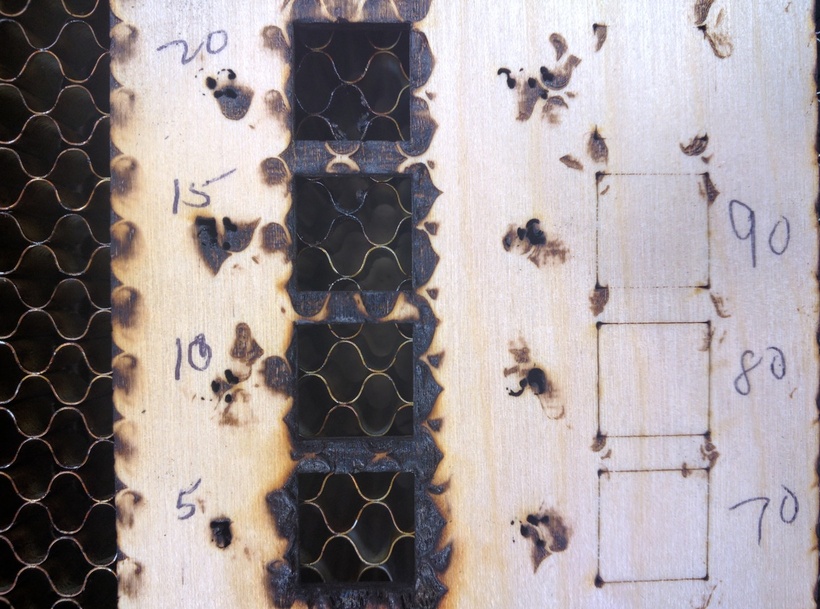
It actually burns serious divots at the lowest speeds.

Next project will need to be an engrave calibration tool. But first I need to find a way to scroll the thumbnails.

EDIT: Adding the SVG file for the calibration template which is showing up oddly

Cut Calibration Template.zip (5.0 KB)

47 Likes

Wow, great work. This is an example of “not sexy” experimentation work that will end up making all of our lasers better.

15 Likes

I’ll post the SVG when I find out the thumbnail scrolling shortcut or if they can tell how the order in the thumbnails maps to the colors in the file. I’ll make it easier to make the settings if I can.

It’s also a good reason to ask for the ability to save settings on our files. As it is now I have to reset it each time I redo the same design.

5 Likes

Great tests!
Only problem with doing them now is…they’re going to change again, and probably fairly soon. :no_mouth:

I didn’t want to mess with re-doing it a bunch of times.

6 Likes

They change on the same material from different suppliers. I run these everytime I get new materials or new supplies. Having a calibration file gives me the settings I need in 3 minutes. Full size it’s a 4x2" piece of sacrificial material. For ones where I don’t care about kerf sizing I can shrink it in half and still get the settings calibrated.

1 Like

No, I meant the overall spread on all of them is going to change…just like they did recently.

(No biggie if you’re used to running them for everything…I’m just lazy.) :wink:

At the risk of stating the obvious that you know and I missed something: You can drag the order of operations in the left column. Click on the operation At the top of the column and the square will highlight and whole box it is. Drag and sort through all the operations.

You should be able to use scroll wheel on the mouse to see other operations lower. There is no scroll bar.

7 Likes

Thanks for doing this! I’ve been wanting to try some testing like this, and a nice little file for cuts and another for engraves (or two I guess: raster &a vector) would be very handy to have.

3 Likes

Most mice don’t have scroll wheels. What about us?

I’ll have to see if there’s a Windows 10 gesture that allows for scrolling or buy another mouse. (Or GF could add a scroll bar.)

The engrave one is next. First I need to overcome the issue with being able to access the stack of colors since I’m scroll-less at the moment :slight_smile: Figured I’d see if they’re going to put in something to make it easier - also really need to have them allow us to save settings. We don’t want to be adding the details on 100 squares for power/speed/lpi only to have to do it again the next time we want to run it.

5 Likes

GF definitely needs to do something about the scrolling, but you still might want to consider a scrolling mouse–once you’ve tried one you’ll never go back. Even works on my Mac!:wink:

6 Likes

I was wondering why there wasn’t a scroll bar in a recently posted screenshot of the Glowforge UI.

They sell mice without scroll wheels? I think this was the last non-scrolled mouse I ever owned…

Image source: http://www.tcocd.de/Pictures/Peripheral/Microsoft/homemouseserial.shtml

9 Likes

This kind of experimentation is really important. Thanks for posting.

1 Like

I was once a Mac fan, long ago, when the mouse looked like this:

https://c1.staticflickr.com/3/2629/4205031822_705808c79c_b.jpg

10 Likes

These make me cringe :joy: I prefer my mouse to look like I could add a couple cannons and then fly them off to a space battle

2 Likes

Do your self a favor. Pick up a modern mouse with a scroll wheel. $15-$25. Some come with wireless dongles, others run off of bluetooth directly. Makes working with Fusion 360 or even Inkscape much, much easier.

5 Likes

You’re showing your age. :wink:

2 Likes

Actually I have one of these for another machine. I’ll just have to pair it with the laptop I use for running the GF. https://www.amazon.com/gp/product/B00S0CTU2Y/ref=oh_aui_search_detailpage?ie=UTF8&psc=1

Usually I use this one because it’s really small and I travel with it where small & light is next to godliness.
https://www.amazon.com/gp/product/B00DR8LA6U/ref=oh_aui_search_detailpage?ie=UTF8&psc=1

My day to day mouse is this one:
https://www.amazon.com/gp/product/B008OEHV6U/ref=oh_aui_search_detailpage?ie=UTF8&psc=1

The latter two don’t have the scroll wheel. But I found I can scroll the list if the site is up on my touchscreen monitor. It’s funny certain things work like scrolling with touch but others like moving the order of the items via drag and drop don’t. But that only works on the smaller laptop screen. Usually I have the laptop attached to an external monitor for the site and use the laptop screen for design work while I’m waiting on the project in the machine to finish.

I still think it would be a good idea for GF to add a scroll bar - I’m not the only (generally) scroll-less person out there. Unless they let folks know that purchase of a scrolling wheel mouse is suggested.

5 Likes

Me too! If nothing else, a scroll bar lets the user know that area of the screen is scroll-able. And, if it’s something you’re looking for, the size of the scroll bar would also give you a clue about how long the list is. (Like, if you were wondering if the list had 18 items or 34 items, looking at the size of the scroll bar could help answer that question.)

Maybe they could elicit Strong Bad’s help. :smiley:

2 Likes

I’ll have to see if there’s a Windows 10 gesture that allows for scrolling or buy another mouse. (Or GF could add a scroll bar.)

Two fingers next to each other swipe up and down

1 Like

Agree. And typically that control also allows you to widen the frame so the thumbnails can be bigger.

It’s all great on a 21" monitor but for laptops and smaller monitors the GFUI could use some accessibility tooling.

5 Likes