One of the things I do in my spare time is make lots of generative/algorithmic art with code, using tools like Processing, openFrameworks, etc.
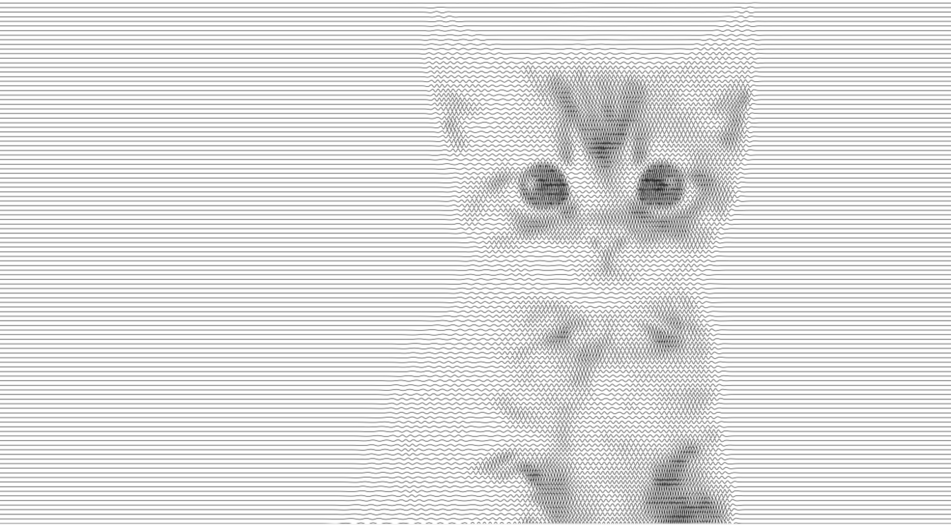
I recently released the code for an app that will load a photo and create a sort-of halftone image using sine waves. That is, the brightness/darkness of the image will increase or decrease the amplitude of a sine wave as it goes across the image. It’s easier to see the example below. The output of the app is a SVG file.
I originally created this app a few years ago for my WatercolorBot, and enhanced it more recently for the AxiDraw (both from Evil Mad Scientist Labs, and both which use SVGs for drawing), but after I released the code I started seeing traffic from a laser cutter forum where users have been using the SVGs to engrave both wood and acrylic.
Since I still don’t have my I hadn’t thought about this one for laser cutting (out of sight, out of mind ), but the samples I’ve seen on other lasers have come out looking great.
If you have questions, or need help running it, feel free to ask. I am working on some generative apps specifically for cutting/engraving, so once I have a device to experiment with, I’ll post more.
Wow - thanks everyone! I’m happy to see folks digging this; I normally make all my stuff just to try things and learn from it, or just to amuse myself. It’s always exciting when other people like it too
For @timtsuga and others wanting to get this running, there are a few simple things to do:
First, you have to install Processing (https://processing.org/download/) Note: you don’t have to donate to download - just choose “No Donation”
Launch Processing
Processing uses “Libraries” of external code for some things, and I used a library for the UI. Since the library is maintained by someone else, I don’t include it with my app. So to install this library:
In the Sketch menu, select: Import Library -> Add Library…
Scroll down the list of Libraries in the window that opens, or use the search field to find “ControlP5” and select “Install”. After it is done installing (shouldn’t be more than a few seconds) you can close the Library window.
That’s it for getting Processing ready. Now, to get the code:
On the right side is a green button “Clone or download”. Click it!
In the pop-up menu that opens, choose “Download ZIP” and save it somewhere you want
Unzip the file and it will create a folder named “SquiggleDraw-master”
Rename the folder to just be “SquiggleDraw”
Double-click the “squiggledraw.pde” file inside that and it will open in Processing
Click the “Run” button at the top of the Processing code window (it looks like a video Play button )
The app should run without issue, and you should see the UI and a sample image. You can now load images, tweak parameters, and then click the “Save SVG” button to have a file to do whatever with
If the app does NOT run, there would be errors in red below the code. Message me with what that says and I’ll try to help out. Every machine is different, so I can’t say if there are problems with your setup or any “known issues” – it works for me
I’ve seen a picture done from a person’s heartbeat but not a sine wave. Interesting and very cool. The sine wave is low amplitude where dark pixels and high amplitude where light pixels (somewhat simplified). Thanks for sharing and we look forward to more posts when the GF comes. - Rich
@gwygonik I kind of collect dithering tools and algorithms and this is the first time I have ever seen sine waves used! Very nicely done and the results are lovely.
This is truly wonderful. Writing and sharing code (and other art forms), the whole attitude of “I love doing this/making this, and it’s a thrill when other people find it useful” is one of the greatest things about our modern world. Simply put - you rock.
The code is naïve and the idea was obvious (at least to me ). I typically only do OSS licenses on physical designs (normally CC, non-commercial, share-alike – or some variation) but we’ve seen how that doesn’t even matter to folks.
I lose no sleep if someone claims it as their own, as I’ve already moved on to other things.


 ). I typically only do OSS licenses on physical designs (normally CC, non-commercial, share-alike – or some variation) but we’ve seen how that doesn’t even matter to folks.