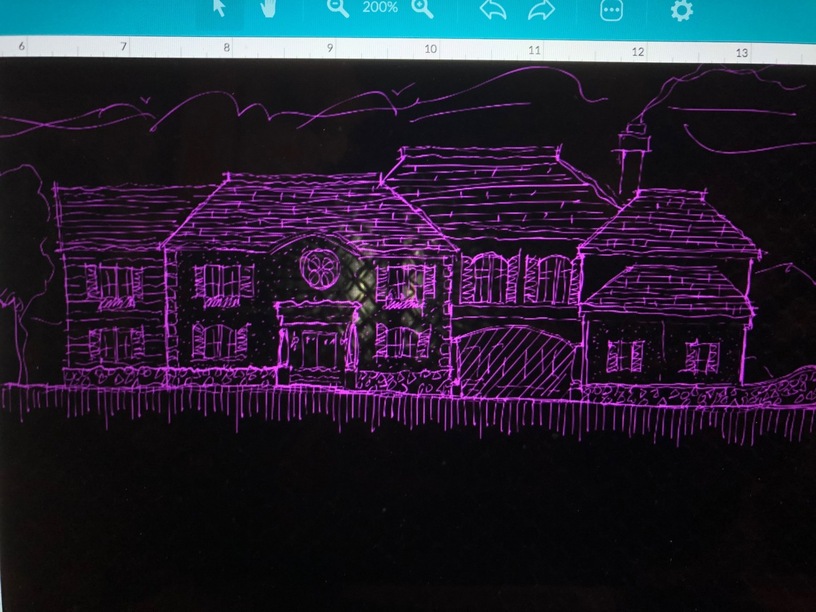
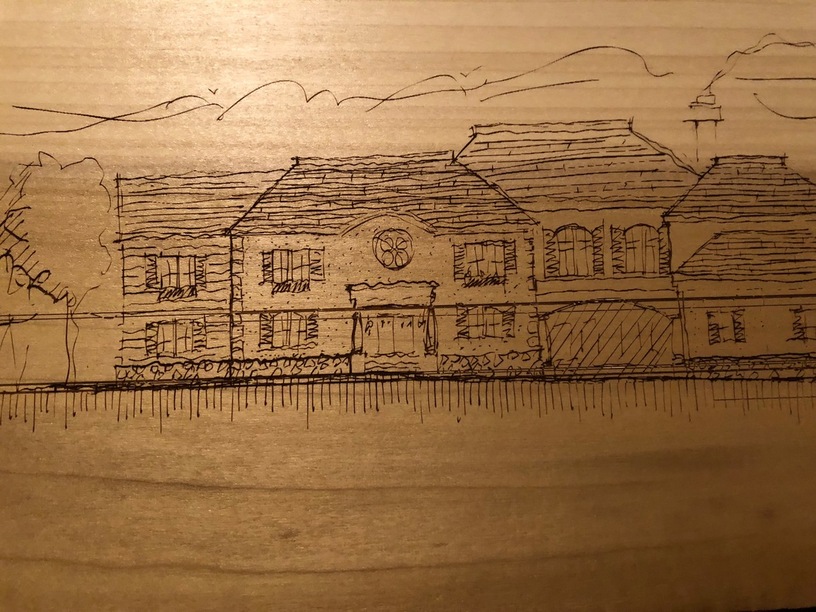
So, this is my first engrave using the SVG export from Wacom Inkspace, and the Intuous Pro Paper. Super excited about being able to convert what I draw with an actual pen on paper to a vector to engrave. However, as you can see the SVG image in the GFUI has no extra horizontal lines across the middle of the image, yet the final product does. Which line you ask? The one that looks like a laser drew it, instead of a jiggly hand drawn line. There are a couple just above the heavy ground line and one in bottom right as well. I used PG Poplar. Any thoughts on why this happened?
5 Likes
Without the image to examine it will be hard to say.
Appears to be some artifact, but from software or conversion I cannot say.
Never seen in any of the drawings I have made so kind of nulls out the Glowforge GUI having done that (at least as far as I am aware).
I suspect something in your hardware, software, or file conversion phases.
Is there a page size or paper break system in your drawing tablet?
If not seen in the actual file, you may want to drill down into that aspect of the drawing tablet and see if it is trying to install an alignment across pages.
Love new toys, always make things interesting.
This looks similar to this old post:
EDIT: I somehow got the wrong link and can’t find it on mobile. It was a helicopter engrave that someone was trying to perform.
I remember looking at this file and there were a number of unnecessary anchor points that were causing the GFUI to engrave lines that didn’t exist in the file. Other than cleaning up the file, I don’t think a bug was ever confirmed or fixed to solve the problem.
Here’s the SVG. Elevation-Front-022818-2.svg.zip (182.0 KB)
Any help would be wonderful. I’d like to use this to make hand drawings for wood puzzles. And, this outcome is disconcerting.
My thing is why isn’t the UI like majority of the machines out there that uses color coded settings… I worked on my friends GF to make a simple fill circle took 5-10 minutes… it would be easier to stay all black(etch), all red(cut), all blue (score). It shouldn’t be that hard…
1 Like
You have a lot of paths. Not a big deal… 2146 closed paths. And one open path. 
I suspect it was the one open path that is trying to close itself for the engrave that is causing the line. That’s typically what causes this behavior. It’s actually just a stray point in the very upper left of the document. I’d give that a delete and see what happens.
1 Like
Why did it take so long to make a simple filled circle? It takes about 1 second - regardless of the color.
1 Like
How do I locate the open paths? How did you get that path tabulation?
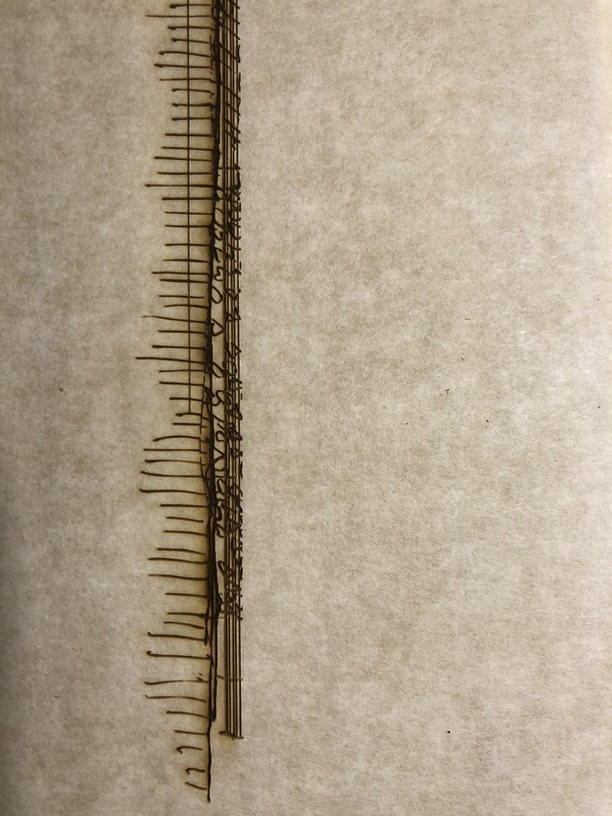
I thought it might have also been all the little dots in the stucco walls.
Thanks JB. I went into AI, created a new layer and turned it off. Then went through and moved the joined unions to the off layer, and deleted all the rest of the deleterious junk. The pen has pressure sensitivity that must be creating hairline wisps. I also deleted all the dots. I’ll run again tonight when I get home to see what happens.
Our messages passed in the ether. I ran the count and down now to 1263 closed paths and 0 open.
Thanks.
1 Like
I use a free Select plug-in from Rj-Grafix: Adobe Illustrator plugins — rj-graffix
It allows you to automatically select a ton of different types of objects, including open paths:

In that screenshot, you can also see the “Document Info” window. Open that from Window > Document Info. Click the little hamburger menu and make sure that “Selection Only” is not checked. Then, hit the hamburger menu again and select Objects. It will give you a path count (and if they are open, closed), total path lengths, etc.
4 Likes
It could be - if it’s not the open path then it’s likely a self-intersecting path. But, I’m guessing that it’s the open path. I hope so, because I don’t know of an easy way to fix self-intersecting paths, unless you take what you have and convert it to a raster for engraving.
1 Like
Had to first figure why I wasn’t recognizing the etch line. And we finally realized we had to make two circle and space it correct between. Both circle… I rather have the UI run as a color coordinated functions…
I get that they’ve gone a different route than other laser software interfaces. How long would it take you to make that same fill circle now that you know how to make an engrave vs a cut?
Did you need two copies because you needed to engrave and cut the circle? How would it work on other software if you wanted to create a vector engrave and a vector cut of a circle?
It done very easy… make a circle contour it or make a thick stoke and color it black because black is engraving for almost all laser machines…
1 Like
Nice thing about this one is - you can use any color you want for engraving. And set individual engraves with different parameters if you like.
It’s tough having to learn a new set of rules if you’re used to doing things a certain way, but the good side is it’s generally easier to pick them up quickly.
There are a quick set of guidelines for the laser savvy at the end of the tutorial below…it generally saves some time to read through it once.
1 Like
Yes but you have to set it up scores manually for each design. On other machines you can specify a score in your design file.
And the Glowforge, you just make a circle with a fill? I guess I’m not seeing where the difficulty lays once you know a fill is defined as an engrave and a cut is a stroke.
It would be nice to be able to set up certain operations as a score automatically which would minimize UI time. It is one step in the UI to make it a score.
1 Like
Maybe this is the problem. Ran again just now and cancelled it. It has added even more lines that aren’t in the svg.
I dont have the gf as of yet… worked on my friends gf but he isn’t to knowledgeable about laser cutting.
You know, if I wanted to use a sketch like that, I’d rasterize it. (Hand sketches are murderous from a vector standpoint. All the scribbles have to be interpreted into a lot of movement rules, and they’re not connected, so the math gets to be pretty extensive.)
But in a raster treatment, the head is going to travel back and forth along a fixed path, and the only instructions written in are when to fire and when to stop.
I’ve been just as impressed with rasterized results from this machine as I have with vector treatments… I’d at least give it a try so you can use the Intuos results. It does look pretty cool. 
6 Likes