I am super excited - I just bought my glowforge after staring at it for the last…oh year or so. I was scared the price was going to go up…and they got me.
I want to make shadowboxes and shadow box frames (I really don’t want to pay micheals the 30-60 dollars per frame.)
I was searching around, and haven’t found any SVG files for an easy to assemble shadow boxframe. If you know any sellers and/or free resources that’ll be great!
Side question - I make patches as well can I cut my patches with the laser from the felt base? Or will I catch things on fire?
Hello and welcome to the community! We’ll be looking forward to seeing what you make. Your best bet on here is to do a search. It appears you’re looking for ready-made files, so I suggest you start looking in the free laser designs section. There are also several posts about felt that might help you out.
There are a couple of nice ones for sale in the Glowforge Catalog if you want to get started with something that does most of the work for you. (Comes with instructions and correct settings, etc. already preloaded.)
Welcome to the community!
Agree with @Xabbess, there is a TON of discussion on almost every imaginable topic here on the forum. Every time I have that amazing new idea I do a search and ruefully find 10 people who have been doing it for months. Luckily, people are sharing ideas like crazy so you’ll have great guidance.
I know I’ve see the ‘felt’ topic quite a few times in particular. Your Fear of Flame will serve you very well. It is not an unfounded fear; wild stories and pictures also here in the forum that are worth looking for. But even when there is a risk there is often ways to get done what you want safely.
Good luck and post your progress!
I did but I was finding pre made boxes - and not just the frames. I’m okay for paying for a kit but again I kept running into shadow box sets vs just the box. @_@ But someone just linked me with the kits from the site which is great XD
Thank you! Yes I was browsing around last night and found the ‘what not to put in your GF’ list. Then what will happen.
I do not want to burn my beautiful GF before using her to the max.
I also can’t wait to share free files as well!!! I love everything i’ve seen so far. For my patches currently I heat knife to melt and seal the edges so if I can take that step out - it would be a nice bonus…if not well it is what it is XD
No, unfortunately the Catalog files are not going to be editable. (Locked) Looking at them to see how the frames are constructed would enable you to design your own though, fairly easily. There are box generators that will handle the finger joints at the corners, and you can size those to fit whatever you are wanting to do.
Okay perfect! I’m new to wood work and crafting things from ground zero (Sewing/paper cutting/ fashion craft is an old hat), but that helps. The ‘tabs’ system in theory works in my brain but visualizing how I design it is another story.
Do you have a box generator you recommend? I’m really concerned about making the cut for the glass in the front and the backing.
I guess it depends on the exact type of shadow box you need. At its simplest a shadow box is a shallow box with a hole in its top. To make one of those your steps are:
Use a box generator to make a box of the desired size.
Cut a hole of the desired size out of the top.
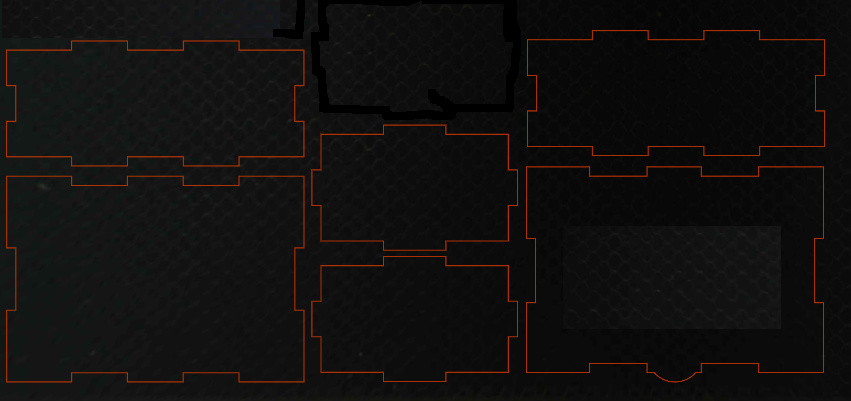
Here is an example of my overly complex one. Unfortunately, I didn’t take a clear pic of just the outer box.
The box generator should output something like this.
There is a bottom, two sides for right and left, two sides for front and back and a top. You open it in Inkscape, or the vector editor of your choice, and you make a rectangle the size of the opening you want in the top. You then position the rectangle in the top piece and subtract it (or just leave it) from the top. Upload to the glowforge and cut.
This will give you a shadow box with an “undercut” along the four sides. There are a lot of ways to deal with that. As far as glass goes, you may want to start with clear acrylic. You can always cut glass (not in the glowforge) and mount it, but acrylic is easier if your learning style is to learn by doing.
Thank you! I think I’m going to have to sit down and think about what you said.
My previous boxes I’ve made with circut - I just bought a micheal’s box with front glass, loaded each layer with foam frame, attached the lights on the back panel, then used double sided tape to keep the back panel in place without gluing.
I love the idea of tabs and finger joints - just my brain doesn’t think like a carpenter yet. So its all new to me XD
I think it will become much clearer once you just cut a box. Don’t even worry about cutting a shadow box, just make a plain old box. Cut it from something cheap, like draft board or corrugated cardboard. Then you’ll see how everything fits together. From there visualizing the rest should be easier. Based on the description of your current process it should pretty much work with a glowforge cut shadow box.
I’ve been using these cut settings on Amazon cardboard for years now - always be careful because things with gaps in the interior can flare up unexpectedly, but this should get you started: Settings for Cutting/Scoring Corrugated Cardboard
You can cut both acrylic and wool felt in GF no problem The wool is STINKY tho.
As always, keep a close eye on it while cutting to avoid a fire situation.
If it can be cut it can catch on fire. Things like stone, tile, steel, aluminum can be lased, but not cut all the way through, and probably can’t catch on fire. If it can cut all the way through it, it can catch fire. You will not start fires with a little common sense. And even if you do manage to ignite some felt, or cardboard, it doesn’t have a lot of thermal energy. That means you can lift the lid and extinguish the fire with a damp wash cloth.
I cut polyester (I think that is what it is, it’s not real felt) felt. The edges are self-sealing when laser cut. Search felt in Beyond the Manual and there are all sorts of threads.
 Luckily, people are sharing ideas like crazy so you’ll have great guidance.