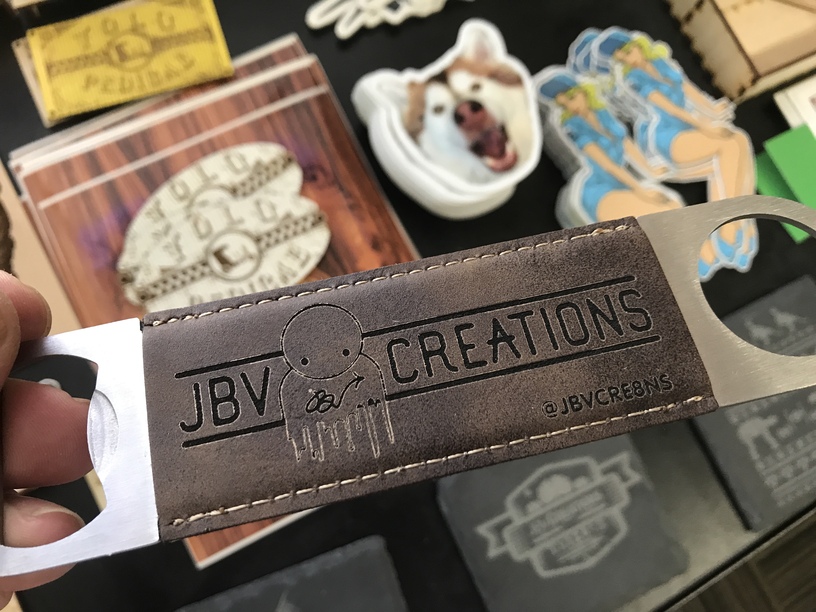
Several people have asked for the settings that I used for the color-reveal engravable leatherette portfolio from JDS (and other suppliers, maybe?). I also used these setting for the rawhide/gold colored leatherette-wrapped bottle openers that they sell. These are not definitive setting, but they are what worked for me, and can give you a starting point. Your particular design may benefit from slower speed and even less power. Too much power or poor focus may burn right through the colored layer and result in blackened results with a thin colored border, which could be a useable effect on some of the colors, but not so much for the black/gold.

40 Likes
Thank you sir. What did you set your material setting as if you don’t mine me asking?
1 Like
I used “uncertified material” set to [caliper measurement] thickness.
I cannot recall how thick the portfolio was, but it was a bit over .5", so it was done sitting on spacers with the tray removed. I made a jig for the bottle openers, for easy place-and-flip double-sided engraves.
1 Like
Today I received my first set of engravable leatherette from JDS and played around with a piece of sheet stock to test settings. I started with @jbv’s settings above, and they were right on. Dropping power to 10 and 8 was too light of an engrave. Upping power to just 13 was too much.
I chose medium proofgrade leather just so that I didn’t have to specify a thickness, and then used the brand new “set focus” feature in the GFUI. Otherwise settings were exactly as indicated above.
Next it will be interesting to see how the curved flask engraves and whether the GF autofocus can create a consistent result.
Now…what about through cuts and scoring? Any experience to share?
Love this forum!
6 Likes
Hey @riverbank !
Did you ever run that JDS Curved Flask? If so, how did it go and what settings did you use?
1 Like
I did! Pretty sure I set up the engrave as I would any other material too thick for the crumb tray, set focus and let it rip with the settings mentioned above. The GF compensated for the curvature with its autofocus quite well. Sold the flask at the farmers market too!
4 Likes
@riverbank perfect!
I think my settings were too high and I burned right through the colored layer, resulting in shimmery letters (due to the metal flask) that didn’t stand out too well… oh well, ordered 2 more and will go at it again!
The leatherette that goes to black seems to be easier because even if you ‘burn past’ the color layer, it is still black.
1 Like
Anyone try the cutting the sheets? Any settings? I’m new to all this and honestly have no idea. Thank you
i used medium leather setting for my cuts and seems to work great!!!
I am looking for help on the 10x 10 wall hangings with leatherette… struggling
Thanks for sharing your settings! This worked well for the patches I engraved. First time doing this kind of thing. There seemed to be some debris left behind and when I tried wiping with a microfiber cloth it smeared like paint. Do you clean yours up after engraving?
it’s been a while… I don’t recall doing any clean up, if I did it would either have been with an air-compressor or a soft dry brush
Thanks.
I know this is an older post, but I am wondering if these settings are for Pro or Basic?
Pro
I saw this old post come around and thought I would add something that I haven’t seen mentioned.
We have done several of the leatherette portfolios, and the outside leatherette is thicker than the inside leatherette. So if you want to do another design on the inside, like add their name or business info, you have to dial back the power (or increase the zooms). Otherwise, you’ll burn through the thinner inside material.
1 Like
I know this is an older post, but I wanted to add the settings that have worked for me when using Leatherette sheets in my GFPro.
Material settings for all should be “Thin Natural Leather”
All to Black (Except Cork)
Speed: 455
Power: 12
LPI: 340
Cork
Speed: 1100
Power: 24
LPI: 450
All Metallics (Except Blue/Silver)
Speed: 500
Power: 7
LPI: 270
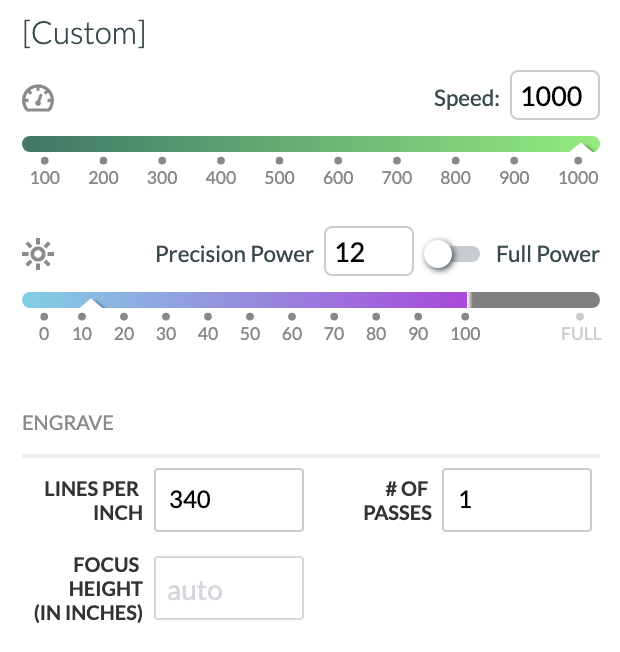
Blue/Silver
Speed: 1000
Power: 12
LPI: 450
7 Likes
Welcome to the forum, and thanks for the additional settings…
but:
just FYI and to help others avoid confusion, the settings you have posted are all “Custom Settings”; There is no need to choose a Material Setting if you are using Custom Settings. Choosing the Material Setting for Thin Natural Leather will wipe out any custom numbers you may have just entered.
For example, the current HD Graphic Engrave settings for “Thin Natural Leather” are
Speed: 300
Power: 6
LPI: 450
2 Likes
That has not been my experience and engrave on leatherette daily. I have never had my custom settings wiped out by choosing the material.
2 Likes
ok, cool. I’ve seen a lot of confusion around material presets/manual settings over the years.
There is no need to select a preset material setting if you are using custom settings on a different material.
1 Like