Thought I would share my testing results using engravable leatherette from JDS Industries (unfortunately you need an actual business to be a customer of theirs).
But those settings, interestingly, were too much on this one. The only thing I can think of is the leatherette appears to be thinner on this bottle opener, or maybe the “rustic” color is just different than the teal:
[EDIT:] The “rustic” color works beautifully if you drop the power to 10.
Then I ran tests for scoring and cutting.
Scoring is really finicky, and it’s hard to keep the laser start and stop points from burning all the way through. Plus it just doesn’t look good anyway. So I don’t plan to score this material.
For the black and silver journals, the Facebook group (Adriane Draude) pegged it on the nose when she said 500, 7, 270 lpi. I use 225 lpi and it comes out great as well. One thing I found was that using an SVG does not turn out well, you have to use jpeg and I think pdf would work too.
As for the black and silver wallets, you have to bump up to a power of 9, and make sure you stick something in between the flaps to make sure your wallet edges are level.
For the journals, do you engrave these without the tray? And do you use the set focus feature on that? It’s my first time trying something like that and I’m not sure where to start.
I tried Set Focus w/ the settings I have used on other leatherette items for the engrave and it’s not working, like not even making a mark in the leather.
And then I tried doing the math to set a material thickness and it’s doing the same thing?
This is my first time trying to engrave anything without the crumb tray so I don’t know if I’m missing something obvious.
Set Focus has nothing to do with whether or not the laser marks, that’s power and speed. Set focus means that the item you are marking is in focus. You still have to get the item to within 1/2" of the laser, so if it’s a 1.5" thick item you’re fine, but if it’s a 1 1/4" thick item you have to put at least 1/4" of something underneath it.
It’s .75" so I put something .875" under it to make it a total of 1.625. I tried adding another scrap of proofgrade underneath the first time it didn’t work to get it to a total of 1.75 and still nothing.
I’ve never used Set Focus, but I’m clicking on the link and then moving my square into place on my material.
I actually turned my glowforge off and then back on to see if that would help and now it seems to be having a hard time centering.
I think I figured out what was happening! the Set Focus was working but I was using the saved settings from the leatherette stock which has a material thickness set in there. I’m engraving now!
Yep. See that. Posting at the same time does that sometimes.
Okay. If theres no mark…if it’s firing, that’s a settings issue, depending on order of things clicked the settings will slip to power 1. Or are the leather items new? Maybe need different setting?
yep! found a hidden material thickness in my saved settings that I forgot about. Got it working! Now just to dial in the settings for the engrave. Thanks!!!
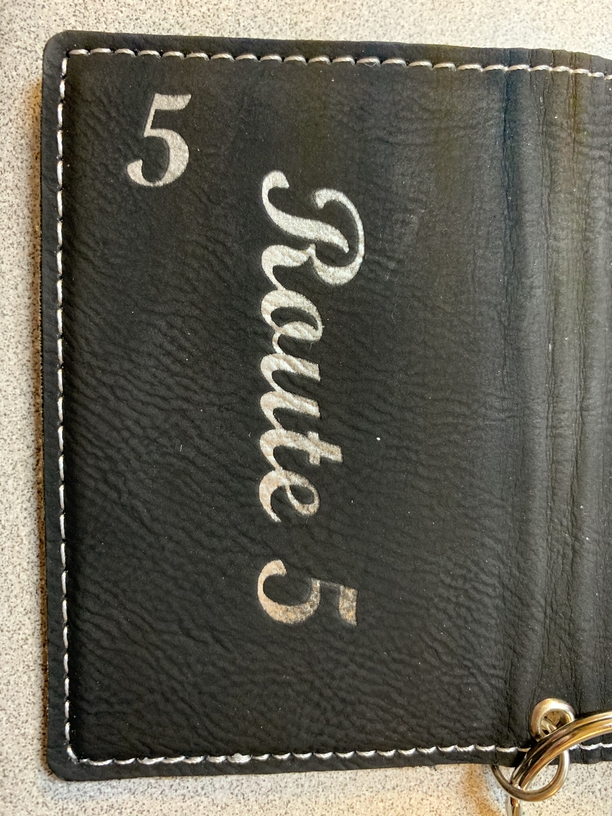
Greg, can I ask what you put in between the flaps to make sure the wallet edges are level? I think that’s what my problem is but I’m not certain! Here’s a photo of the issue (How the Route 5 is great to start but then gets weird.):
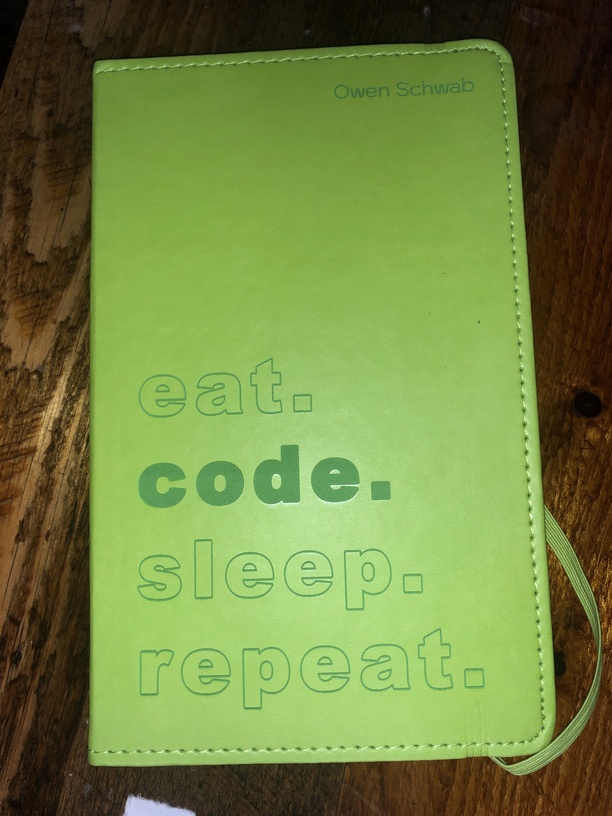
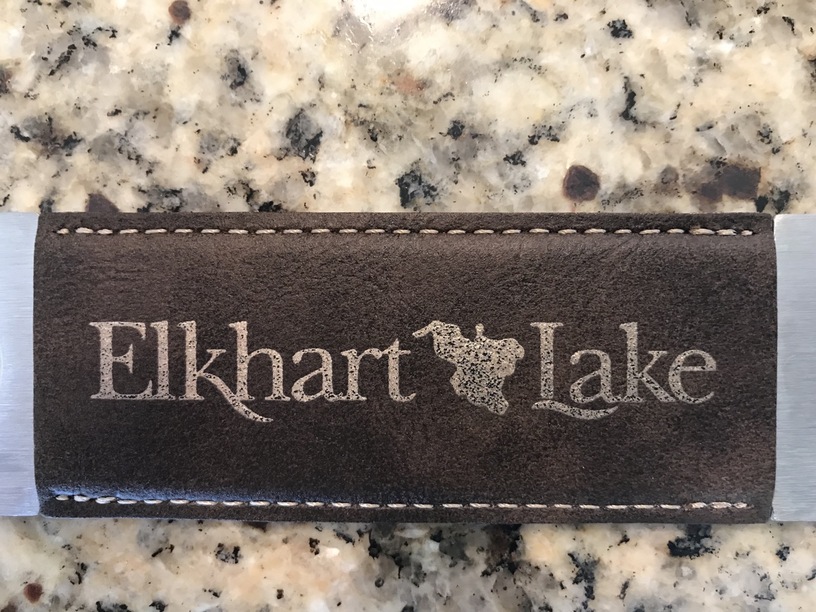
Thanks for these settings. I used them to perfectly engrave this leatherette journal as a personalized award for outstanding Computer Science students!
The JDS videos suggest changing the focus 1/8" for the gold ones. Has anyone tried that? And has anyone confirmed if there really is a different in the way the leatherette engrave with an SVG vs PNG? I’m just wondering if the people using the SVG and saying they don’t work have the settings too high and by changing it to PNG, it naturally changes the intensity from solid to dots and that’s why it seems to work better?
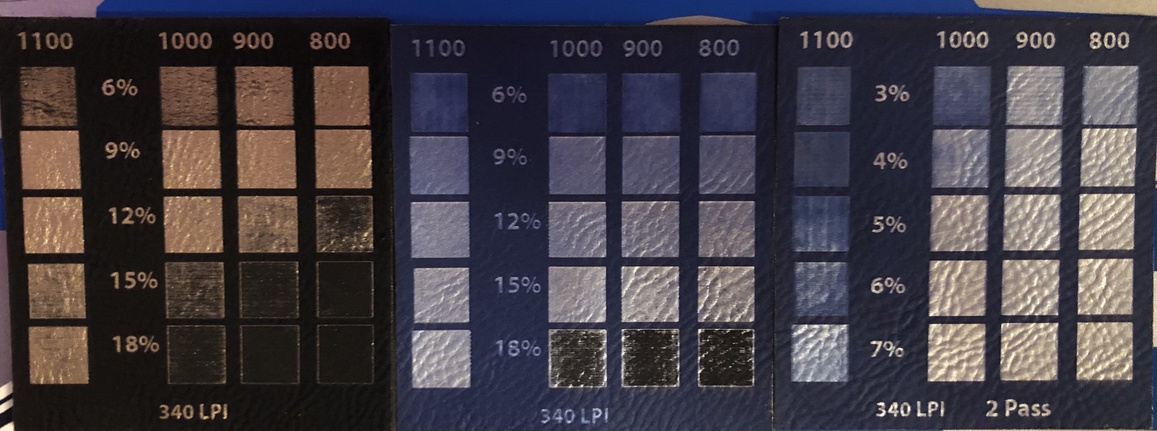
I have been working with the JDS Black/Gold and Blue/Silver products. The black/gold does a great job with the settings above. However the blue/silver does not work. The settings always left a blue hue or if you step it up it burns off the silver. You will need to make two passes at a lower setting. The images shows the test run and the varied setting. The photo does not show the blue cast very well but it is there in 15% row.
Which setting worked best for the Blue/Silver leatherette? Also, would the Black/Gold Setting for the Dark Brown/Black? I need to make about 100 of these so I want to make sure I get it right!
 (I’m in Fond du Lac).