Input appreciated: Engraving a cello bridge

So one of my good friends is a Middle School Orchestra Director. When I first bought-in on the :glowforge:, he was one of the only people I told. Shared with him this story of the violin bridge when it happened and it apparently got him thinking.

They have another director who’s taking a new job and my friend approached me about engraving a cello bridge to give him as a farewell gift. Since I’m fairly new to lasering things, and I’ve only had one project so far where I strayed into the land of non-:proofgrade: material, I was hoping you guys might be able to help me not screw this up. (Good news though, if I do it’s not a huge deal because he apparently has a ton of these bridges laying around).

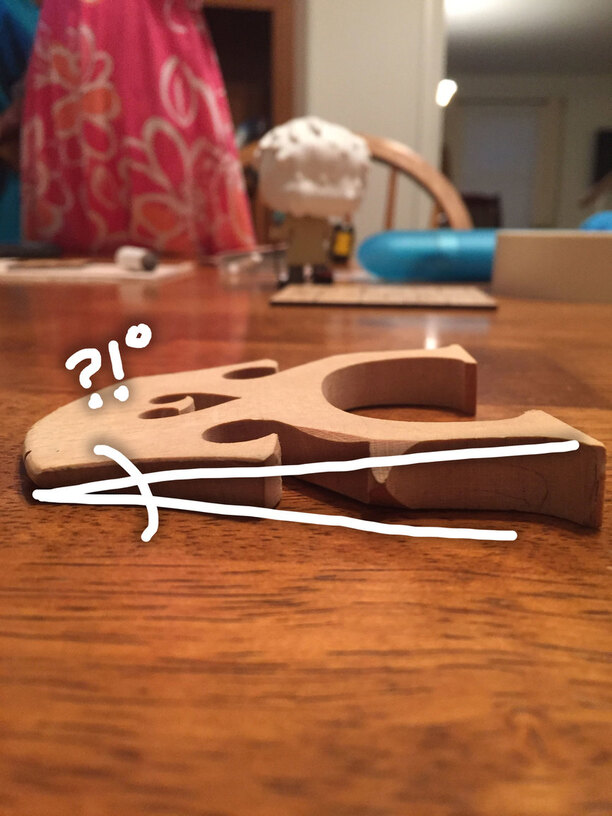
Here’s what the bridge looks like:

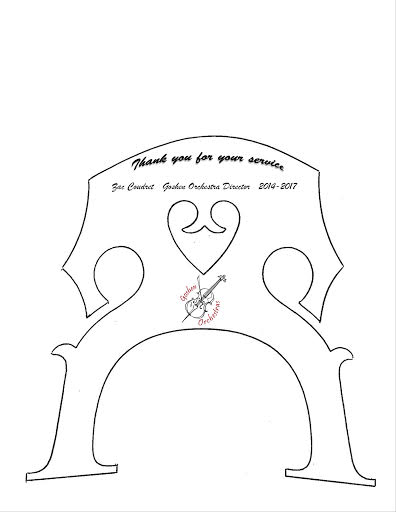
Here’s the mock-up he sent me of what he wants to do (I doubt I’ll do this exactly; definitely clean it up and make it look much more readable & professional in Illustrator, but this gives you some idea of the general direction):

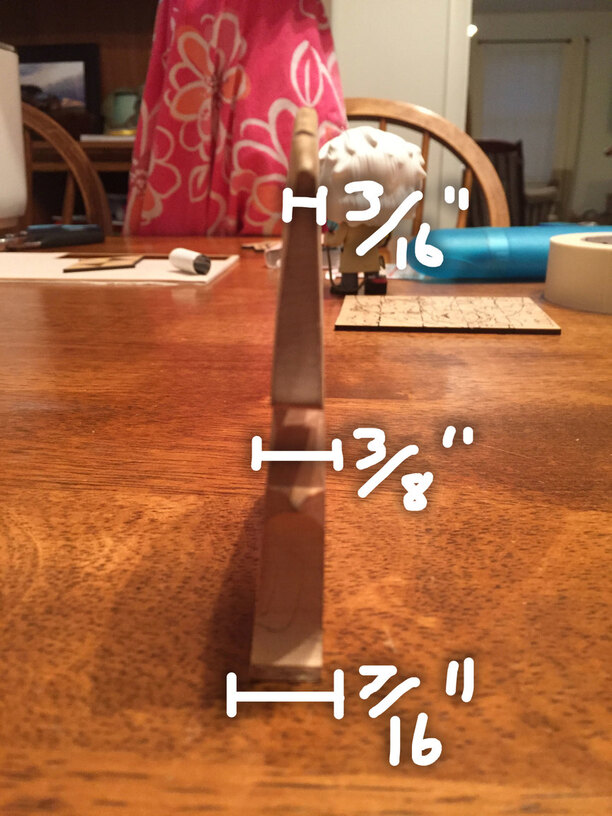
I vaguely recall the Glowforge is supposed to be able to detect curved surfaces, but this isn’t really curved; just angled (though I have no idea how many degrees… No protractors around). I wasn’t sure if I should just engrave sections separately based on thickness of the material (adjusting focal height for each part), or if I should just set the power to work for the thinnest section and keep it at that for everything.

Another option is I can prop the thin side up so the surface I’m engraving looks flat.

The wood is Maple. Based on how my coaster project went I was kind of thinking I might put the settings at 65%, 335 in/min, and 270lpi. Think that would work?

Another random question: I’ve seen some things on the forum briefly mention the difference between engraving and scoring. Is this the kind of thing I should be scoring instead? Would it make much difference either way?

P.S. I promise not to sue any of you if my house burns down on this one. Again, just looking for your words of wisdom to point things out I haven’t thought through.

Thanks in advance!

UPDATE: I finally got around to posting the final product: Cello Bridge Engrave

20 Likes

Very unofficial, but I’m pretty sure it can handle differences of up to a 1/4" in height - it did without problem on those egg shells, which had a pretty steep curve on the surface.

But, you’ll get a better result if you level it a little, just to be on the safe side.

I’d engrave it. Scoring is a deeper cut, and you might damage the structural integrity of the bridge.

The bad news is - at 7/16" at one end, you’re going to need to rig up something to prop it on instead of the tray. That’s over the height that the focus can be used on - there’s a limit of something like 0.43 inches (don’t remember exactly and I’m running a job so can’t check right now.)

@henryhbk has a tutorial in the Laser Tutorials Matrix that tells how to set up to cut without the tray. (Very good.)

8 Likes

If you have a second bridge you could flip it the other way and use that to prop it up flat.

19 Likes

using a 12x20 art board, Make a cutout of the outline of the bridge as you have in the design file on a fixed sheet of waste material. Cardboard would work. Put the bridge in the jig. Put the bottom of the bridge toward the front of the Glowforge and the thinner top toward the back. Set the focus .18 to split the difference and engrave as normal. You won’t hit the bottom of the bridge with the air asssit nozzle since it is toward the back. Since the center is 3/8ths you should be good for the focus. That would be easy but you’d have to test to see if the focus works. Could do the engrave in two steps at different focuses.

Otherwise as @jules said make a support that would bring the surface up flat for the bridge after removing the crumb tray.

6 Likes

7/16" is .4375".

I’ve seen mention the max material thickness you can enter in the thickness field is .433". If I understand correctly, this field is used for correcting the positioning as it relates to the GFUI and what the lid camera displays.

Only a few thousandths difference. I’d experiment if he has many of them, like you mentioned.

Throw a 1/4" shim under the skinny side, borrow the engrave settings for the proofgrade maple and run with it.

5 Likes

Btw - get the material and just put the calipers on it and see what you have. Take the guesswork out of it. If he’s just measuring with a ruler or tape, it wouldn’t be out of the question that he’s 1/16th off in either direction :slight_smile:

Also - if 7/16th is accurate - it’s only an itty bitty portion that thick. Placing as @marmak3261 said - you’ll have no issue with clearance.

Or maybe I’m just laissez faire about some things :slight_smile:

3 Likes

You guys are awesome! Thanks for the help. I’ll see what I can do here and try to run it at some point this weekend.

3 Likes

Do everything in it’s own layer too.

If that small graphic doesn’t look sharp enough after engraving run a score around it. Don’t move anything when you look, then ignore the other layers and change that one layer to score. If it looks good already at that point just walk away :smile:

4 Likes

And by layer, he means give everything a separate color so you can specify it separately in the UI.

6 Likes

If you do a manual score you can set the power wherever you want. I did a score (maybe 3/200?) that just barely cut through masking tape, so you could probably get the numbers you need.

1 Like

WE HAVE SUCCESS!!! Thanks for the help guys! It actually engraved much better and easier than I expected. I’ll post the results soon under “Made on a Glowforge,” once I get the stand I made for it finalized. Seriously—you guys are the best!

14 Likes

It looks like “hard” maple, which is a slightly different species and is actually harder than what is commonly called “soft” maple. They are both technically hardwoods, but might make a difference with these settings.

2 Likes

True. Proofgrade maple is hard rock maple (Acer saccarum)… It’s more expensive and generally better than soft maple species.

5 Likes

Glad you got it the way you wanted it! Isn’t it great when you just jump right in and try something on the Glowforge for the first time and it just… works?! My brother’s an mechanical engineer and often prototypes with amazingly-expensive 3D printers and such. And when I show him something it blows his mind… “So that was your first attempt?! And it came out perfectly?! Is it really that easy?!”

4 Likes

@bruceaulrich Thanks for the info! Materials is something COMPLETELY new to me… All of my design work prior to last week had been digital or printed on paper, otherwise I simply sent off the artwork to be outsourced (shirts, stickers, coffee mugs, etc.). I’m learning a whole lot about wood, leather, and acrylic fast (And honestly, I haven’t even touched the acrylic or leather yet… those will definitely be happening soon!).

@Tom_A YES! Love it! Unfortunately, then I also have times like last night where I know I have it all figured out, only to realize when I told it to cut at 100% power I somehow typed that without the zeros… Yeah, 1% power. And I moved it after. :angry:

3 Likes

There are a couple of really good, leather threads here on the forum. I’ve read through them all. I hope to be able to tackle that when I get mine.

2 Likes