roygoh
June 21, 2021, 7:21pm
1
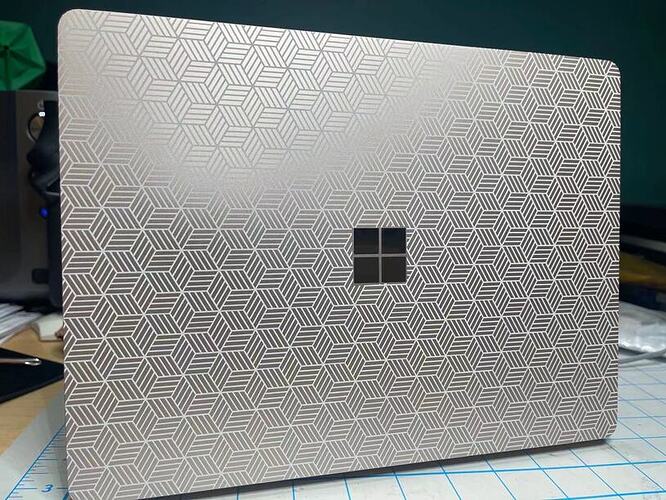
Generated the graphics using inkscape and etched a Surface laptop. I like the outcome a lot
45 Likes
Huh, that’s clean. Nice. Engraved or scored? How long did the job take?
4 Likes
This is super clean looking. Looks great
4 Likes
roygoh
June 21, 2021, 9:53pm
6
Thanks!
I used manual setting: speed = 1000 and power =50%.
5 Likes
FYI we’re only allowed to discuss non-PG settings in the Beyond the Manual category (per the Friendly Neighborhood Lawyers - FNL). You can make a post there and describe your technique/settings and link that back here
5 Likes
rvogt
June 21, 2021, 10:27pm
9
This looks great!! Love the pattern!
2 Likes
Very nice upgrade to the Surface.
2 Likes
This is absolutely gorgeous, I’m a big fan of this particular design and it looks great against the windows badge in the middle.
2 Likes
djfb
June 22, 2021, 4:06am
14
That looks so cool! You’re a braver man than I am…
2 Likes
Love, love, love it! I am too afraid to try engraving on a laptop or phone, so well done!!
1 Like
Very nice alignment. That’s an attractive pattern. Bet you get a lot of notice with that laptop.
sensei
October 5, 2021, 10:30pm
17
I am planning on doing a black Surface Laptop 3. Since the Surface Laptop is slanted, did you use a wedge to level it?
1 Like
Something like this:
(Note: this is a personal project, not supported by Glowforge… I do get to do these from time to time, CEO privilege.
or
So probably my most famous post here is the tutorial on how to cut without the tray . And I do it frequently, and I needed to do a mass production run of cutting boards which will require the tray to get removed. Since it’s like 34 boards I figured a jig would make it so much easier. So I designed this flexible jig. I designed it for 3D printing (but actually would be trivial to make with draft board (or any other material). The 2 added items are the tabs on the side to tape down the jigs into pl…
or
Started working on non-standard thickness materials. Took the plunge and engraved my 13” MacBook Air using the GF MacBook Pro presets.
Jigs worked perfectly! The plan is to cut 4 more to support my materials with 8 points on 4 sides and add magnets.
The highest step setting is 1.445” so higher than the crumb tray’s 1.367”
Notice since the Air is thinner on the front than the back. I used the 2nd and 3rd level steps to achieve a level working height.
[image]
[image] [image] [image]
Crumb …
Lots of ideas
1 Like
roygoh
October 5, 2021, 11:11pm
19
Yes, I removed the crumbs tray and then used wedges to level the surface to be etched.
Uh yeah. Worked for me forever, but then I realized I could just print those steps. and as long as the top is in the orange zone I’m good. That was easier than the waste proof grade scraps (also I think my wife is getting annoyed at my box of little scraps “but honey I use them”)
2 Likes
![]()

![]() My usual go to is just cramming pieces in there until it looks right
My usual go to is just cramming pieces in there until it looks right ![]()
