Laser Thursday and Hello! -- Leather & Acrylic Wallet & Keychains

Hello everyone!

This is my first post on the community forums having recently joined the Glowforge Team. I’d to say a quick hello and share the first projects that I made on my first day in the office.

Originally hailing from the UK, I am currently working for Glowforge as a Project Designer and am one of the lucky few who is paid to shoot lasers all day!

I’m a skilled designer and maker across a range of materials and processes, and amassed a diverse portfolio of projects including: custom molded headphones; hand built bicycles; small furniture and bespoke leather goods.

If you’re interested in seeing some of my work, take a look at my website on my profile and keep an eye on my forum posts; I’ll try to regularly post what I’m making!

––––––––––––––––––––––––––––––––––––––

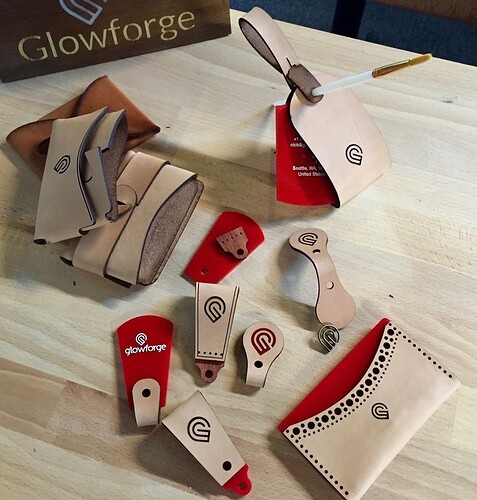
As promised, here is a handful of small projects I made on my first day. These all use 5/6oz veg tan leather and 1/8" acrylic. The white text on the acrylic portions was simply an infilled engrave with acrylic paint; It really helped the engraving to pop!

The wallet-like things on the left are a design I’ll be perfecting in the coming weeks. Its made from a single piece of leather and folds to make a 3 pocket card holder with a leather loop under which cash or receipts can be tucked. Best thing is that it’s assembled using a slot and tab, so no glue or thread required!

The large holes in the keychains and luggage tag will accept screw posts for assembly, but unfortunately I didn’t have the correct post length on hand when the photo was taken.

You might also notice that the ‘lightbulb-shaped’ keychain has a red Glowforge logo. This was a piece of inlaid red acrylic. it’s a subtle but nice detail and would work really well against a darker leather.

Please let me know if anyone has any questions and I look forward to talking with you all soon!

Nick
44 Likes

I’m curious about this technique, and how it was done on the leather…

I found this on youtube, makes sense with the masking. is this how your white letters were done? or is there another way?

2 Likes

Very nice!
I especially like the idea of the wallet/card holder. Slot and tab assembly with leather is something I am definitely going to be trying when I get my GF.

2 Likes

Hey jbv!

I only applied this technique on the acrylic components on this occasion, although you could apply the same technique if a flexible ‘paint’ or infill material was used. You can find acrylic leather paints made by fiebings or similar that would likely do a great job. As the laser produces a lot of carbon in the engrave, I’d recommend you clean out as much carbon as possible and probably apply a white base coat to ensure your color pops.

  1. Cover part with transfer tape.
  2. Laser engrave design
  3. Keeping transfer tape in place, in fill design with desired finish.
  4. Remove transfer tape and enjoy!
9 Likes

Thanks areader154!

I’m a traditional leatherworker by experience so being able to experiment with these new construction techniques is really exciting!

1 Like

Welcome!

Ill take one of those Glowforge keychains! I need one and that is beautiful.

1 Like

I’m going to have to try this technique. I had not thought of leaving the transfer tape on to do the infill. It’s a good idea.

4 Likes

I love these, particularly the idea of receipt pocket. No more purse full of receipts for me :). In the meantime, how did you attach the leather to the acrylic? Glue?

3 Likes

Welcome to the team/community!!! Fantastic collection! Thanks for sharing! So cool. Love the idea of putting holes in the leather as a design feature. Genius.

Hello Nick, welcome!
Nice work, thanks for sharing.

ah man, these look great! Is that a metal glowforge lapel pin?

Thanks Morgan!

In this case I used a CA glue and accelerator. although this was only a temporary solution. Ultimately, there would be hardware or stitching that would join each assembly/sub assembly.

CA glue is too brittle to be a permanent solution although with a textured surface on the acrylic, it may be possible to achieve a good bond with contact cement. Depends on whether any force was applied in a ‘peeling’ direction as opposed to a sliding direction really

2 Likes

Thanks Phillip!

I assume you mean the small skinny Glowforge logo?

That was actually the waste material left over from cutting out the Glowforge logo out of one of the keychains!

1 Like

Welcome Nick!
Awesome work!

What is the part on the bottom left? It looks like leather wrapped around a piece of acrylic? Another wallet design?

I’d love to hear the results you get from the contact cement, and the particular kind you use. Gluing leather to nonporous materials is the bane of my existence.

3 Likes

@morganstanfield, My neighbor next door is a knife maker and uses Barge All Purpose Original.
Also my buddy is a pediatric orthotics and and uses it all the time.
Might not be the safest stuff, but I hear it works great.

2 Likes

Have you tried scoring + barge?

1 Like

Ha, I think you posted like 1ms before me. Anyways, this stuff is great. I keep quite a stock of it and use it all the time on my leather projects. Its pretty amazing

1 Like

LOL! Great minds.

Thanks for the replies, @spike and @takitus. I’ve always avoided Barge because of the toxicity, but I’ll keep in mind that your peeps have success with it.