I keep failing to burn through the masking tape at the top of the design (engraving from the bottom up as is standard).
See attached.
Anyone know of better settings than the proofgrade one?
I keep failing to burn through the masking tape at the top of the design (engraving from the bottom up as is standard).
See attached.
Anyone know of better settings than the proofgrade one?
Can you upload the actual image you are sending to the Glowforge? (I’m actually asking for a reason)
Which ProofGrade engrave setting are you selecting?
I had the same issue using PF maple hardwood SD engraving. The setting seemed under powered.
(This jpg looks a a bit darker when uploaded here vs what it looks like in Corel.
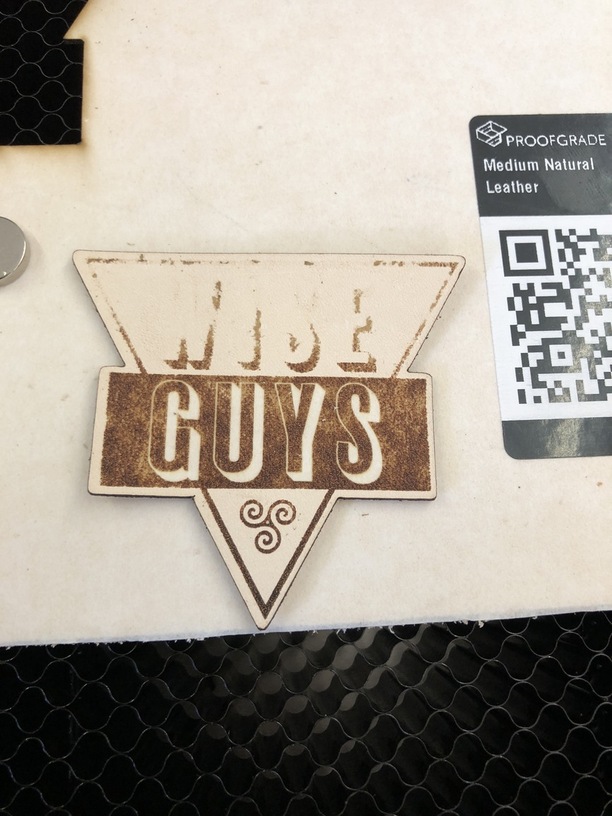
top w/masking still on, bottom off. Didn’t make it through most of the masking.
The reason that I asked is because the Draft and SD Graphic settings use vary power, so it’s scaling the power in relationship to the grayscale value of the pixel.
The HD Graphic setting uses Convert to Dots, which will use the same power, just dispersing the dots further apart for lighter values.
SD and manual vary power is my are my go-to settings that I use 80% of the time. I’ve only been doing acrylic B/W engraving for a few weeks and this is my first wood engraving in a while, but the setting seemed to change for the worse. This is not the result I expected.
For leather, I usually remove the top mask since cleaning up after is pretty easy.
The settings itself hasn’t changed in quite a while, so far as I remember.
Dan mentioned a bug and change in how they were interpreting grayscale values, but I believe that was fixed months ago (before the new year). That said, yours looks fairly dark (I haven’t measured the pixels).
Just in general, not to you, but I would imagine that the lower power engrave settings (either manually setting a low power or low power achieved through vary power) would be very susceptible to dirty optics. You might still be able to get a cut with optics on the fringe/slightly dirty, but I would imagine that the power loss at very low power levels would be very noticeable.
But I also use my own settings since I prefer less power than the PG settings (probably related to removing the mask).
Thank You, JBManning - I used proofgrade leather - the one that is shipped with the collection - and automatically recognised by the camera. The setting was HD Graphic (since it was graphic and in a fairly high resolution).

I think the image is black/white - but I didn’t actually test that. Should have, should have.
The spooky thing is the way that it starts out great, and then deteriorate. At first I thought it was the leather lifting and curling. So I stopped and redid with magnets holding it down. It was the same.
Btw: Why does the machine cancel, when I opened the lid instead of pausing? First laser I have seen with that response. Is there no pause feature?
I don’t think I have more than an hour or two of runs on it. I know the air support is a bit weak on the ’
forge, but still - lens ought not to be touched by smoke at all.
Correct
What I do to get consistent results on leather:
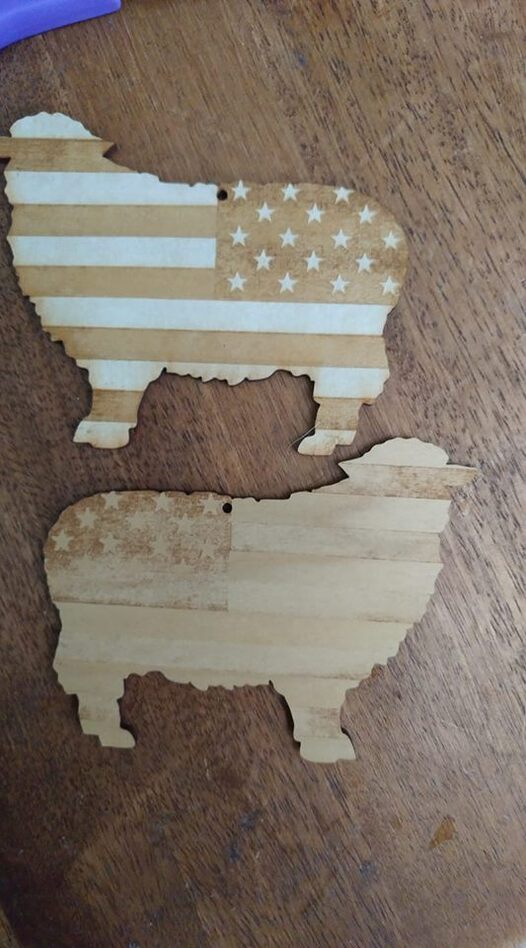
Or you can test it on some draftboard, which stays flat. The fading of the engrave might have been due to some variance in the material - leather bends a lot. You really have to make sure you have it tacked down perfectly flat.
Hey Jules
Thank you, but that does not seem like a usefull approach - there is no way for me to anchor the leather strongly enough to allow me to detach and re-attach masking tape without moving the design just a little bit.
Further, if I could cut and replace masking tape precise enough to do what you suggest, I would not need a laser cutter. 
I think I will have to find a setting that’s better than the proofgrade and burn all the way through in one go.
I will test if there is a heat issue or other with the machine, trying to do the engrave on a piece of plywood.
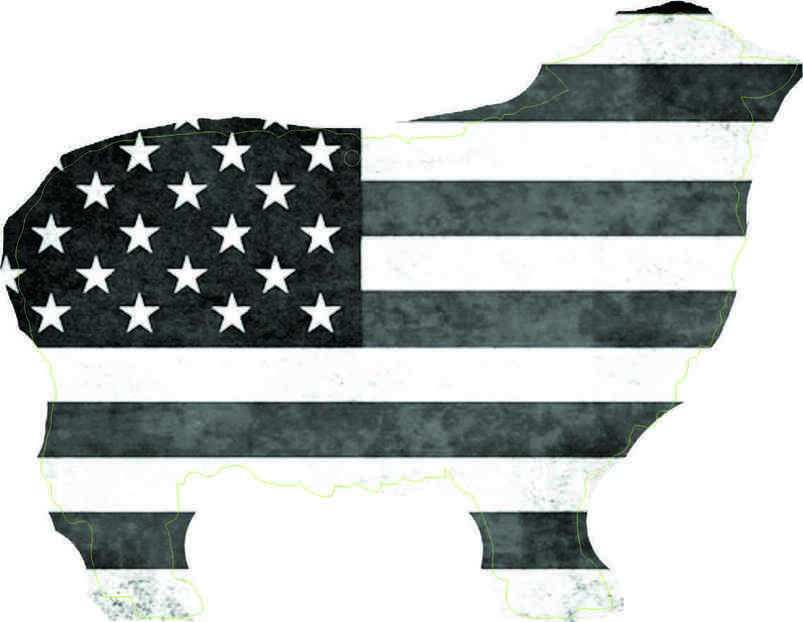
These are the honeycomb pins she was referring to:
With those you should hopefully be able to align and hold down the leather in a specific spot.
Edit: well, this link has the actual design files
You’d obviously have to remove the masking before anchoring the leather, since it takes some pulling. Just a rectangle roughly big enough for your project. Then tack it down, score, stick the rectangle of masking back on (which you CAN do without moving anything, pretty easily), and finish the cuts.
Thank you.
Yes, I can easily see how that is possible.
But then the entire idea behind proof grade materials and their matching settings are void.
I might as well just purchase much cheaper components, if I have to apply masking tape and set my settings manually. 
I’ve found that this (engrave without masking) is more true of leather than other materials. Still there are some images that work better without masking. For leather though, I don’t think I’d like the result if they boosted the power to reliably make it through the masking because I just prefer the lighter touch on leather.
Nothing in my reply mentioned manual settings. And as for masking, leave it off for the whole job if you prefer, it just means a little extra cleanup.
There’s no way to keep masking from obscuring engraving details, whether your material is PG or not. They had the option of leaving it off everything and making us apply it ourselves, or putting it on everything and letting us remove it when we wanted better precision details. Frankly, I’m very glad they chose the former.
The vast majority of what most of us do involves cutting, which works great through masking, and the masking saves us a ton of work. Peeling a little off now and then for finer engraving details seems a whole lot easier than buying non-PG unmasked materials and doing everything manually.
You can also continue to just use the Proofgrade settings and leave the masking on the leather. They have to be set stronger to burn through the masking and adhesive. My personal opinion is that it is too hard to get that just right all the time, and that the melted adhesive goop is too much of a pain to deal with, so I take it off.
You do want to make sure that you have the leather pinned down flat. (@drelleum posted the link to the honeycomb pins above.) You won’t get consistent results if there is any wobble in the leather.