I know there are discussions about this, but I haven’t seen an answer to my question below. If there is, please link it! Thank you all for the help!!
So I’ve had a repeat issue with a few different materials (wood and leather mainly). My engraves look amazing, the score lines are perfect. But when the GF goes to cut, it doesn’t cut all the way through. I’m not sure what method I should use to solve this problem.
should I up the number of passes? (Side note: does that cause problems if I cut the same line too many times? And if so, what problems?)
should I increase the power?
should I increase the speed?
I’m just not sure which setting should change (or in which order I should change multiple settings) in order to cut out my items without ruining something (the material, the item, the GF ) Any advice would be welcome!
Here you go, you’ll be able to get any material settings figured out with a quick process.
As for the rest of it, there are as many answers as there are materials. There’s no good one size fits all answer to those things.
That being said, generally you want to cut hot and fast, meaning at full power at the highest speed that will cleanly and reliably cut through. This is less true with extreme materials (i.e. delicate or thin, particularly thick, or more/less flammable materials), or in cases where supreme accuracy in the corners is needed (lower speeds yield crisper corners, it has to do with acceleration, search “clean corners” and read up). It’s a very deep topic and there’s no shortcut to reading through the threads on what you’re trying to do as you go. Want to know how to engrave and cut cork? Search it, and read all the threads you find. Want to engrave tile? Search. Want to get a clean edge on birch plywood? Test and search.
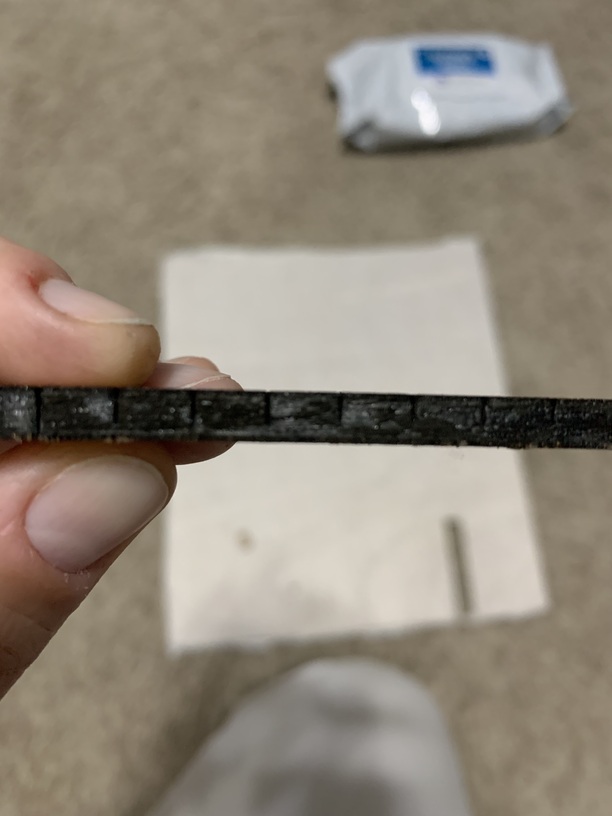
These are the shapes I’m currently trying to cut out of 0.19in plywood. The top pair were done with the PG settings for Thick Basswood Plywood (cut and engrave). The bottom pair were done with the same engrave settings (and didn’t fully engrave in a few spots; any ideas about that?) and cut settings of Spd:182, Pwr: full, 2 passes, FH: 0.209. Neither set cut all the way through; there are no marks whatsoever on the back. So HERE’S my question
Where do I start with choosing settings for your “test shape”? I thought for sure that the second set of cut settings would do the trick no problem (the original post I got the idea from used Spd:155, Pwr: full, 1 pass, FH: 0.196 and everything cut with no issues), but obviously no. So now that I want to test this (cause I don’t want to waste any more materials) where should I start with settings? I don’t really understand the correlation between changing speed or power and what that’s supposed to do to a material. Any guidance you can offer would be SO appreciated!
What is the core of the plywood you’re using? If it’s an mdf core, then, in my experience, you’ll get more consistent results. A wood filled core will have voids and knots in it, causing areas to fail to cut through, and create inconsistent engraved areas. I typically use my phone flashlight to backlight and illuminate my wood filled plywood and mark any voids or knots that I can see so I know to avoid those areas. If you are using an mdf core style plywood getting these results can mean a handful of things ranging from the wood itself being inconsistent in thickness, the material not sitting flush, the tray sitting unlevel, your optics may need to be cleaned etc. It could also just be that your settings are needing to be refined even more, and unfortunately, this will require you to use more of the material you’re not wanting to waste.
In the past I felt the same when it came to testing, but now that I’ve got my own personal settings that work for the materials I use and my particular machines. Like evansd said, there are a ton of variables that you’ll have to work out, but it is helpful having us around to nudge you in the right direction.
I honestly don’t know what the core is. How would I tell? I’m using Luaun (Lauan?) plywood from Lowe’s.
With this test shape, where should I start with settings? I don’t know how low is too low to be useful or if I’m going to ruin something if I start too high
Lauan is also known as meranti plywood, it can be inconsistent to cut and chars a fair amount. 0.196 sounds a bit thick, most Lauan I see is more like 0.110, you might want to check that. You probably got the 5mm stuff and are correct, but still, worth a doublecheck.
As for where to start with my test shape, I have one that I use for 1/8" wood that is 150/160/170…240, full power, 1x. I let the height float (leave it on auto or blank). With a pro, 150/full is enough to get through almost any 1/8" wood except ridiculously tough exotics like ironwoods, rosewoods, etc. If you have a basic I might start at 130 and go up by 15 speed with each step, so 130-280.
THAT BEING SAID: my meranti cuts really easily, but again, I may have the 3mm stuff instead of the 5mm stuff.
Then use the set focus feature to set the height or manually measure (with your calipers probably) and enter the thickness. Since you never set specific heights in your test cut job, it’ll work with whatever material you throw at it.
Then let er rip. 150/full at the correct height should easily get through lauan, but it’ll probably be heavily charred. That’s why I don’t prefer lauan, it chars. Baltic has less character and doesn’t engrave as darkly, but it’s more consistent and doesn’t char.
In the future, you can search for lauan or meranti settings, like so:
This is probably a dumb question, but I would rather be sure - when you talk about changing the speed by 10s, is that for engraving or cutting? Just so I’m sure I have this right:
Numbers - score
Squiggly lines - engrave?
Outlines - cut?
or do you set the squiggly and outlines the same (both cut or both engrave) depending on what setting you are trying to determine?
Thank you so much for all your help. The thinnest wood I could find on hand at Lowes was 5mm/0.196 (I double-checked it with my calipers to be sure ). Also, I have a Pro as well. Any thoughts on why the setting for PG Thick Basswood Plywood wouldn’t cut through my Meranti plywood? My speed was faster than 150; would that make it NOT cut through?
You asked about cutting, so advice is in regards to cutting.
Settings for PG ply won’t work because it’s not the same material.
I use a fair amount of Lauan from Lowes for “scrap”/tests or painted projects (it’s really not very good material for anything that requires a nice finish). It’s close enough to ~0.2". I use 146 speed.
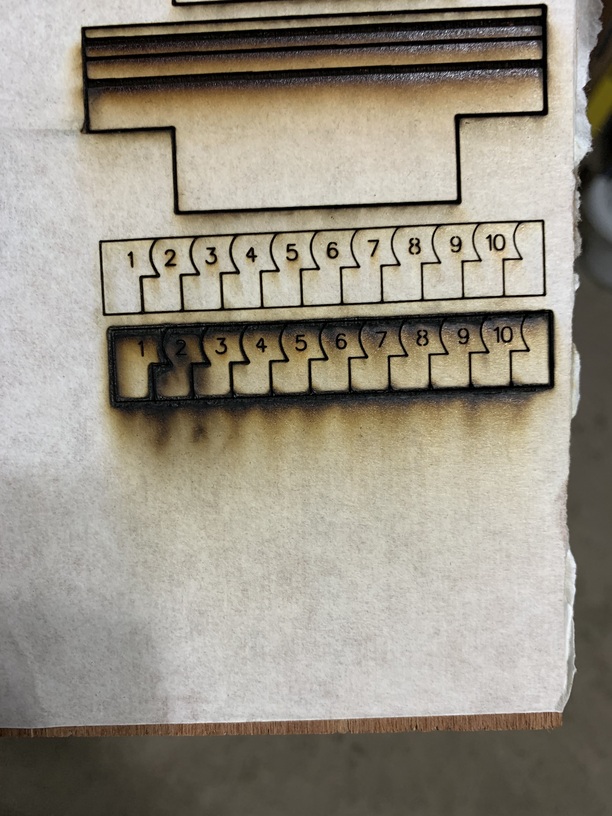
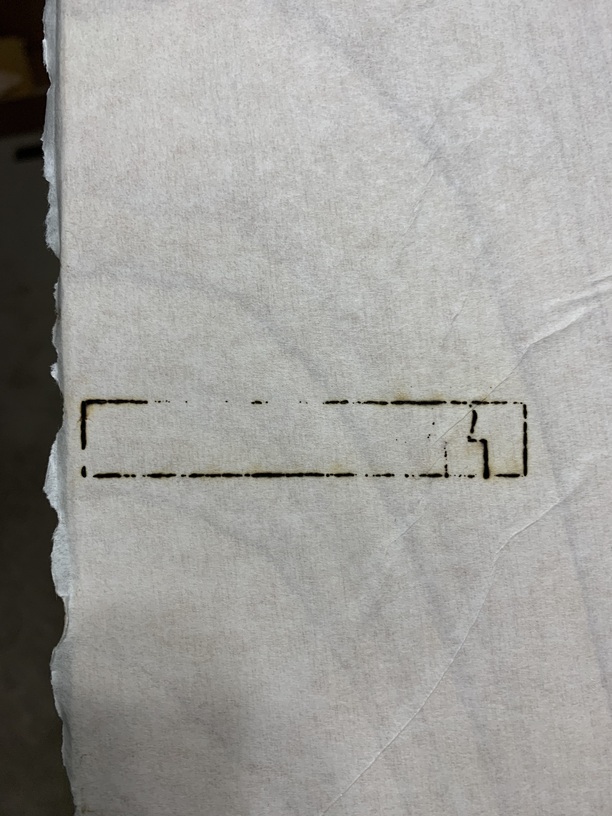
Ok! So I had to run through a few tests with GF Support, but I’m back to trying to find my settings for my 0.2in Lauan (Miranti) Plywood. I used @evansd2 Material Test shape and ended up doing two of them. The first one (on top) I used 125/21/auto for Score and 150-240/Full/auto Cut for squigglies, 150/Full/auto for outside edge. These were all done on a freshly cleaned Pro with honeycomb pins holding the plywood down. It looks great from the top, but as you can see from the back picture none of the cuts went through. There should be 2 shapes in that back picture; the shape you can see is my second print (the bottom, very burned looking one in the front picture).
So! I did a second one I used the same engrave settings and started my speed at 100, going up by 10s. Side note: I do not recommend this; the flame ups scared the life out of me. I also set the focus height at the caliper-provided thickness for my plywood (0.2in) for this one. I’ve never used the Set Focus feature before the first test and was concerned that the SF contributed to the cut not going through. You can see the results in the pics. Upside; the cuts kind of went through the board (but not all the way so I still can’t get anything out of this wood!). Downside: the front looks rough and watching it cut scared me (I don’t want to break my 6k GF Pro!!).
Any more advice? Suggestions? Other ideas? I’m beginning to wonder if I’m ever going to get anything to cut out of this wood, which stinks since I have quite a bit of this plywood that I was hoping to use.
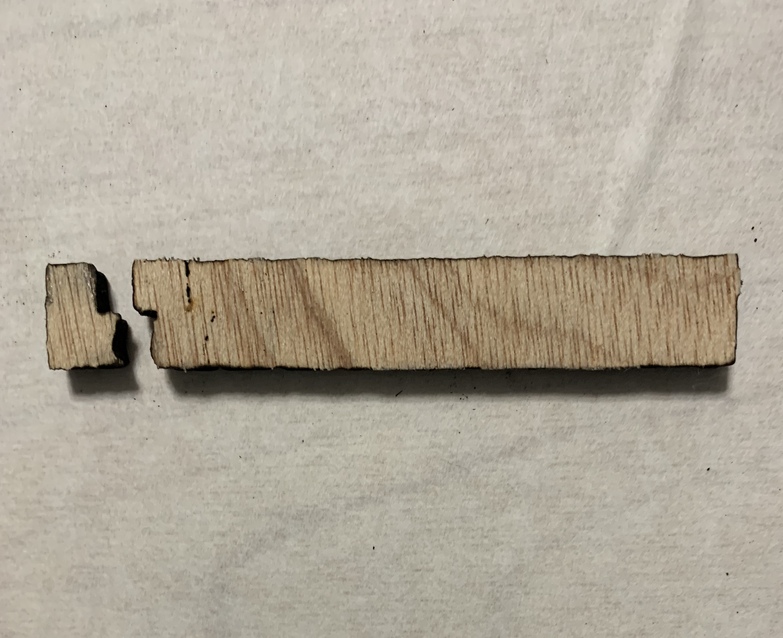
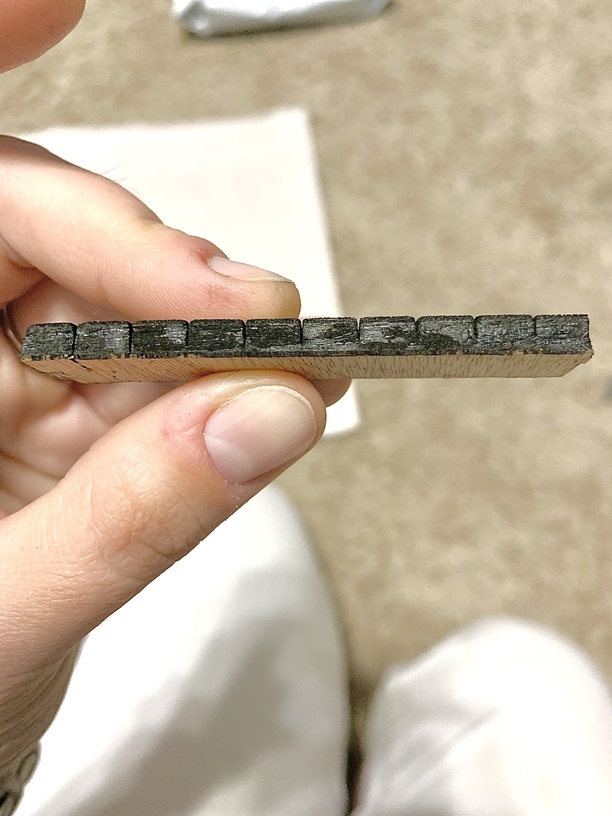
Update!! I was able to extract the second material test (with some help from an exacto blade) and below are the pictures. @evansd2 I see what you mean about the charring. I was never able to get a piece out of it and all the engraves I did looked really nice. Anyway…
From left to right: 100/Full/0.2/1 pass; 110/Full/0.2/1 pass; 120/Full/0.2/1 pass; etc. to 180/Full/0.2/1 pass
FWIW my settings for 1/4in baltic birch ply were 125 / full on a pro and I used auto focus. Some spots wouldn’t cut through, and others would cut fine but be blackened and require a lot of cleanup.
Plywood is tricky at best because of the filler in the middle. Some areas will be wood, others putty, and others are hollow. The fill on the wood you pictured seems pretty dense so 100 doesn’t seem completely ridiculous for speed.
Try a test with two passes maybe? Char is going to work against you here, the char layer eats up laser energy on the subsequent passes.
150-240 full 2x height 0.125 Might get you some results. Usable remains to be seen but that’s up to you.
This is why I stick to Baltic birch. It’s way more civilized. I very rarely touch what meranti I have left.
If you do hunt down Baltic, it can be super inexpensive if you source it locally. If you mention your closest city, someone might have a recommendation
My closest city is San Antonio. Is Baltic Birch something I can get at Hobby Lobby/Michaels? I feel like I saw birchwood there in their wood sections.
Should I be concerned about how many tiny flames I had while cutting out that second test? It’s the most I’ve seen on anything I have cut and made me concerned
Not really, no. You need a bit more specialty shop for that, rockler, woodcraft, or (for price) better yet a lumber yard. You can also get it on etsy, ebay, amazon, but as always buyer beware when using etsy and whatnot.
I get mine from Rugby ABP, they have lots of locations, but they sell full sheets and it’s on you to cut it down. I take mine home and cut it up with a circular saw. I just checked and there is a rugby in san antonio… 5’x5’ 1/8" thick sheets go for 10-13 bucks, it’s really affordable and will save you a lot of frustration.
Ideally, you’d find a supporter that has a panel saw and will cut the sheets down to size for you (it’s so convenient), but if you have the space and tools, cutting it down isn’t that bad.
They are. I had issues over the weekend with PG draft board not cutting so I went through a whole troubleshooting/cleaning process with GF Support. I cleaned all my lenses and emptied/cleaned the crumb tray.
It’s been so weird because so many people use Lauan plywood with little to no issues and I do the same things and can’t get the wood to cut to save my life. The engraves look lovely though.
How likely is it that I would be able to cut something out nicely on either a different section of the same board above or a different Lauan Plywood board all together? Basically, is this it for my results with this material or is it possible that this area isn’t working but another area might?
I don’t want to spend too much more time (been at this for a week now) if I’m doomed for it to never work, but I’m willing to give it one more go if there’s a chance I can actually make the finished products I’ve been trying to get.

 I’m not sure what method I should use to solve this problem.
 ) Any advice would be welcome!
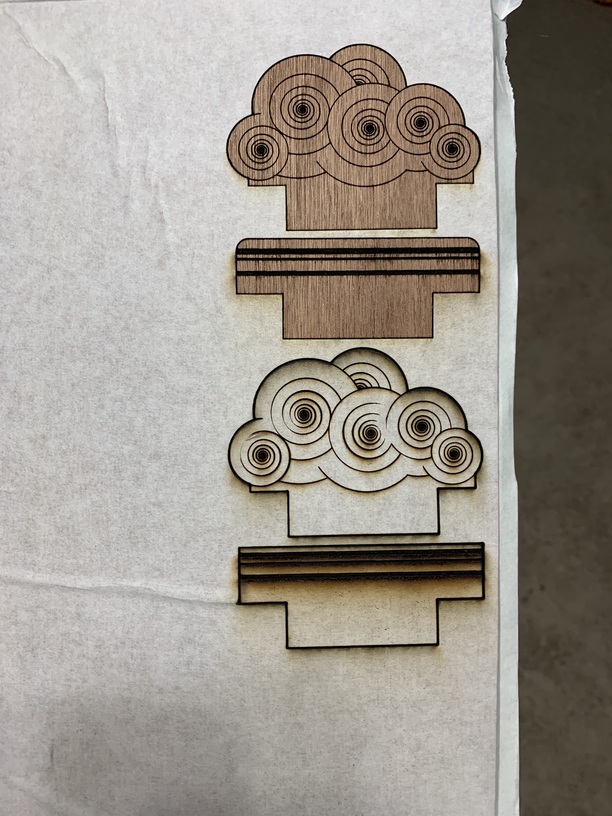
 - when you talk about changing the speed by 10s, is that for engraving or cutting? Just so I’m sure I have this right:
 ). Also, I have a Pro as well. Any thoughts on why the setting for PG Thick Basswood Plywood wouldn’t cut through my Meranti plywood? My speed was faster than 150; would that make it NOT cut through?