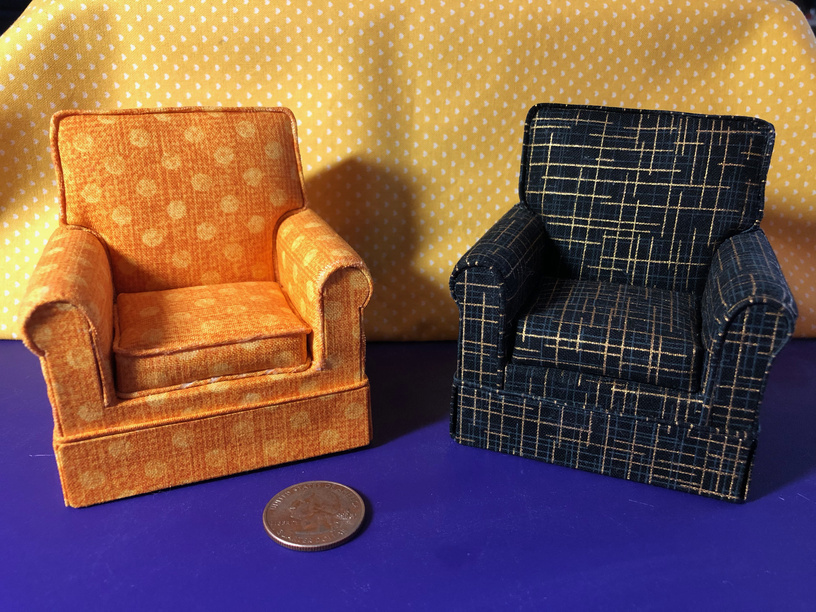
These don’t look “made on a Glowforge,” but I did use my GF to cut out all the foam core, card stock, and mat board innards for building them, so I think they still qualify as MOAG.
I followed this tutorial to build them. My foam core didn’t cut nicely; the foam part shrunk a lot, but fortunately none of it shows in the finished product.
Also, tiny piping is HARD, and having a laser cutter is no help with that at all!
Also, you can control foam core shrinkage a lot by using as low of power as you can. I’m doing a lot of it for model airplanes and I take three passes to cut completely through.
Another trick you can do with the stuff is to make a deep score farther out, and then peel the foam away leaving only the one sides paper that can wrap around and be glued down.
The problem with this is that now I have two tiny chairs just sitting there by themselves. So I feel like I need to make tiny throw pillows, and maybe a tiny Afghan. And a tiny side table, with a tiny lamp. And some tiny books. Which means then I’ll need a tiny bookshelf…
Oh, I love these chairs! I’m a huge fan of miniatures. You did a really stellar job, especially on the piping. You really should make a whole shadow box scene with lamp, tiny book, kitten, ball of yarn, the works. You can even make the box to put it all in.
Yes… you’re going down the rabbit hole I used to go down a lot… now only occasionally. Your grandkid is going to love it… that is if you’re willing to give it up.
It’s foam core – foam sandwiched between two layers of poster board. They sell it in our hobby store right next to the poster board. @markevans36301 has posted about using it in Beyond the Manual.
Initially I tried to do it the way the tutorial says, where you put glue on the edge of the fabric and line up cotton crochet string along the very edge, then use your fingertips to roll the fabric over the thread, and then trim off the extra. Riiiiight. If you have 1/12th scale fingers, that might work. I couldn’t get the fabric to want to roll, and it would come unstuck after I trimmed it, so I ended up just rolling the thin strip of gluey fabric and the string between my fingers and hoping it would mostly cover the string. Most of the orange chair’s piping was done that way.
Then I tried another way. I spread a layer of glue on the edge of the fabric like before only a bit wider, then laid the string into it and folded it over. I used my fingernail to shove the thread all the way into the fold and make the fabric stick together, and then ran my fingernail back and forth along the string keeping it pushed in while the glue set. When it was stuck good, I trimmed away the excess fabric to leave just the fabric-wrapped thread. It comes out more flat than round that way, but I think it looks finer. The piping around the lower part of the orange chair, and all the piping on the black chair, was done the second way.