I had a Kurta with 12 buttons , and the senior architect would sketch designs on grid paper at 8"per square, so it was easy to set the snap at 8" and sketch them in seconds or minutes. It was my own tablet so mine was the only one in the office, so as I could use it I had the hottest machine in the office with a whole 2 meg of ram. ![]()
1 Like
WOW! Thank you for all of this information. You are inspiring me for sure! Also, that Wenge/Padauk combo…out of this world. Love it
2 Likes
Hey, I’m new here and don’t know if the OP is still posting or if anyone can help me. But how do you get the patterns so symmetrical? I kind of get how to make two shapes interlock from the posts, but I don’t know how to make it perfectly symmetrical on both sides like that fancy double curve. It’s insane, but I can’t imagine how to do it. I could see some program effect that mirrors what you do on one side on the other so when you manipulate it on one side, it will do the exact on the other, but have no idea what its called or what I’m even talking about.
2 Likes
Basically the easiest way to do it is to use the exact same curve. You could do something like a Boolean to extract the negative but why bother? Boolean operations can only impart some level of error, whereas using the same curve is guaranteed to be identical. Just break your path at the ends of your curve, separate it into two objects, copy and paste the curve and voila, build your other side to fit that new copy.
I forget where I discussed that technique but if you search for my other posts that are linked in this thread, specifically about trays, you’ll see a lot of talk about how I do it.
2 Likes
Aha! I talked about it in this very thread!
Good luck ![]()
1 Like
Hi Chris, welcome to the forum! @evansd2 is still here so he’ll be able to tell you how he did it. I use Coreldraw and it has a symmetry feature that does exactly as you describe which makes it pretty easy to do. (I’m going to guess most draw programs have a similar feature.) Before I had the symmetry tool I would make copies of my shape and align them using guidelines. It was tedious, but worked.
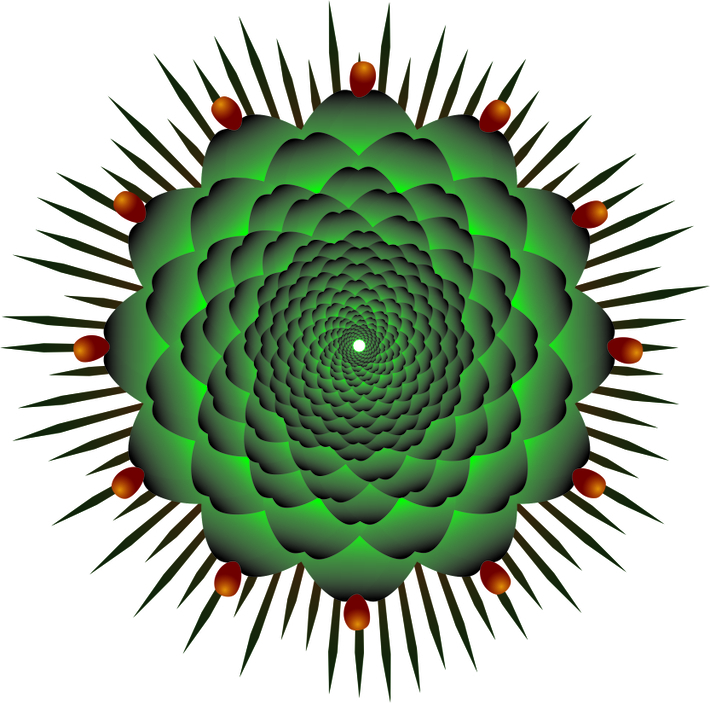
Just as an example, this was made using just one pedal and applying the symmetry. It’s fun stuff. ![]()
6 Likes
Inkscape also has a number of tools to place a fixed shape along a line either single bent in any direction or copied as so.

8 Likes
That’s really cool! I’m hoping I can figure something like that out in Inkscape so I can just learn one Program. But if I have to, then I’m glad to hear that is an option! Thanks for the information. I think I was able to recreate the swirls in that Maple/Padauk Box I only downloaded Inkscape yesterday, but had a few weeks on Illustrator in College years ago. It seems that Inkscape is a little more intuitive. The guide lines definitely make things much easier.
2 Likes
this is wonderful work
1 Like
Hey! Thanks for getting back to me. Your ability to create these patterns is really impressive!
I’m having a hard time grasping some of it is all. I’ve worked out the curves to make that entire box. I just made one swirl, then flipped it vertically and horizontally to get the full shape and paste it accross. I’m guessing it’s probably similar to do the other ones. But I just cant seem to figure out some of them. I’m going to keep at it. But So far I’m glad I’ve got some of it understood. Do you have a “Portfolio” of sorts? Your work is really great!
1 Like
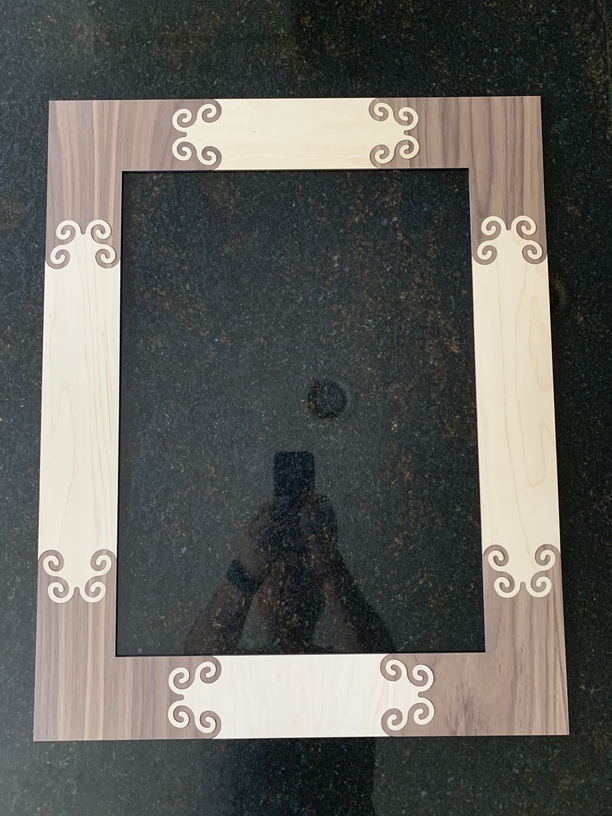
evansd2 work is incredibly impressive! I’ve since tried to replicate with some good success. I’m an AutoCAD user so I’m drawing linework in that and then “plotting” to a PDF for cutting. My biggest “issue” right now (and it’s not too much of an issue) is kerf for matching different species of wood. I’m building a frame right now out of proofgrade maple and walnut using a swirl pattern to connect corners to sides (post to come soon) and flipping pieces once cut usually takes care of the gap as the laser is really at an angle - that’s helped. I’m mounting these pieces to an underlay of hardwood for a sturdier frame, but this is the “decoration” on the front.
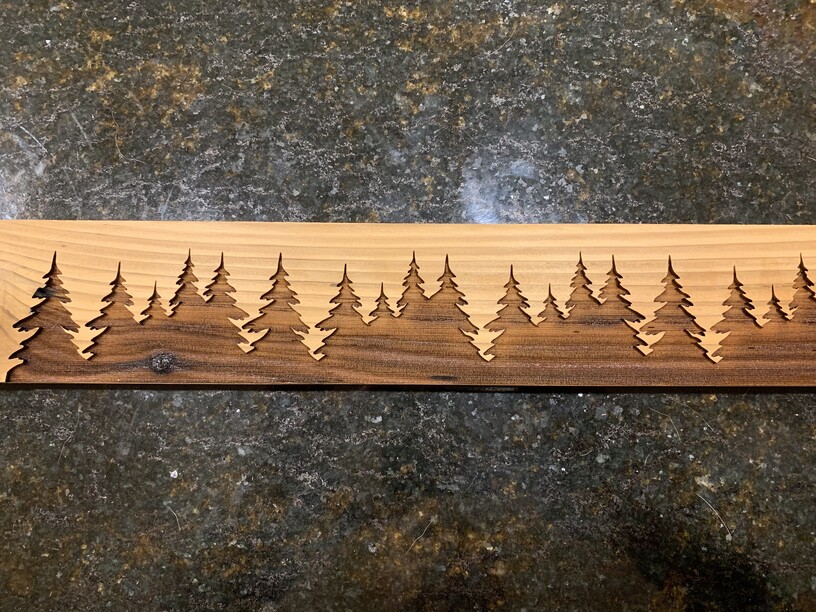
My next step is to follow this incredible post in dealing with the kerf and cutting some 1/8" stock I’m getting off of Ebay. I have another frame I made with an engrave of a pine tree forrest (came out AMAZING - I’m in the poly stage and will post pics soon) but want to use that same outline as a cut between wood species - just waiting for my stock to show up. I’ll cut both / mount to other hardwood to make the frame. So just about anything can be used to “join” different species as long as there’s a locking cut somewhere.
16 Likes
Those Trees look amazing. I think I’m starting to get the idea. I’ve recreated a really, really ugly wave. It seems as though it’ll take some practice to actually learn to curve a Bezier the way you want it, and Figuring out the start and stop points seems to determine the shape.
3 Likes
I am trying to follow your steps but I am in the process of learning illustrator. I created my rectangle, converted it to a path, I added to anchor points (one on the left vertical side and one on the right). and now I am stuck.
I basically just have a rectangle with a line down the middle of it LOL. Any help with this would be helpful. I am just trying to create those beautiful wave patterns you have.
1 Like
Actually I managed to created a very simple S shaped and I am putting those together now to create the pattern!! I think I am okay with the super basic stuff. Thank you.
4 Likes
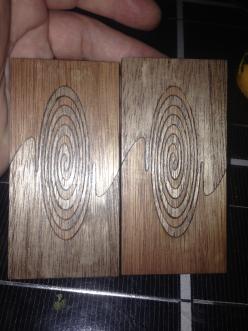
First attempt at one of these. the plywood material i use has a different color front to back so swapped them around and turned out pretty nice  . trying to make interesting panels for a box im working on and ran this test. Thx @evansd2 never would have thought to try something like this if not for this post.
8 Likes
Woo, those look fragile. Good work
2 Likes
it was pretty springy hehe. I thought it might be kinda neat to just glue the outside edges of these so the box would have springy sides. That one you made
Mind blowingly nice.
11 Likes
Thanks! It was actually really simple to design.
2 Likes
That photo still makes me drool a little.
5 Likes
Still I find it hard to imagine piles of such experiments lying about and not made into things particularly in a time of no Glowforge.
3 Likes