Been experiencing some problems cutting thru my acrylic/plastic material. My settings havent changed in at least 3-4 months and I have been cutting this material A LOT (and i really mean A LOT). So, that being said, what could be causing this? Maybe my laser getting weak? (GF Basic machine is about 5 months old). My settings to cut the material are 200 speed, full power 2 passes. The problem I am having is is not cutting all the way thru in some parts (its a circle about 2.5").
It kind of scores the pieces that are not fully cut to the point where I can snap the uncut parts (maybe it cuts thru about 85%-90% of the entire circle and the rest of it its pretty much almost cut but I have to snap it and this leaves some material attached to the edges, not a clean cut)
No matter if I send the cutting part of the job again (meaning 4 passes total instead of the regular 2). Something is not right, and if I slow down the speed then it cuts off-center and if looks like the cut is not straight like this I, it is more like this / (maybe not as much but is definitely not a straight cut, it is kind of tilted)
I doubt it’s the laser tube. I have had mine for over 2 years with no issue. Make sure all your lenses are clean including the one on the bottom of the printer head. If they are all clean and still not cutting through try reducing you speed to abut 160 and see if that works. PG cutting speed for medium (1/8) acrylic is 157.
No. In fact, probably less because right now you’re effectively going much slower since you’re doing 2 (or 4) passes.
Sometimes with thicker material 2 passes is good because the acrylic kerf fills back in behind the laser from excess plastic melt. For 1/8" you shouldn’t have that problem.
Hmm interesting. Also, I wonder if there is a way for the GF to cut the material (2 passes) at once then move over to the next cut instead of doing one pass, move to the next then coming back to the first one and do the remaining pass
Clean your optics. Make sure you haven’t missed any – there’s a list on the support site. Also clean your air assist fan. Not cutting all the way through is always my first indication I’ve gone too long without cleaning.
Here’s the support website page on “not cutting through:”
One pass should easily cut through 1/8" acrylic. I use the Proofgrade settings no matter where I source the acrylic and have no problems at all. Best check your optics. Are you using set focus or inputting a height?
Hello, I tried using the Proofgrade cutting settings for the material I am using and for some reason improved a little (still not 100%). It used to work like a charm for 5 months in a row and I clean all the optics all the time. I just did it again and also calibrated the camera. Problem persists. Makes me think maybe it has to do with the latest update? I dont know.
I select the set focus every time before I engrave/cut.
Something that comes to my mind is maybe now it is more accurate than before (maybe due to an update or maybe a little less accurate than before?) and is not cutting all the way because my material has ADA tape on the back (2mil thickness) and pretty much that is the problem I am having, it is cutting almost all the way but I would say about 99% of the way. How could I compensate for that tape on the bottom of my material? Maybe the set focus is not detecting such a small difference in height?
I’m sorry that you’ve run into some trouble with prints not cutting through using acrylic/plastic material. It’s nice to see fellow users offering some tips and advice already, and I’ll be happy to help with troubleshooting. I noticed you had opened another forum thread for an issue when you try printing using Set Focus, and will address that in this thread as well.
First, to address any cut issues, please do the following:
Print the Gift of Good Measure on Proofgrade material, using Proofgrade settings.
When the print finishes, leave the lid closed and wait until the fans stop and the picture updates.
Check the completed print:
If the Gift of Good Measure fails to cut through, take a photo of the front and back of the print and attach these photos to your reply.
Next, I’d like to address the error message when you try to printing using Set Focus:
I extracted the logs from your Glowforge and noticed some trouble communicating with the printer head that can result in that error messaging. There are two key connections I’d like you to check for me.
Could you please do the following?
Turn off your Glowforge.
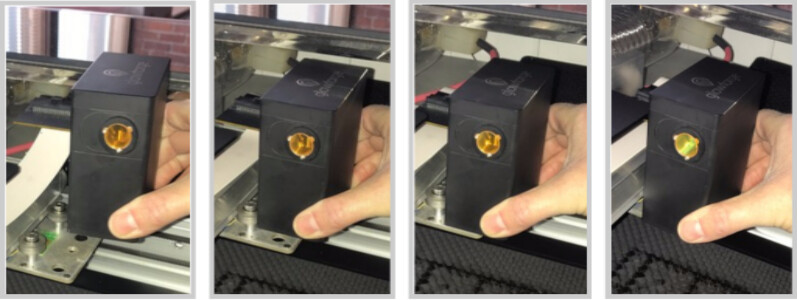
Holding only the finished black surfaces, grasp the printer head as shown. Pull gently up and back to disengage the magnets and remove the head.
There is a small tab in the center of the wire ribbon. Push down fully on the tab to release it, and gently pull the wire ribbon plug from the printer head.
Pick up the printer head and wire ribbon. Make sure the tab on the wire ribbon is facing up. Slide the ribbon back into the head until it clicks.
As shown, lower the printer head over the metal plate so that it rests next to the two round posts. Then push it gently away from you – you’ll feel a “click” as magnets pull the printer head until it sits snugly atop the metal plate.
Take a photo of the circuit board. If the cable I’ve indicated above with the red arrow appears to be loose, please reconnect it and try printing again. This cable should ‘click’ back into place.
nothing is unplugged or not connected properly. no bent pins… all good. this is just random set focus failure
If I set the focus on the center of the bed or any other area EXCEPT the right bottom corner, it will fail. It only will read the right bottom corner, otherwise it shoots 2 laser beams and fails after it goes back to home and throws that message. Also, sometimes it works perfectly then I does it again, it is very inconsistent and frustrating none the less. If I turn off the machine and turn it back on it gets fixed only for one or two times, then it goes back to me having to set focus at least 6 times to avoid the error
Hello Brandon, I need tech support to contact me ASAP. Even my proof grade material (medium draftboard) is not cutting all the way thru. check my logs please 3:15-3:20 pm TEXAS time. I tried to cut a square with a circle inside and it didnt cut all the way thru. Using the PG settings… something is not right!