Trying to cut a large design on PG Medium Draft Board and the forge is not cutting all the way through along the right side of the material. I checked the forums and I ensued the crumb tray was seated flush. I also checked to make sure the bottom of the forge was clean and nothing was interfering with the crumb tray. I also made sure the material was laying flat.especially before testing some more smaller designs posted to the right side of the material with no luck. I also cleaned the lenses worn the provided alcohol wipes and still no luck. Any one else seeing this issue?
Yep, those are all the right things to check. Sometimes they still don’t quite make it through. Which is not much fun. 
In the future, if you get a cut that doesn’t make it all the way through in one pass, you can save the print if you just hit the Print button again to repeat the cut…provided you do not move either the base material on the bed, or the image on the screen. Even if it looks like the image has shifted…do not move it. It will cut in exactly the same place.
It won’t help for that piece, but the next time, since you know that draftboard didn’t cut all the way through, stick a note on that piece to remind yourself to slow down the speed a little, or test the cut by lifting with a pick to see if a second pass is needed.
3 Likes
That’s good to know but I had to pick up the board to see if it cut all the way through. I’ll see if I can use tweezers or something similar next time. But… Is this normal? Based on your response, it would seem others have experienced this? Yet I haven’t been able to find another similar post. It seems to me that the head loses laser power the further away it gets from the left side of the forge/secondary mirror? maybe?
Usually this is due to the wood slightly warped (make sure it doesn’t “rock” at all when flat on the tray. Also make sure tray is in the little divots (for the feet) inside the glowforge and that the piece of wood isn’t up on the side of the crumb tray (making it slightly ramped)… Just some possibilities (I’ve made a few of these mistakes) Hopefully nothing major !!!
1 Like
Usually it’s caused by either a very slight warp in the material (like almost too small to measure) or you can have variances in manufacturing…generally not on draftboard, although there have been a case or two. It’s not a common thing, but yeah there can be slight differences once in a while.
Here’s what I use to test to see if it cut through, and I wouldn’t be without it…these inexpensive picks are a Godsend. I use them for many things laser related…they’re great for cleaning out narrow engraves, lifting on a cut to see if it cut through, scratching up a surface before gluing…
1 Like
I always use magnets to hold down everything flat. So I can use a small piece of masking tape to lift each piece out. Wouldn’t use gorilla tape for that because it would lift the whole material.
5 Likes
I use tape also, in a situation where there are a lot of pieces to flip to engrave the other side, tape is a lot faster than a tool.
3 Likes
Ok, so after reading all of the comments (Thanks to all) I decided to use a tape measure to ensure my crumb tray was level to the rail where the laser head travels… Low and behold, my crumb try was off by about 3/4" of an inch on the right side. I wiggled the tray some more to ensure it was sitting center and re-measured. It looks level now.
I’m running a test cut now to see if this improves my final results. I also took a part a hard drive to mine the magnets to help hold the material in place.
4 Likes
That’ll do it ![]() Always check the divots under the tray to make sure they’re clean and that there’s nothing stuck to the little bumps on the tray that act as feet and then wiggle it a bit to make sure it’s seated correctly when removing and replacing it.
Always check the divots under the tray to make sure they’re clean and that there’s nothing stuck to the little bumps on the tray that act as feet and then wiggle it a bit to make sure it’s seated correctly when removing and replacing it.
3 Likes
Hold on… Nope, that wasn’t it. My test cuts still do not penetrate the material.
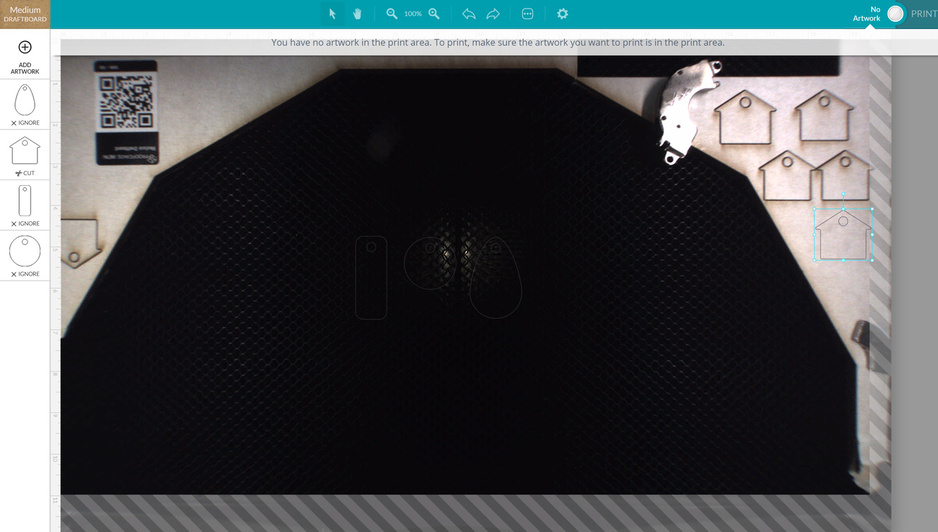
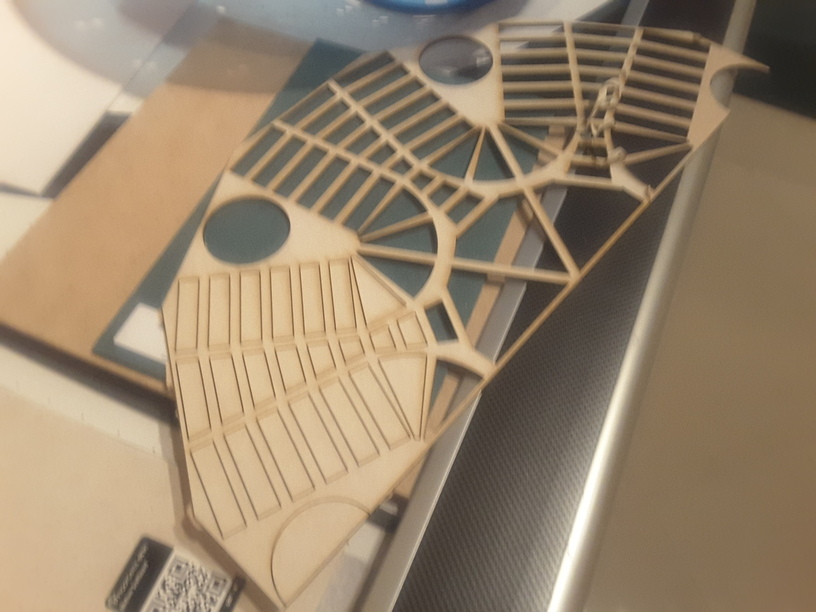
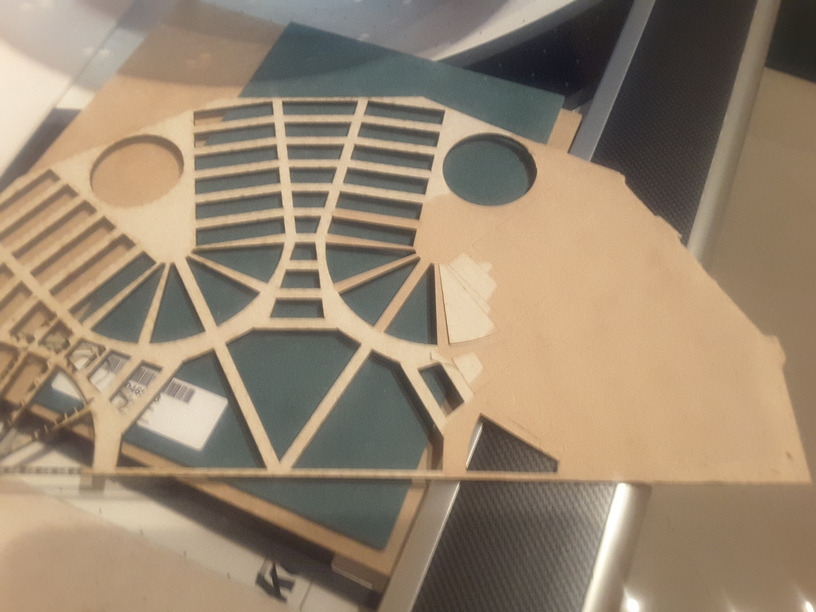
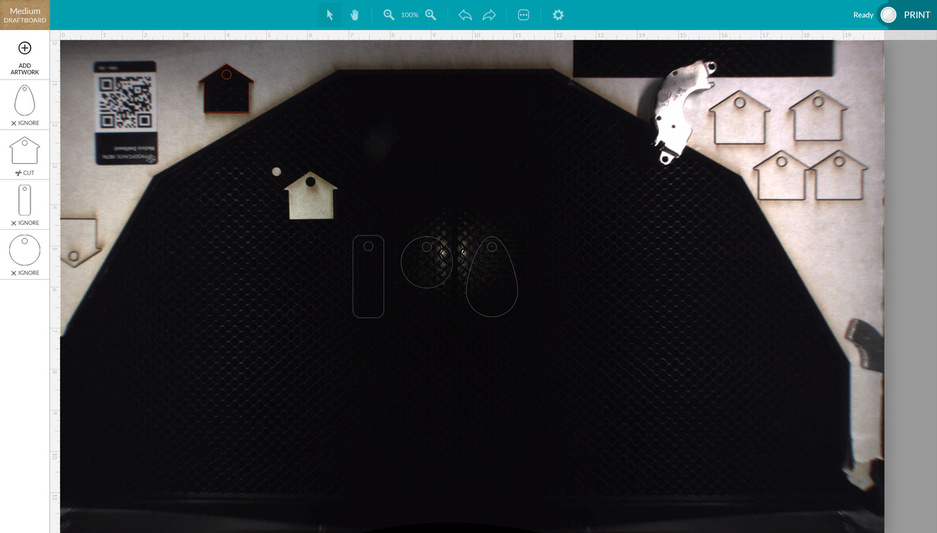
All of those key-chain houses along the right side of the image are not cut all the way through…
The material isn’t warped? Did everything on the other side cut?
Is the gantry level?
Yep. Here is a screenshot of the same key-chain house cut on the left side of the same board:
One thing I noticed standing over the machine is the kerf for the left house is very tight but the kerf for the houses on right are pretty fat in comparison.
The gantry appears to be level. I measured from the bottom of the gantry to the top of the crumb tray and the measurement taken on both sides are equal. So I’m not sure what else to check.
The head is losing focus on the right then. That thicker kerf is what happens when it’s defocused. It’s actually a trick you can use if you want a thick line but don’t want to waste the time engraving - defocus and run a score.
But that doesn’t help you now. It’s a Support question for sure. I’m at a loss if the bed is level and the material is flat and the gantry is level.
Nothing on the track over on the right side is there?
Yea, the material is flat and tight to the crumb tray and I only checked the gantry level with the crumb tray. I’ll have to shut it down and move the head and take some measurements off of the head in relation to the crumb tray in some spots to see if there is any movement up and down on the head.
How long does it take for support to respond?
I’d check it with a bubble level too - one of those torpedo types should fit in there.
They should be getting to this one today or tomorrow at the latest. Otherwise it will be time for an email (which gets an initial autoresponder that it might take 3 more days but generally doesn’t).
Ok, Support. I need your help.
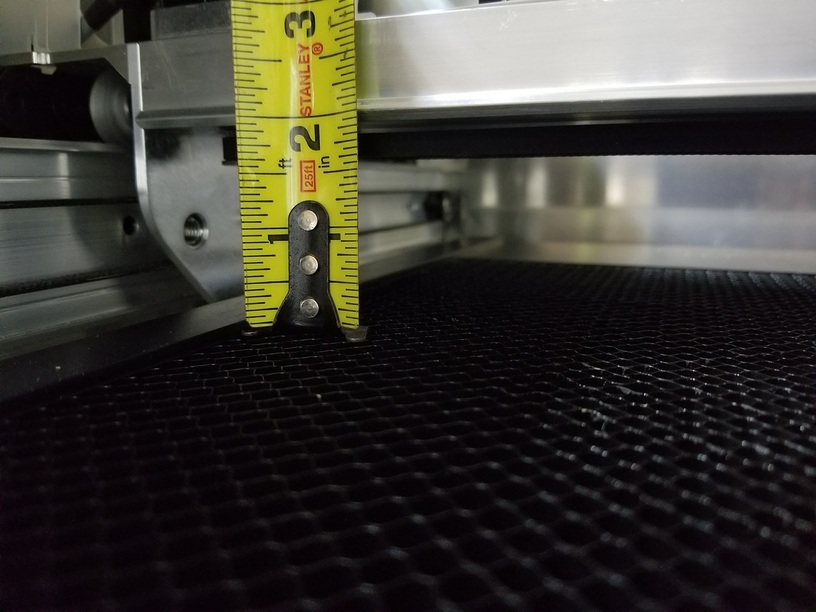
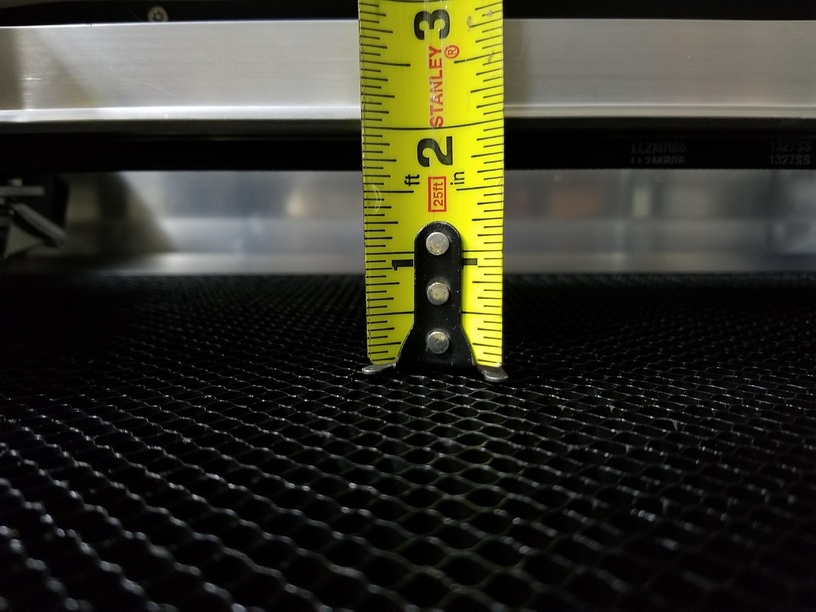
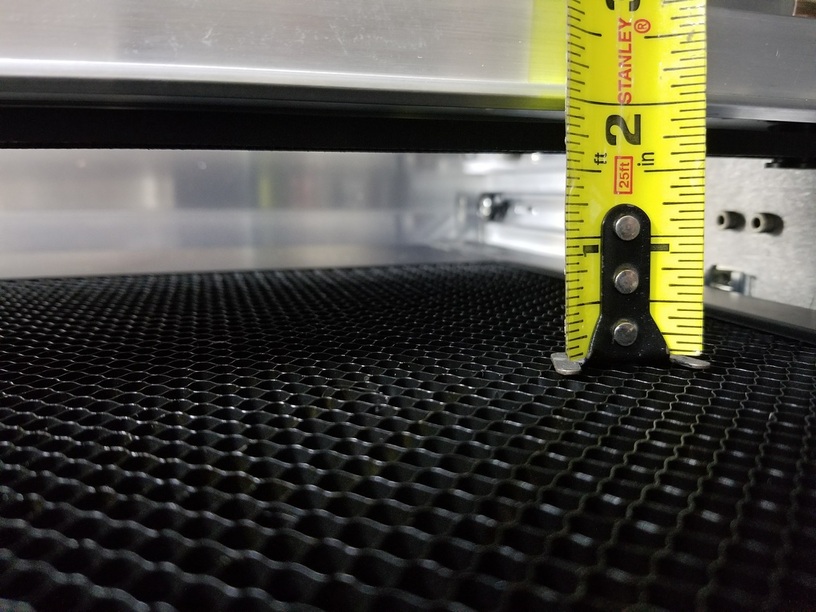
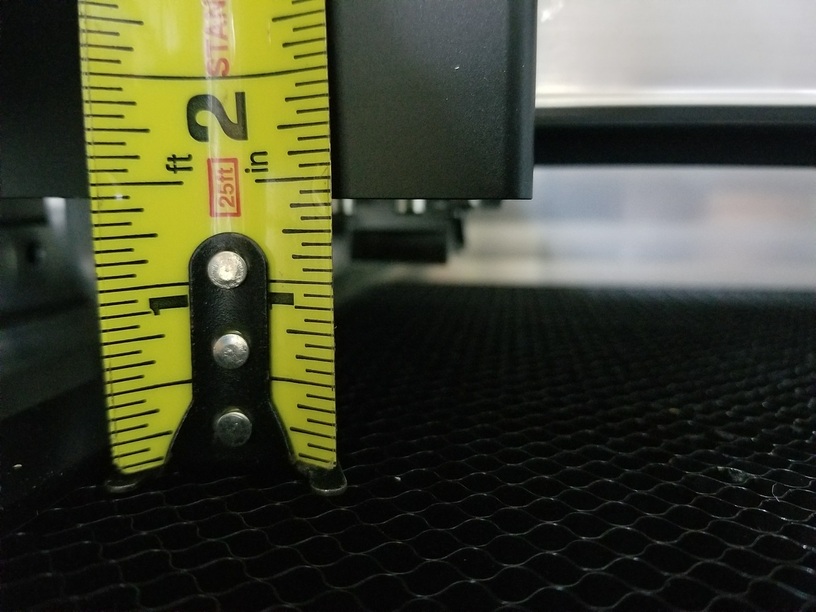
I took measurements and the attached photos show what I see. Everything appears to be level with the exception of the middle. The middle section appears to be of 1/32" ~ 1/16" of an inch off.
Overall View:

Left Gantry:
Middle Gantry:
Right Gantry:
Left Laser Head:
Middle Laser Head:
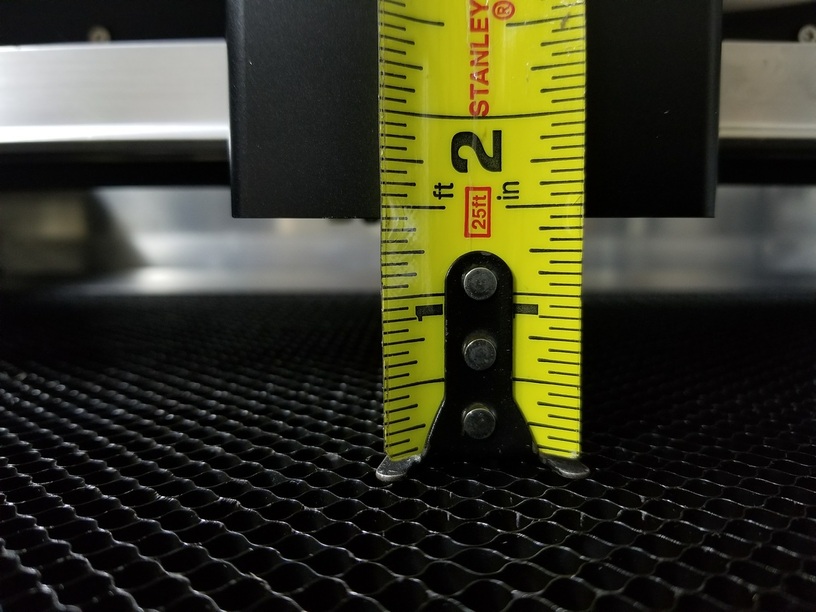
Right Laser Head:

But my issue is on the right side. The laser will not cut all the way through my material along the right third of the material.
1 Like
Someone else reported that their crumb tray was not flat all the way across. I believe Support replaced it for them.
1 Like
But my measurements appear to be ok. Although I only did measure across the center of the crumb tray. Maybe I need more of a sample size of the crumb tray.
I believe it does the focus adjustment in the middle of the bed. If that’s not the same as the sides, it’ll be off. Not sure why you’re not seeing an issue over on the left side though but if the center of the bed is a different height than the sides and your material is flattened on it (using magnets or whatever) then you’re actually changing material heights across the bed and have the same issues as warping would cause.
If you have a steel ruler - one of those 18" ones you can place it across the bed to see where any high or low spots occur pretty easily. If the bed isn’t whacked then there’s something wrong with the head travel as it’s clearly different heights in the center than the sides from your pictures.
1 Like
Since your baseline is measuring from the crumb tray, have you checked crumb tray flatness?
See: Crumb Tray Flatness