Proofgrade 1/4" Clear Acrylic: Bunny Cookie Cutter

One would think that I would be rather busy this weekend. Actually it isn’t too bad. Everyone else is busy with family. I only have one service each evening, and office was closed Thursday and Friday. So I thought I would make some cookies for the reception after our Easter vigil tonight. How about bunnies?

Well, I don’t have any bunny cookie cutters, but I do have a Glowforge and I have some 1/4" Proofgrade acrylic. Let’s see what I can come up with.

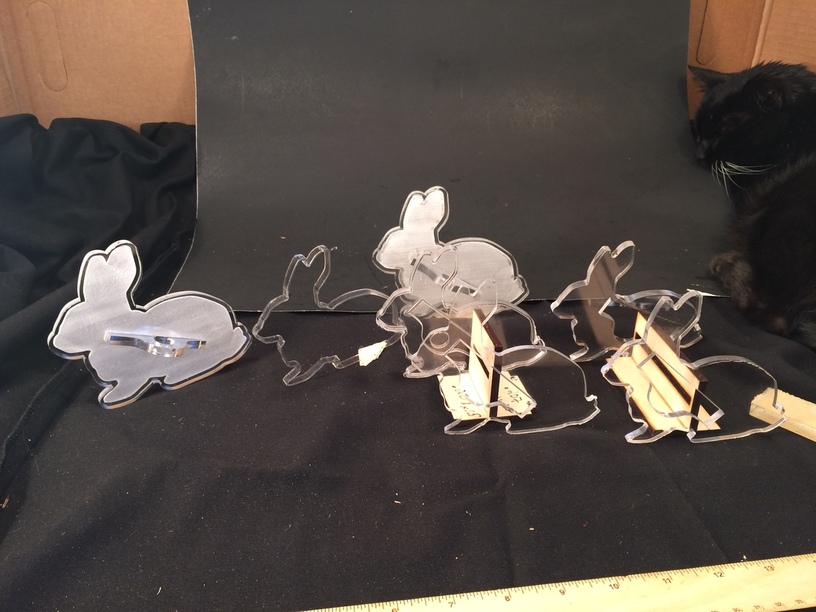
Can’t have just one bunny! They multiply fast!

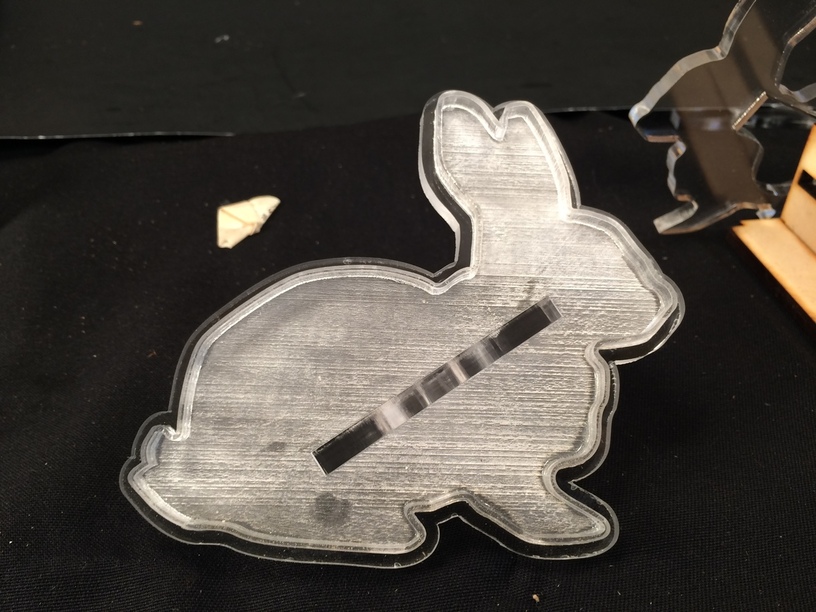
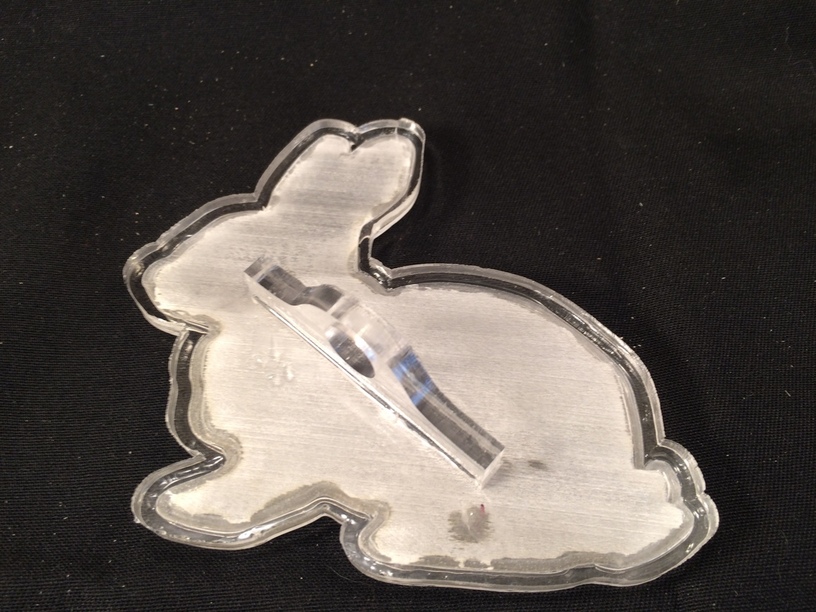
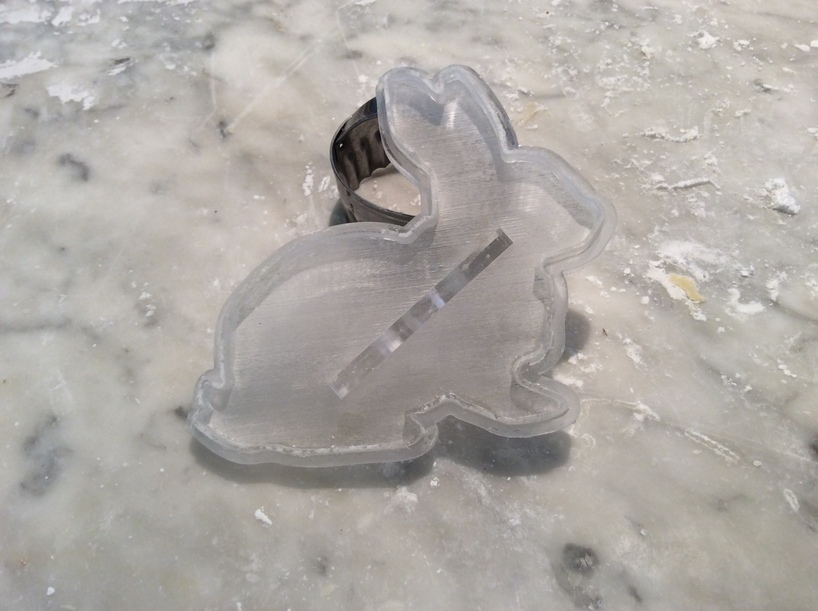
It’s one file that takes an hour to process (edit:mainly because of double pass engraving at 340 LPI), but when it’s done, just glue together and you have a durable, bespoke cookie cutter. This is the base of the cutter. Using the same technique we have learned to make inlays of letters using Inkscape, I simply put one outline of a bunny in and used it for various operations, giving each its own color.

The base has a 1/16" deep engrave in it so that with the acrylic “blade cutter” can be inset in the engraved pocket to give the side more strength. I engraved with full power, 340 LPI and full speed with two passes.

The blade is about 1.5 mm thick. When glued into the engraved pocket, it is pretty rigid and doesn’t seem like it’s going to break. There is an almost imperceptiable narrowing of the blade from bottom to top of the edge so it’s like it’s sharp, thicker at the base and thinner at the top from the way the beam goes through 1/4" acrylic.

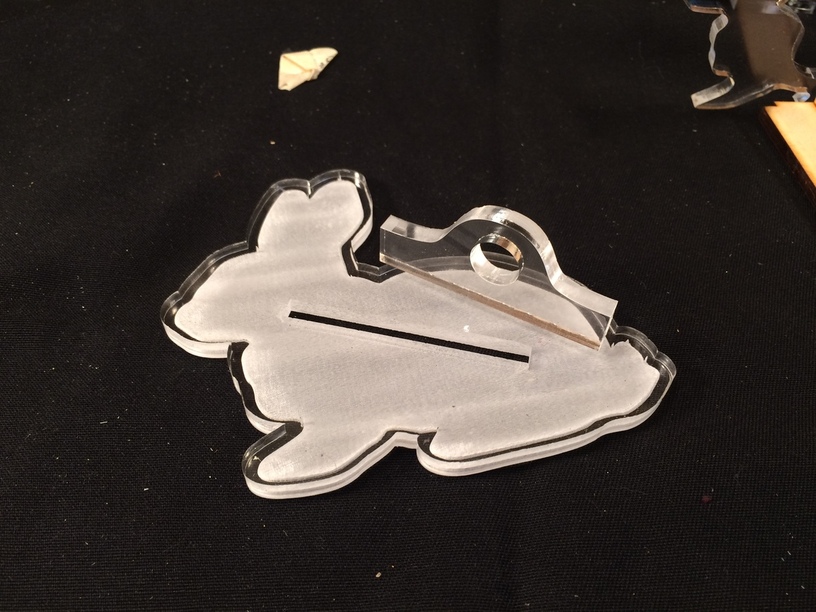
A little handle set into a pocket makes it really sturdy and easy to use.

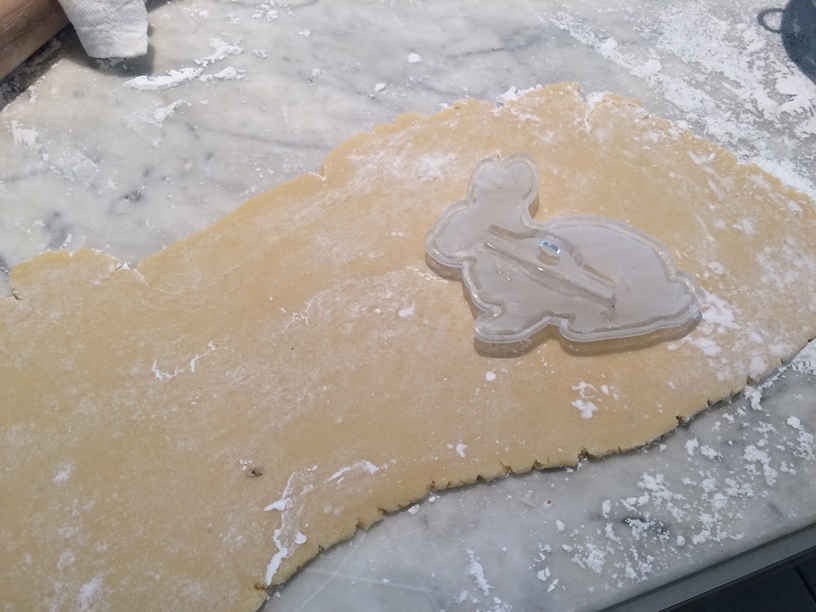
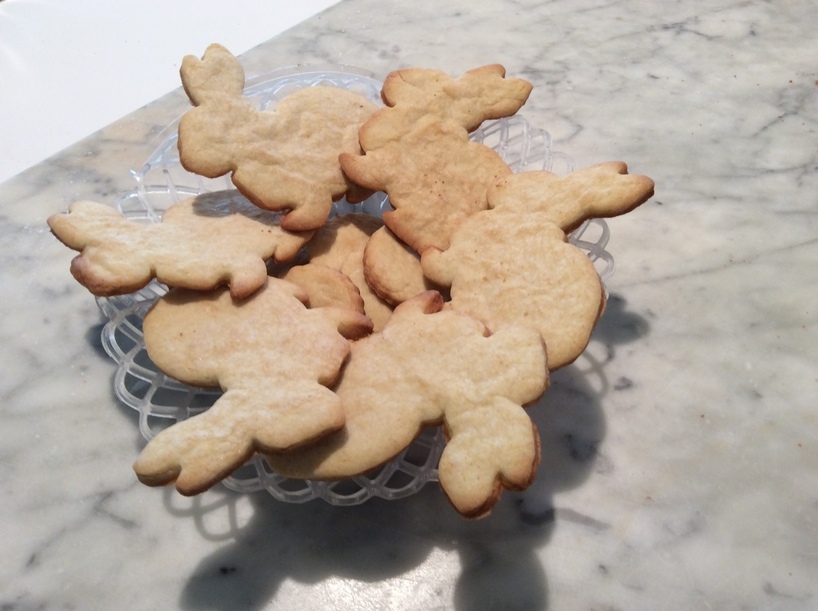
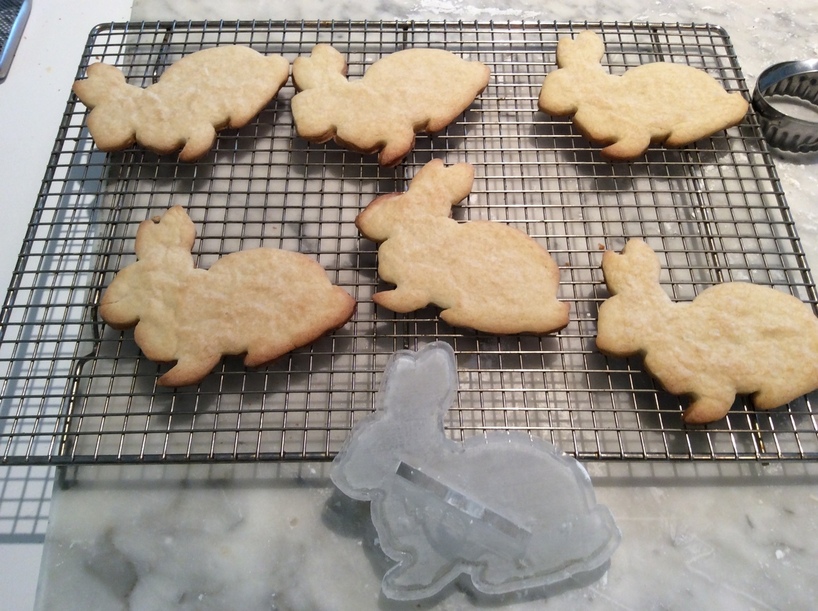
I whipped up a batch of Alton Brown’s sugar cookies and put the bunny to work making more bunnies (after carefully washing the whole thing in warm soapy water!)

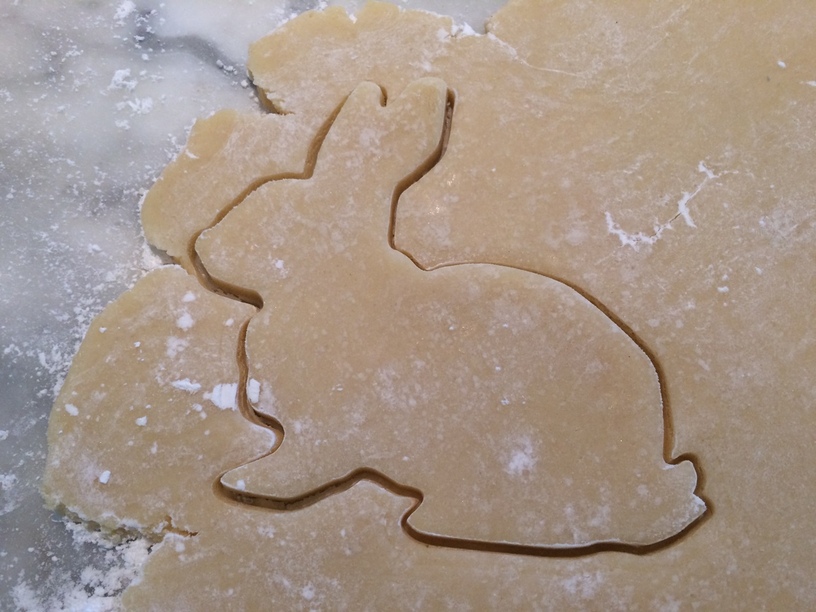
It worked perfectly!
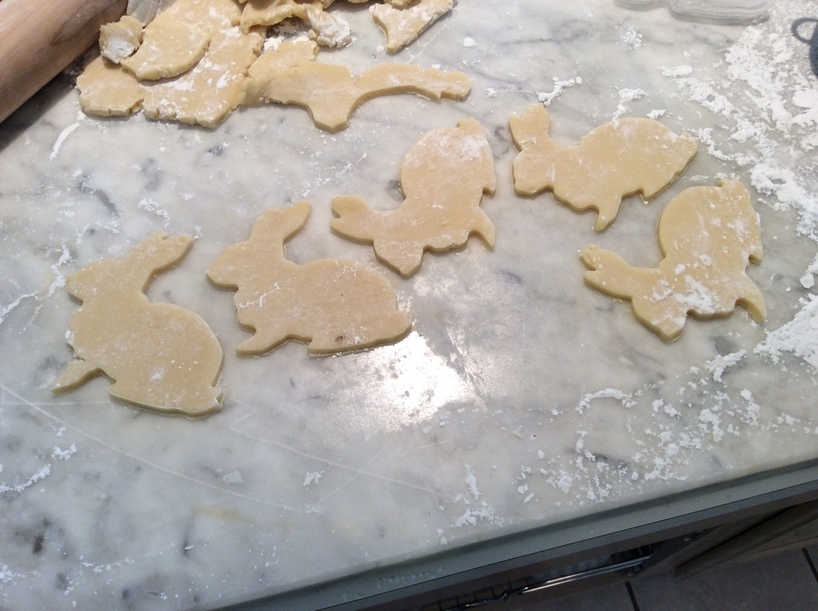
Bunnies everywhere!

I like a crisper, well done cookie not those chewy dough balls!

Dust the inside of the cookie cutter with powdered sugar and brush it around. Make sure your cookie dough has a fine dusting of powdered sugar and the cookie gets cut out and released without sticking.

Build Notes:

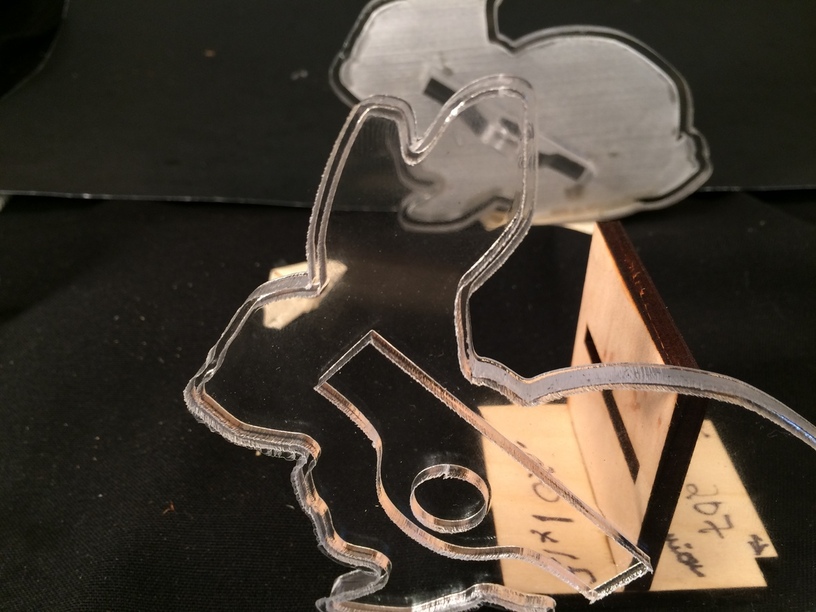
This is a failure to cut the fine blades out. Didn’t make it all the way through the acrylic. Note the parallel lines going around the perimeter.

The design was perfect and would have printed out perfect the first time, but there were a couple things going on. I used the Chemcast acrylic, non-Proofgrade, for the test pieces, it’s just a hair thinner than Proofgrade. It works great but, the first two didn’t work out right. I couldn’t get the laser to go through like it should. So I checked things out:

This is my screen on the vent to the outside after six hours of engraving acrylic. Lots of acrylic powder. So if this is the screen, what must the inside of the Glowforge look like? Yep, pretty dusty. So I did the recommended procedures for cleaning the lens and the windows and it immediately was back to full power. Was wondering what the heck was going on yesterday.

So now I have two cookie cutters, one Proofgrade and one in the Chemcast. As I was using them, I thought about making one cutter a mirror to help with the tiling problem on the dough. An Escher I am not.

The file has several operations:

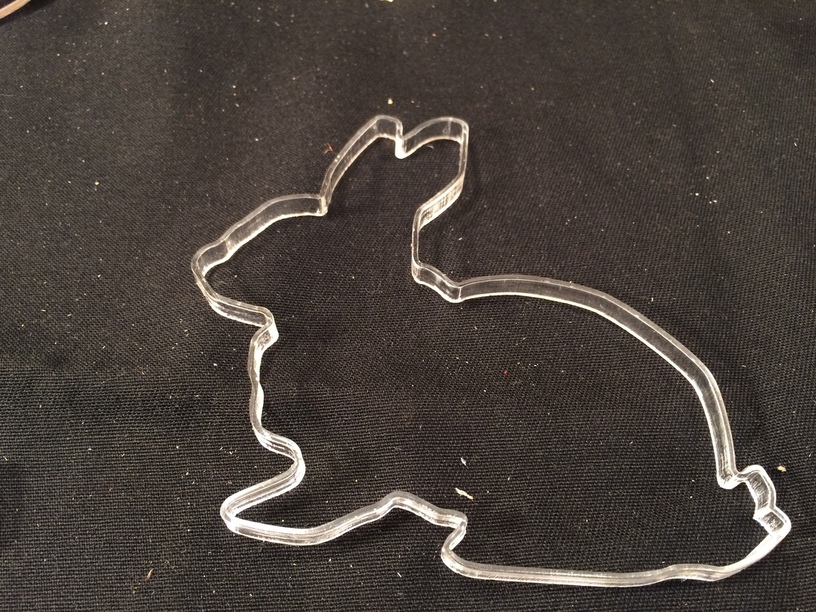
  1. It cuts the blade and the handle. The handle is cut out of the center of the blade.
  2. Then the cookie form exterior is cut and the handle recess.
  3. Then the area to be engraved is scored to sharpen the edges up for the blade to glue up against
  4. Then the rabbit shape pocket is engraved.

So have at it. I think it will be so cool to make your own custom cookie cutters with a Glowforge. I already have a request for a trout!

One final note: the cookies are in an acrylic hump bowl I made after @jules pattern. It worked fine, although I had a problem going through the acrylic yesterday when I printed it even though I put it at 95% power and 15 speed two passes which normally works for the Chemcast with power to spare. I just though that there was still some tweaking going on with settings. I didn’t want the whole 10" piece of acrylic to go to waste so I engraved the back with three passes and that went deep enough to meet the cut from the other side and release the acrylic (except for a little spot that missed a layer of engraving from inaccurate positioning… Proof of concept. I’ve been working on one in 1/8" proofgrade and another in the chemcast 1/4"

Bonus cutter, untried as to how it works with dough and doing the blades. Will test out later. Right now I have an hour long cutting operation: 10" lace, slump bowl in 1/4" acrylic. Lots of diamonds!

Hedgehog Cookie Cutter: Evidently for these the icing makes it!

111 Likes

That file takes an hour to process in the GFUI? Otherwise super slick!

6 Likes

Double pass engraving of a 4.5 x 4.5" image! Cutting is fast, but 1/4" acrylic takes two passes to go through. One reason to have a Pro! Would probably work with a single pass in the engraving setup, but I wasn’t sure how the blades would hold up.

9 Likes

As always your work is amazing and helpful!

8 Likes

Very well done. I expect a lot of people will be doing this type of work.

8 Likes

Whoa! Hold the phone! You’re making cookie cutters? (What a great idea!) :grinning: :squeeee:

Double squeeee for the bowl test…I’ve got one cut that I’ll try to slump tomorrow, but it’s great to see that it can sag. (I’m just going to use 1/8" or less on the bowls…1/4" is going to be massive, but I’ll be interested to see what it does. :squeeee: :squeeee:

Triple squeeeeeee for the hedgehog cutter…he looks adorable! :squeeee: :squeeee: :squeeee:

And I hope everyone has a Happy Easter tomorrow!

14 Likes

Wow, what a wonderful idea! Something like this would make an excellent hostess gift (along with a plate of cookies) for Thanksgiving. I totally want to do this for my mom now :slight_smile:

Thank you for sharing this.

6 Likes

Awesome!!! I love your creativity!!

4 Likes

Impressive. Custom cookie cutters would make great gifts for a lot of things. Great job!

4 Likes

This is fabulous! And it’s making me hungry. Wishing you a blessed Easter!

5 Likes

Wow! Wow! Wow! Once more you are pushing back the frontiers of Lasering All The Things! Very cool and well executed idea–the possibilities for custom cookie cutters is endless.

Thanks for the tip about cleaning the lens (I need to get a lens cleaner thingy), and Happy Easter to you!

6 Likes

That’s fantastic! I have a friend who owns her own custom cookie biz, and finding the right cookie cutters has always been an issue for her. One of the things that made me excited about the Glowforge early one was the possibility of helping her create some unique cookie cutters for her business—now I know exactly how I’m gonna go about it. Thanks for sharing!

5 Likes

Well I personally don’t condone the association of rabbits and Easter as it leads its self to tons of bunnys being given to very you children as gifts and the ln said pet is neglected and if lucky the end up at a shelter in drives.

I do love the concept of making a practical kitchen tool

4 Likes

Maybe I’m stupid, but why the engrave? More depth?

1 Like

“The base has a 1/16” deep engrave in it so that with the acrylic “blade cutter” can be inset in the engraved pocket to give the side more strength. I engraved with full power, 340 LPI and full speed with two passes" per orig. explanation from :try_to_be_helpful_but_not_authoritative:

It gave a lip for the sides to have better stability - like an upside down lid… (No question is stupid ! )

edit - the “reason” was a direct quote from :try_to_be_helpful_but_not_authoritative: - It didn’t register because i quoted above it !

2 Likes

Another cool project! Question; why engrave the whole inside, rather than just a channel for the outline hollow piece? I am guessing it is for artistic reasons (it has a nice frosty look!) and maybe gives more depth, to allow for a thicker cookie?

3 Likes

Squeeeee

Ah. Like @jeremiah, I’d figured you were just engraving a slot to set the cutter in.

Confirming @PIGHEADED’s excellent response. If you just engrave a channel to set the cutter in, you lose height on the cutters won’t have a deep enough trough for a cookie. Since the acrylic is not a full 1/4" thick, you want to give as much depth as possible and the sides make a difference for supporting the blade which is quite thin.

You might even try it without and engrave and just glue to the base. I’m sure it would work. Just not as strong.

You might be able to modify, simplify and get away with a faster print, but in my experience of working with acrylic, I figured this would be best. It held up very well for the first use.

As folks are concerned with the time of an hour print: those of you with 3D printers, how long would it take to print a comprable design with a 3D printer? That might be the comparison we are looking for.

Update: I tweaked a few of the settings and can get by with a 41 minutes print so that’s not bad for default Proofgrade settings. Remember that I have a very early prerelease and things continue to improve. Your mileage might vary! Engraving at higher resolutions take a surprising amount of time if you haven’t had to wait on something like this before.

The hedgehog takes 38:31 on my machine at default Proofgrade settings.

7 Likes

Yeah, coming from 3D printing…this is a bunch faster. (Can’t wait to see the hedgie!) :wink:

6 Likes