ok, so I printed coasters on medium PG, no problem, pretty much right on. Then I turned off the machine, cleaned those two lenses, the one on the side and the eye on the lid. Set this up, no more than 1/8 inch higher from where the PG was. Turned it on. Set auto focus. It’s a lot better than last time, but I don’t know if you can see the shadow (I guess I went a little too light) low and to the left.

That’s a little bit too light to tell for sure, but it doesn’t look to me like it’s resized, it just looks shifted a little, which is the battle we fight using the lid camera for placement.
Have you ever used a jig with it? A jig will enable perfect placement, and absolutely perfect alignment relative to the edge of the cutting board. (It might still look like it’s off on the screen, but the print on the actual cutting board will land exactly where you want it to.)
yes, I do believe it is just shifted slightly (as opposed to dramatically before), but not resized. I guess I don’t thoroughly comprehend how a jig is going to assure perfect alignment. How does it line up, if not with the eye?
Ahhhh…you asked the right person. ![]()
The reason a jig works is that the relationships between the elements of a design are fixed, when they are created in the same file.
So when you create a cut line that is the size of the cutting board, and then align the artwork inside of that cut line, the relationship between the two is always maintained perfectly.
Then you just cut the rectangle, take out the center area, drop in the cutting board which is the same size, and the placement of the engraving is going to land exactly where it needs to be on the cutting board. Then you run the engrave.
There’s a brief writeup on it here:
The reason that is necessary, is because of the fisheye effect of the lid camera. The view is always going to appear to be farther away from the actual engraved result at the left and right edges of the bed. They are farther away from the lid camera at the center.
There is an algorithm that compensates for that effect, but it is dependent on the thickness of the material to calculate correctly and adjust the view, so that is why we are so concerned with getting the thickness of the material correct for the calculations. It adjusts the view we see on the screen.
Recently, Glowforge released two things…the ReCalibrator and the Set Focus tool. Those do all of the heavy lifting now, and will correct the distortion, but you have to run the ReCalibrator and use the Set Focus tool before the print to adjust the view near where you are wanting to print in order to get corrected results.
These tools are discussed here…if you haven’t run them yet, you should do that…it improves the image you see, making visual placement much more accurate.
You might be able to get by without a jig if you run them. (And it’s getting to be past my bedtime, so I’ll check tomorrow if you have any other questions about it.) ![]()
1 Like
thanks so much, a jig definitely makes sense for things I do in quantity. On these other ones though, I did try to position the art close to the center to avoid distortion and such. Until I have a large enough run to justify a jig, I’ll check out the recalibrator and the set focus tool. Thanks to you and everyone else who spent time assisting me tonight!
1 Like
A run of 1 is enough imo.
It’s trivial to make a corner jig out of cardboard. If alignment is key, I can’t see why you wouldn’t use jigs extensively.
I like corner jigs. They take almost no material.
1 Like
thank you. This is something I will incorporate.
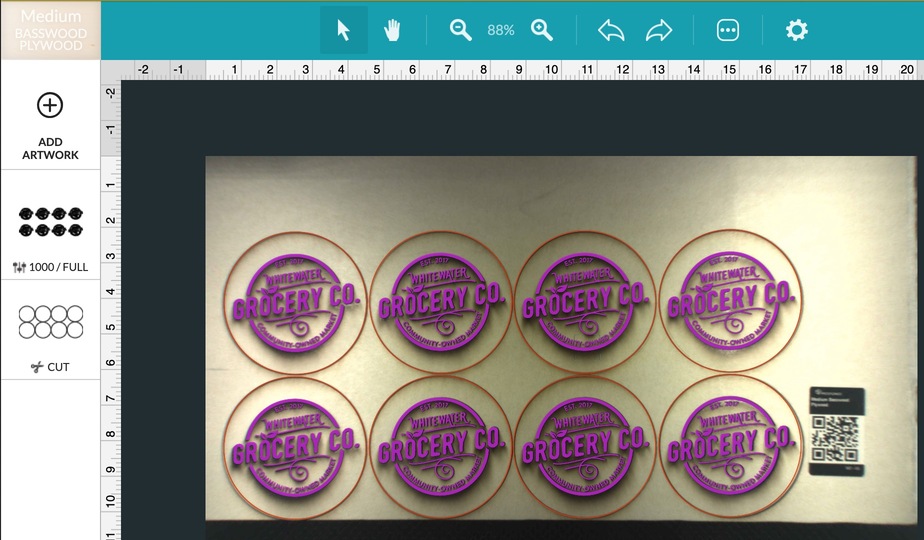
I’m cursed ![]() Now it’s happening on PG. The focus seemed to be jumping around, so I hit “set focus” before I ran it, and this is what I ended up with.
Now it’s happening on PG. The focus seemed to be jumping around, so I hit “set focus” before I ran it, and this is what I ended up with.

Just out of curiosity are you aligning the artwork inside your cutout before you bring it to the glowforge or are you trying to align it by eye on your cutouts inside the glowforge?
I guess I’m not entirely sure what you mean by aligning before. I’m using a copy of side A cut lines as a template for side B artwork. In the situation above I wanted to run just one to show the customer before doing all, so I took just one and visually aligned the ignored cut line and artwork in the Glowforge.
Did you create the entire project in inkscape or some equivalent program and then with the engraving aligned inside your cutout, save it and then send it to the glowforge? Or, are you trying to align the engraving part into the cutout shape after you have brought it onto your dashboard? If the latter then unless the cutout is directly centered under the lid camera there will be a discrepancy between what you see and where the engrave actually falls due to the fish eye nature of the camera.
After re-reading your response I see you are attempting to visually align so that will be hard to do the farther from center you go. I suggest you create and save the entire artwork and then when you get it into the glowforge you can copy and paste as many as you like and they will all be centered exactly as they were when you saved them.
If you have an engraving for the other side just put it right over top the other one in your program, in a different color. Then when you bring it to the glowforge set it to ignore until you do the first side and the cutout. Then carefully flip the pieces without moving the board you cut them from (this is now your template) and set the first side info to ignore and engrave the second side. It will stay perfectly lined up.
This topic was automatically closed 30 days after the last reply. New replies are no longer allowed.