OK, I have done A LOT of GF jobs over the years, for this project I had a weird issue crop up and I can’t ever remember this weird problem. So I cut a panel in acrylic, then did the painting and when I put the painted panel back in the hole I cut it out of (the acrylic panel didn’t move as I had the panel taped in place with gaffer’s tape) the job was now outside the printable area, which is really odd as I had cut that exact position a few hours prior without moving it…
2 Likes
That’s strange! Did the settings change at all?
2 Likes
In theory no, I went back to the same job and changed the engrave layer from ignore back to my custom engrave…
2 Likes
Adding the Engrave COULD mean a speed change, and head speed can change the available work area, due to ramp-up/slowdown…
7 Likes
yeah but it was in the same position as it was when a cut was done. Cut will always be faster than engrave. That doesn’t seem logical to me.
1 Like
And weirdly I turned everything off and enabled the original cut profile, same result…
2 Likes
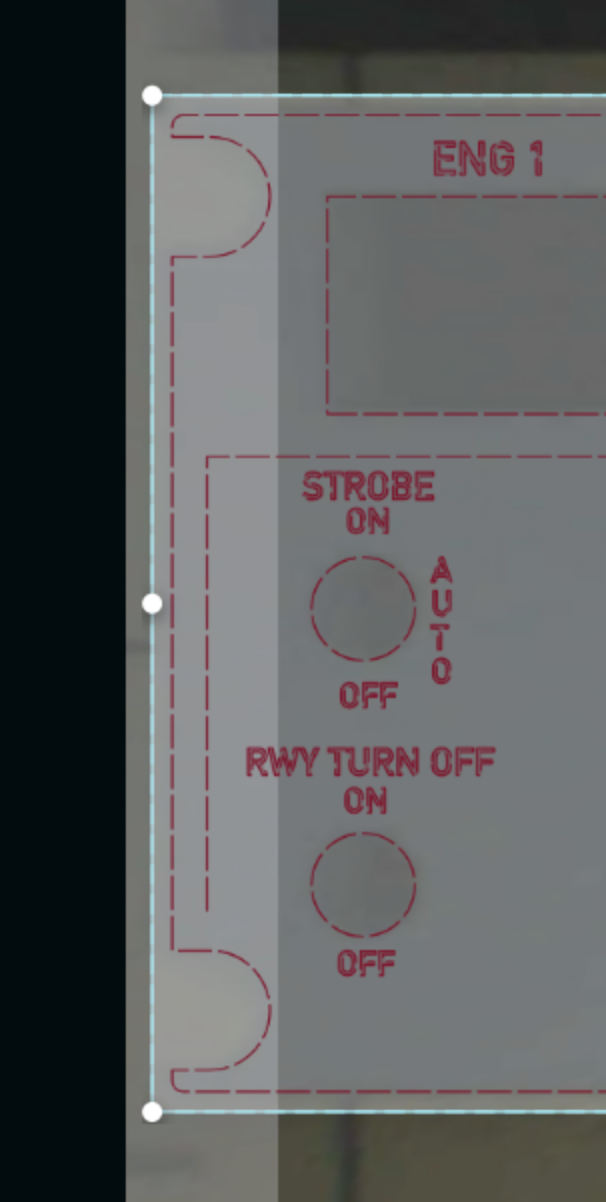
I can’t tell from the photo if the material and therefore the engrave elements are near the border of the usable part of the bed. Engraves near the edge will become outside the engraveable area if the speed is high because of the distance needed for acceleration/decceleration of the print head. It looks like one text line is the problem. (RWY Turn Off)
3 Likes
So how would engrave be faster than cut, when it was fine when it was cutting?
If the engrave was not enabled when the cut was done, the border issue would not arise. Once the engrave was enabled, the one line of text becomes outside the margin at engrave speeds which are usually over 500. The printhead needs room to speed up and slow down for each line of engraving and thus the usable bed area shrinks as speed increases. If the RW in that one line of test is moved over, all of the text would engrave.
7 Likes
Agreed. The most simple test is to “Ignore” all engraves.
3 Likes
Oh yeah, that makes sense. Funny that in all these years never ran into this before. I am using a very fast engrave since my goal is in fact not to engrave the acrylic, just the paint layer revealing the acrylic, so I think my tried and true is 1000/40 (yeah settings, I’m going with the setting is the specific issue here). The second op on that job is scoring so presumably not wider than cutting (although that is also in much closer to the inside of the part)
OOOOH, you also just solved a mystery, having at this point made like 8 of these that have been wrong for various reasons, I remember there was one that in fact was missing the R, and I was perplexed as to why out of the entire sheet only 1 letter was not engraved despite seeing it in the GFUI, but now it makes total sense.
@dan another hopper idea, maybe like on my prosumer video gear they show the actual margin of the video as well as the official “broadcast” area within (and other margins related to text and stuff) which I am guessing all date back to the NTSC era rather than digitial today where if it is in the max outside borders it fits. Maybe the GFUI could show engrave and cut margins at all the time. Even if the margins are a rough estimate it would be better than my confusion here…
I keep convincing myself I don’t need a fibre laser, but then things like this pop up and well that x-tools one is pretty sweet (of course with that one I could actually do steel panels like the plane, as if you are willing to take the time you can slowly cut steel, and I am sure the sheetsteel that the prebuilt 19” rack blanks are made of is low quality steel, so not like trying to cut into stainless, tool steel or what have you (they do show engraving 316L which is mind blowing)
2 Likes
As always @dklgood has you covered with the right answer. If anyone’s curious it’s explained in the help pages.
This includes a link that talks about a workaround, engraving in the margins.
3 Likes

Good catch! They rebuilt the help pages lately. @Brandon.B is tracking these broken links down.
You can find it here in the minimize margins section:
2 Likes
Alrighty, well on the diagnostic advice of @dklgood being at the margin for engrave, I just moved the existing file (with engrave and score layers ignored) and cut another panel out of the sheet basically in the middle of the sheet nowhere near the edges, I took the cut panel out and put my previously cut and painted version. Then I reenabled the engrave and score and they are offset. Yes I realize optical alignment is imperfect, but in theory nothing needed “aligning” since I put it in the exact hole I had just cut out of without moving the file at all. I mean it’s “usable” but hardly good. Everything is slipped to the left by about 3mm. That makes little sense (Between layers of the same file you should not need to resort to snapmarks or anything fancy, I mean otherwise a multioperation file is useless… I’ve done this numerous times over the years, WTAF is going on? Even if one belt is loose or something it should be consistently slipped, not like this… I almost want to throw in a sheet of draftboard and do it all in one shot and see if the job can complete with all layers enabled in one go… I did reboot my GF yesterday to make sure I had the latest firmware before starting this set of jobs…

4 Likes
That’s definitely weird. Sliding it in the same hole should have gotten you to within a kerf.
Are you absolutely certain nothing got moved with either the surround material or the artwork in the ui? Sometimes I accidentally move portions of a design when clicking the steps in the ui, is that at all possible here?
Is it possible that the head got bumped or manually moved between the surround cut and then the engrave? It might lead to the Glowforge not knowing where the head was. I’m grasping here but this is weird enough and you’re experienced enough that grasping for some weird edge case is probably the right move.
1 Like
Most odd. I can turn my machine off and it will print in the exact same spot next time.
1 Like
Right, because it recenters the head etc as part of startup. If the head was bumped between jobs and not reset it could make this happen, in theory. I would think it could only shift right though, as you can’t really bump the head to the left when it’s parked on the left edge.
Weird. It could have been bumped/jammed during the job but you’d expect to be able to tell where things went wrong, some elements would be properly placed and the rest would be too far left. Might be worth calling support to see if the logs show anything.
2 Likes
Hmm.. I’m wondering if one “tooth” equates to the distance those engraves are off? So perhaps the belt slipped?
2 Likes
So by my best eyeball with a micrometer they are all left shifted by about 0.75mm? Does that sound right? That almost sounds like a stepper motor step (assuming no microstepping?)
3 Likes