I have tried all the solutions, I think. Unplugged, resatrted, pressed yellow button until it’s teal, etc. happened all of a sudden after a lengthy engrave. Is set up in the basement, where it is always very cool. Is vented to the outside. Had just thoroughly cleaned before the last engrave. Sent three messages to Support with no reply? Anyone else havng these problems?
1 Like
A yellow button basically means check the UI, that there is something going on. It doesn’t necessarily mean that it’s in a cooling phase but that’s the most prevalent cause of it. Unfortunately, most of the potential problems, aside from cooling, don’t provide an error message in the UI yet.
What exactly is happening when you turn the machine on? Is it calibrating? Nothing? Going straight to a yellow button?
BTW: Having a temperature within the operating limits does not mean the unit won’t enter a cooling phase, especially during or after a long engrave. It only means that the unit will eventually cool off and if it pauses during an engrave should continue once cooled.
1 Like
Just recently got that and it turned out my vent fan (in the left rear of the machine) was gunked up. I cleaned it according to @jules’s cleaning method and everything was good as new. Have you checked the vent fan?
1 Like
As you had just done a cleaning my first suspicion is a jostled connection. Particularly where the tape plugs into the printer head. There have been several folk here including myself that had been going crazy thinking it was about cooling when that particularly was the problem. The ribbon can still hang on but not be well connected and it will either calibrate endlessly or do nothing
1 Like
Oh no! I’m so sorry you’re having trouble printing. I extracted the logs to investigate, and it looks like @rbtdanforth is right and your Glowforge is having trouble communicating with the Printer Head. Would you please try the following?
- Turn off your Glowforge.
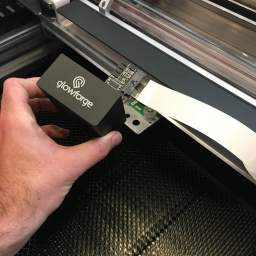
- Holding only the finished black surfaces, grasp the printer head as shown. Pull gently up and back to disengage the magnets and remove the head.
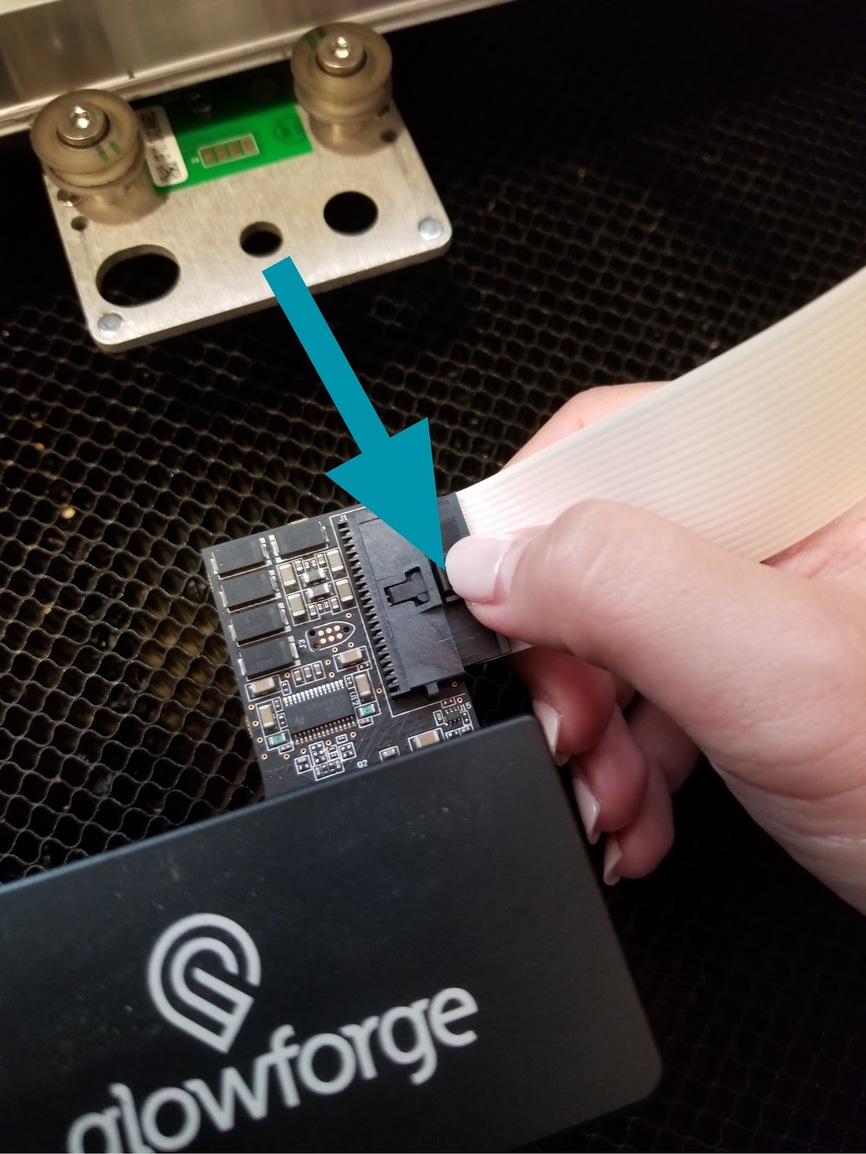
- There is a small tab in the center of the wire ribbon. Push down fully on the tab to release it, and gently pull the wire ribbon plug from the printer head.
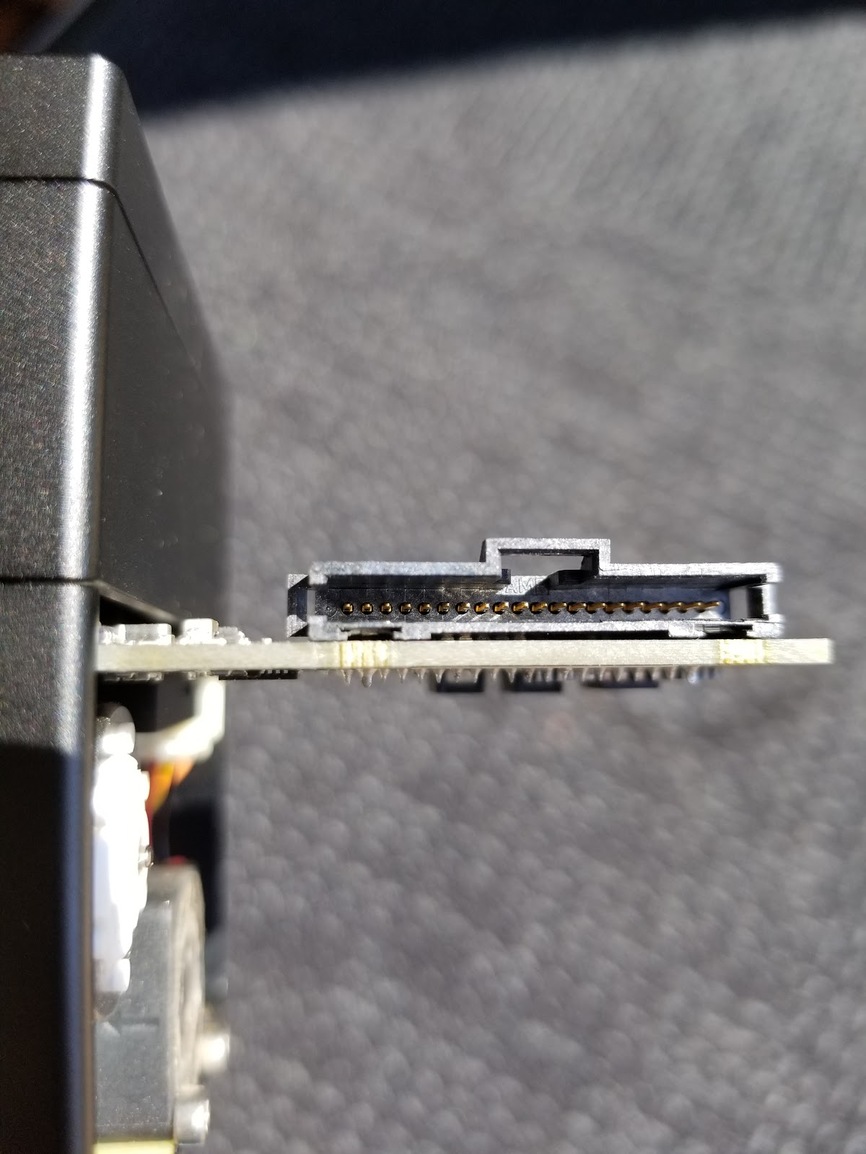
- Take a clear photo of the gold pins inside the printer head where you just unplugged the wire ribbon. It should look like this.
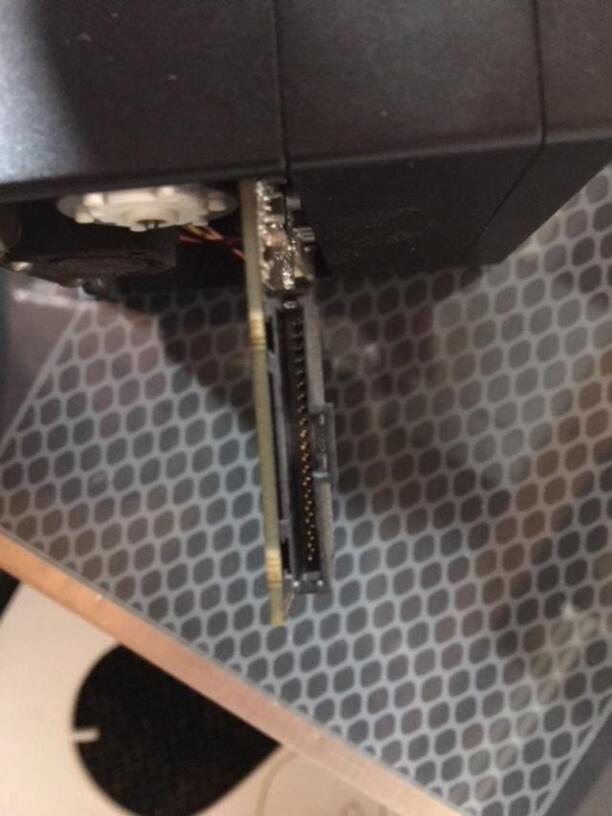
- Pick up the printer head and wire ribbon. Make sure the tab on the wire ribbon is facing up. Slide the ribbon back into the head until it clicks.
- As shown, lower the printer head over the metal plate so that it rests next to the two round posts. Then push it gently away from you – you’ll feel a “click” as magnets pull the printer head until it sits snugly atop the metal plate.
- Turn your Glowforge back on.
- Send us the photo of the gold pins from step 4.

3 Likes
I was just able to cut one small acrylic job, but the very next one failed when the yellow light went on. I then unplugged both the laptop and the GF and waited a few minutes. It powered back up, gantry moved as normal, screen display was fine, but when I pressed “ready,” the yellow light came right on. So weird.
I was thinking it might be the printer head cable but wanted to see what it was doing before I led you down the wrong path.
1 Like
Thanks! I did the troubleshooting sent by GF with the pic, but no luck so far.
1 Like
Jaz said that when she checked the logs that your machine was having trouble communicating with the laser head. Even if you checked and cleaned that most obvious point that has been a problem, that communication remains an issue , A bit of cleaning all the points with an alcohol swap and where the fan connects cannot hurt if you are gentle with them. If still a problem it will still be the communication and you will need to follow everything back more…
Thanks! What do mean by where the fan connects? Outside the machine? Thanks again!
1 Like
I will have to wait to be back at the computer to find the previous thread, but when you remove the laser head there are four more gold contacts at the back and corresponding parts on the head that go to the fan behind that blows the smoke away from where the laser is working.
I have discovered somewhat belatedly that if the smoke stays about it is much more likely to catch fire. I had been less concerned as it would frequently do so and then go out even in the best of conditions, thinking it only really important if the fire continued when the head was gone.
Experience has shown however that for most materials even a continued fire is primarily charcoal like burning that ruins the work but except for things like cardboard does not actually burst into flames that turn the machine into a hibachi. However the smoke itself is a fuel that produces far more energy burned than as smoke and in my case that rear head fan overheated as it pulled that super heated gasses through the fan making the plastic bubble like a stew pot. It also scorched the work to a point that much sanding was necessary to get to clean wood.
I don’t know how much the communication to turn on the fan is recorded in the logs but having that fan working at top efficiency is needed to keep the smoke from igniting as much as possible in any case.
sure makes sense. thanks very much.
1 Like
Unfortunately, since that didn’t help, I’ve determined there’s a hardware issue we can’t resolve remotely. I want you to have a reliable unit, so I’m recommending we replace this one. I’ll be in touch via email to sort out the details. I’m so sorry about the bad news.