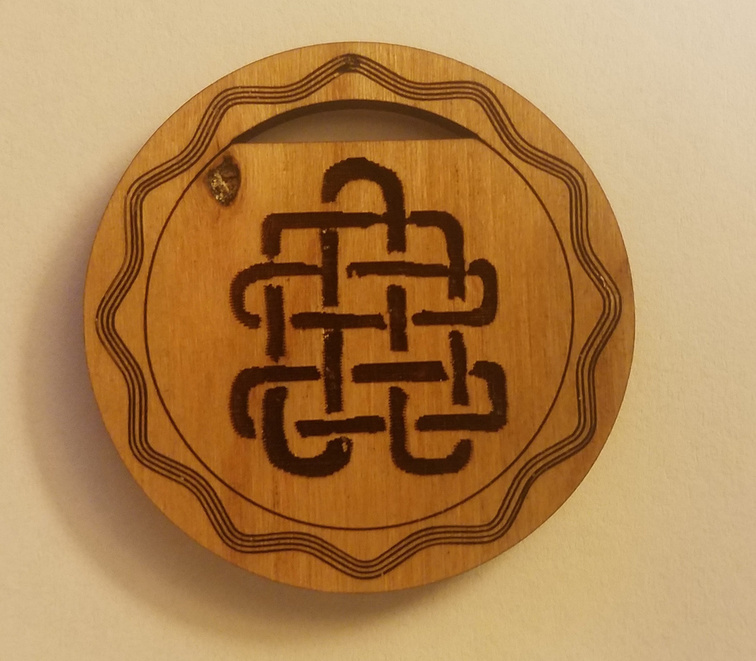
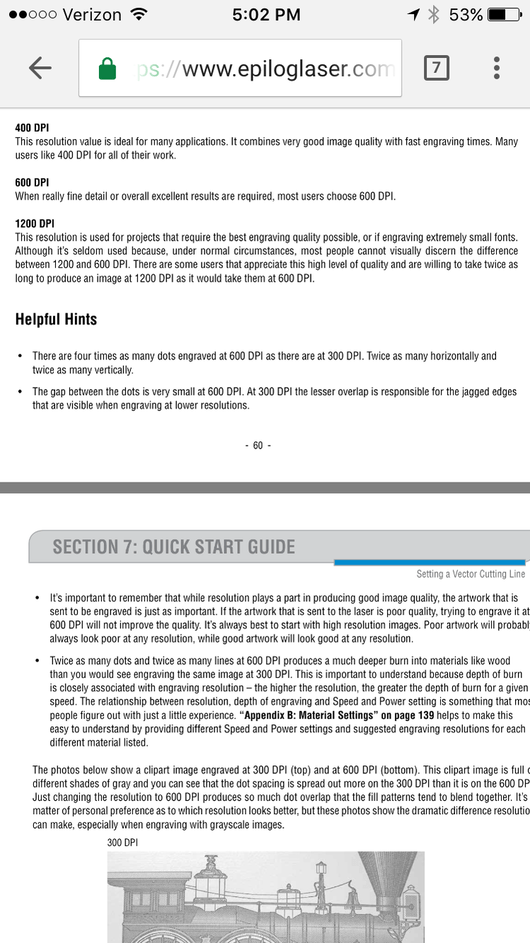
Looking at some of the engraves that have been done over time, I keep seeing banding in them, which is very noticeable in the most recent photo (top).
Is this something that is in its final form and will be in all of the shipping glowforges, or is this a work in progress that will have some sort of resolution increase or the laser equivalent of anti-aliasing (hopefully the former) added to remove this effect?
Is there any insight you guys can offer into this? …why its happening and if its fixable?
They were using extremely low resolution on the stuff they did at the Makerfaire - to cut down on the time factor for the samples. (Too many folks, not enough machines and operators.)
Yup…never noticed that…might be the artwork, or something about the grain in the hardwood, but we’d need to see another example to tell.
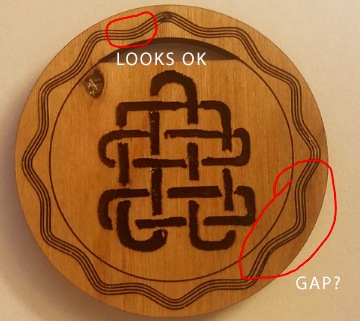
You know if that is a deep score, and not an engrave - it looks to me like the beam hit a little knot or something in the wood and the material shifted. If you zoom in on the original photo above - at about the 2.75 position, you see a little part that looks separated.
If you look at the sides of the lines in the Obrien knot, there are distinct lines where each engrave pass happened to stop slightly off from one another.
I assume that is what you are talking about.
This is normal with engraving. It isn’t that one line is going long, then the next short, and repeat. The longer segment is the center of the line. Because power was cut, material ablation doesn’t spread out as much.
This is VERY easily fixed, you just run a vector pass along your borders after you finish the engrave pass.
Going higher LPI would also help, because eventually the spacing between those “fingers” is too small to notice. But the fastest and nicest looking solution is a vector touch-up of all borders.
Seems the answer I was looking for is that they were running low res. Makes sense. I didn’t know it was an option. I was hoping it wasn’t the case that scans were engraving at a lower res than engraves sent from a file.
In this case however I wouldn’t be happy with a vector cut around the edge as there would still be gaps between the lines. But as a test engrave mechanism I could see the usefulness of low res
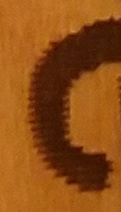
This makes sense as where the laser is moving in one straight line there isn’t going to be “steps” whereas slanted lines will show the steps based on resolution.
What gaps are you seeing that would still exist with the vector around the edges? The only gaps I notice are along the edges, and the vector would be right along those gaps.
Maybe we are looking at different parts of the image?
PS. It (the manual) might be an interesting read for lots of people here? No, it’s not a Glowforge, but it is a laser so it does share a lot in common.
It still doesn’t explain the banding we’re seeing though. That’s definitely more than a ‘pixel’ difference in width there. Those lines should end at roughly the same point unless it’s trying to account for a blurry edge. Even still I’d much rather have a straight edge than one that is reminiscent of the scanline filter.
The difference in width of those lines is quite a bit thicker than the cut width of a vector engrave. You would probably have to run 2 or 3 that overlap the original engrave, which would also leave you with a deeper engrave where they did overlap with the raster.
Either way that means you have to go back in and create a vector engrave to wrap around it. With all that time might as well have done a high res engrave to begin with unless it’s a throwaway test piece.
This may be hard to understand what I am showing. I used photoshop to put the pendant in transparency over the same image, and then lined up one of the wavy engraves on the edge with one of the ragged edges of a knot engrave:
This thickness of that vector line is the same as the thickness of the ragged region.