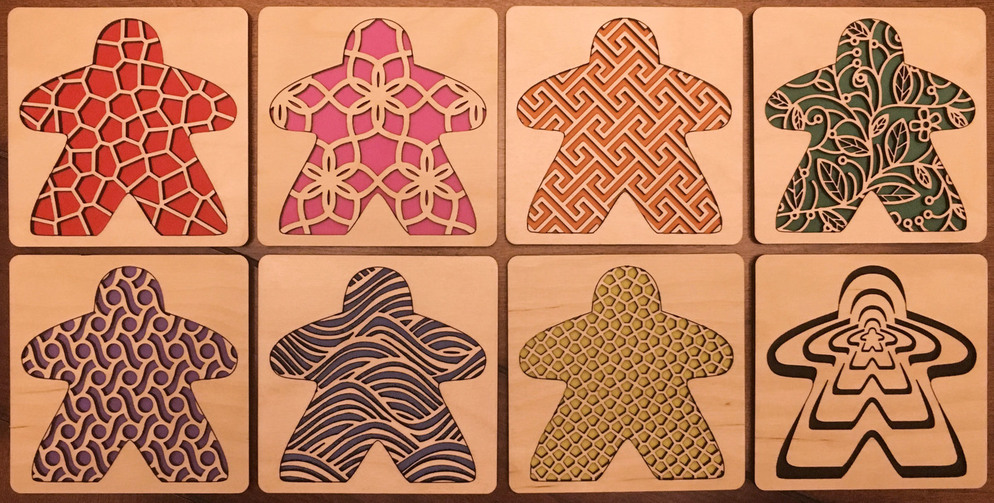
(I’m sorry for the phone photo / lighting quality. The background colors are more vibrant that the photos would suggest. Also, the last one isn’t an etch; it’s a cut backed by black foam.)
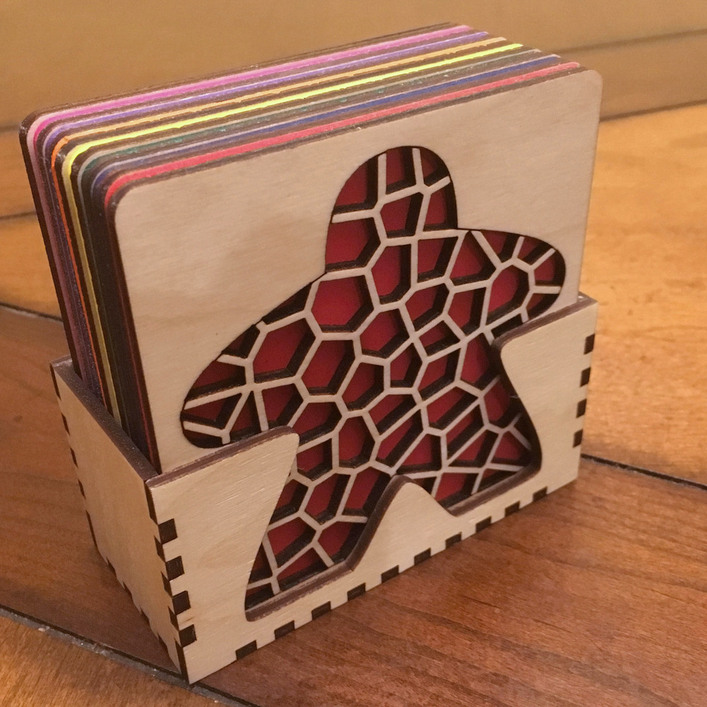
I also considered cork backs, but I preferred the ability to mix & match the background colors.
Lessons learned:
I don’t suspect I learned much that others don’t already know…
It was a lot of work to get the cut patterns just right within the meeple shapes, but ultimately a fun learning project. I certainly got plenty of practice with the path manipulation tools!
I’m sure it’s material-specific, but there was definitely a threshold level of detail to dial in, both in terms of extremely thin lines being too fragile and thicker lines hiding too much background.
Coasters get wet, so make sure the finish and glue/adhesive can handle it.
For a waterproof finish, you might consider something like this. It’s basically an epoxy; it’s a two part mix, and you’re meant to pour it onto a wood surface and let it level itself out. It would fill in all the holes and give the coaster a smooth top, and seal everything inside.
This line may get your topic moved to the “beyond the manual” forum. So if that matters to you you may want to edit it out and possibly start a new thread about EVA settings and then link to it.
Thanks for the heads up. This post was just intended to show something cool I made on my Glowforge. I understand that extended discussion of non-Proofgrade materials belongs elsewhere, but I hope that a mere comment about settings doesn’t invalidate the overall spirit of the post.
(I can certainly understand moving posts that advocate something harmful – even incidentally – but I don’t think that’s the case here. If there are more specific written guidelines that I should be following for this category, please let me know and I’ll follow them.)
Thank you! There’s actually a slight trick to that one. Originally I just cloned the main score line that I had used for the coaster meeples themselves, merging it onto the box front as a cut line. But when I enlarged the box slightly to make it easier to slide in the coasters, that allowed the front coaster to slide ever so slightly from side to side. (The box interior is 101mm wide, vs. 100mm for the coasters themselves.)
That slight movement sometimes revealed the plain wooden area outside of the front coaster’s meeple outline, which distracted from the clean appearance. So I narrowed the front opening by 2mm, ensuring that only the colored portion is visible even when the coaster moves.
Very nice! I posted a source that had many background designs but those you used were not among what was there. Did you create or source those? I am building a kit of those I can find and would love to add to that collection.
I don’t have a very efficient process for creating repeating patterns at scale, so most of these only exist at the specific sizes/shapes needed for this project. I need to do a better job in the future of making larger, generalized patterns and tweaking them first, then trimming to fit within a specific shape. Too many of my final tweaks this time were done within the meeple cutouts, so I can’t easily re-use them elsewhere.
Thank you, Dan! When can I add them to the Design Catalog?
Now that I’m thinking about it… I like the foam colors, but I might also have to try a set made of contrasting Proofgrade veneer and plywood (e.g., maple over walnut or vice versa).
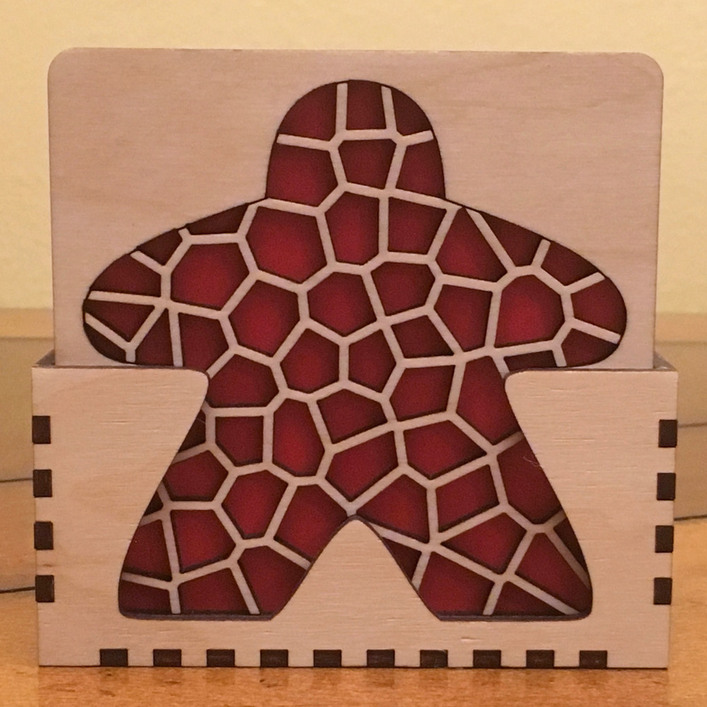
Cut the wooden parts from desired Proofgrade or other plywood. I used 3mm Baltic Birch, but Medium Proofgrade Maple Ply would probably yield very similar results.
Everything should fit within a single 12x20 sheet.
Remember to set the plain meeple outlines to SCORE. Everything else is a cut.
The holder includes depth options for 4, 6, or 8 coasters (assuming your materials have similar thickness to mine). Just print the largest sides & bottom if you want a full set of 8.
These use the same cut pattern as the outer wooden edge (the plain rounded square).
Lightly sand & finish the wooden parts. You’ll likely want several light coats.
Affix the foam to the wooden coasters. I used a water-resistant spray adhesive, sprayed onto the back side of the wooden coasters. That way, the adhesive doesn’t get onto the visible portion of the foam.
Assemble holder using your preferred glue.
Enjoy your enhanced gamer geekiness.
If you create additional versions with new patterns or other improvements, please share!