I’ve seen this question come up a few times recently and wanted folks to get the newest info. The new “set focus” feature has really changed things for working with thick material!
If you have something over .5" to put in your GF there’s no longer a need for complicated math or tray calculations. All you HAVE to do is make sure your materiel reaches above the height of the tray and is the cutting range and the GF will do the rest.
Here’s what to do…
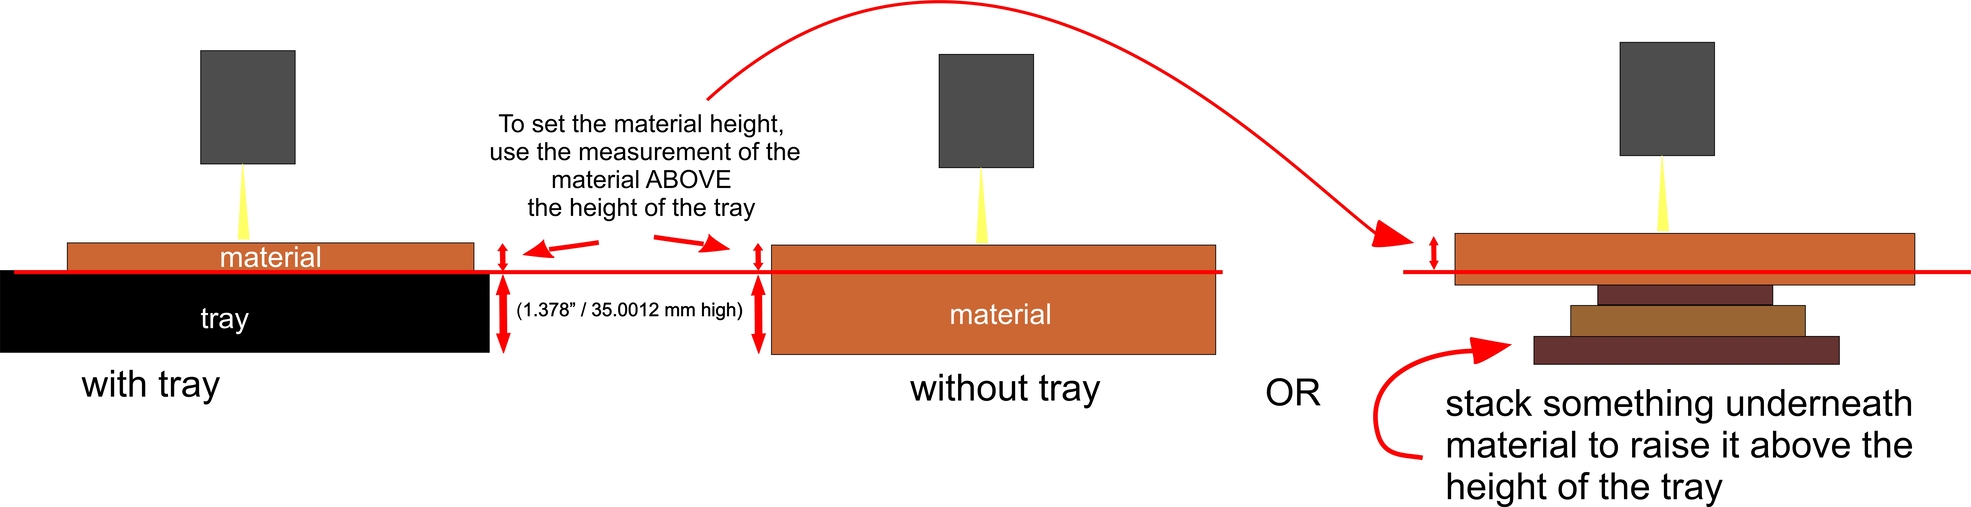
Remove the tray
For material taller than 1.4", but less than 2", place it on the floor of the GF
For material less than 1.4", place it on something that raises it above 1.4", but is still UNDER 2". (See the handy tool file below to make this fool proof.)
Push the “set focus” button in the GUI and the GF will set the correct height.
That’s it! Now you can push the magic blue button.
Just a reminder for folks to never to put something inside the Glowforge that will exceed a height of about 0.6" with the crumbtray or 2" without the crumbtray. The air assist fan under the laser tube will hit the material and may completely dislodge the gantry from the rails.
Makes me wish I did things that required me to yank my tray more often. The list of features I don’t have is starting to become the list of features I don’t use enough!
except ‘set focus’ is ‘somewhere in the area’ of the box on the screen. and that box is a big area, so it’s not useful for something that is like 20mm x 20mm x 100mm. The red dot misses more often that it hits…
With anything that’s not at least say 3x3". If you’ve something that is 5 inches long but half an inch wide you’re going to have trouble trying to get it to set focus.
I was able to get it to focus on the pen barrel blanks consistently. That is a pretty small target. Got it to hit the top of the barrel. Didn’t seem that difficult.
I seem to have a fairly consistent red dot that hits about 3 mm down and 5 mm over from the center of my Set Focus reticule. Maybe it is just my machine that is consistent.
Thank you for this tool! I just loaded it into inkscape and had an idea to make a slight adjustment to “proof check” the material to ensure it’s not too short as sometimes getting a bead on the lines is tricky. I added a bump out at the lower threshold line with a curved corner so you can put it on the material and push down, if it slides off and the leg of the tool hits the bottom you know you need more spacers below.
[No-Math Focus Rule v1.3.svg.zip|attachment]
(upload://cQpcsb6nOjFfgXGKqjAurDjiARj.zip) (5.2 KB)
Every time I use Set Focus I am disappointed with the placement of the actual print. It moves it over half an inch from where I have placed it in the app.
Yes I redid the calibration last week. I cannot get consistent results with Set focus. Ruined a cutting board just this morning because the print is so off center. Looked perfect before starting the print.
You’re doing Set Focus first and then moving the design where you want it? And it then engraves a half-inch away?
Or are you placing the design first, then doing the Set Focus?
The first is the correct way and if it’s not working it’s a problem that needs support. If you’re doing it the second way, try again the first way and you should be happy.
Yes I set focus first and then move the artwork into place. I have sent in a ticket but until I hear back I am not using the set focus any more. Had much better results before I tried using it.
With a good calibration run, it should cut/engrave right where you put it then. Almost everyone has reported sub-fractional inch offsets (mine is within a score line width) - it cuts where dropped. Something’s up with yours. Calipers and manual settings seem to be your alternative until you hear from GF.