Knife Block - Inlay (In Progress)

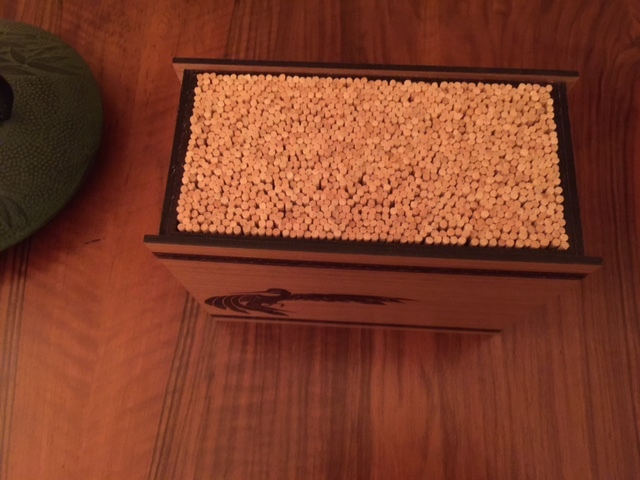
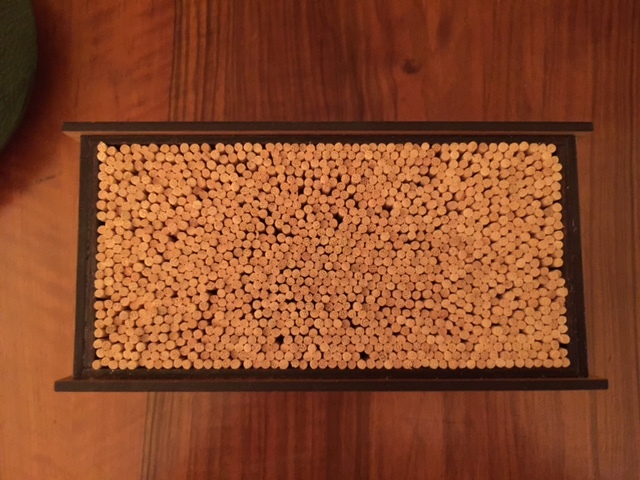
Okay, you guys know those really fancy, (really expensive), knife blocks that were all the rage a few years ago? You can stick the knife anywhere into it and it just stays there?

I thought it would be an interesting exercise to try to duplicate the effect without spending a fortune.

So I whipped up a little nouveau-looking-ish design from a dingbat that I liked, ordered the things I thought I’d need, made it up with Proofgrade cherry and walnut, and gave it a little Proofgrade walnut veneer inlay, waited around for a while for additional supplies, and finally got it assembled:

And it works…sort of.

Errors were made in assuming that:

a. 500 diffuser reeds were surely going to be enough to fill the inner box.
(Nope, it takes 1000. If you order enough to start with you can avoid that hefty double shipping charge.)

b. The 5 1/4" reeds that I ordered were all going to be 5 1/4" in length.
(Nope again. They’re pretty close, but there is enough variation in them that I can either cut down 1000 reeds or make the next knife block have a slightly higher front and back - for aesthetic purposes. “I believe I’ll choose option B, Bob.”) :rolling_eyes:

I was planning to rework it anyway - I did not have the engrave “quite” deep enough for the inlay and the veneer is just a hair proud of the surrounding wood. Might also have been because I pre-stained the veneer to make it darker and it swelled a bit.

Anyway, I’m getting there with it. The concept works pretty well from a mechanical standpoint - just stab the knives down in anywhere.

(And it looks a lot more interesting than the plain block it replaces.)

72 Likes

That is cool! So the inside is vertical sticks? At first I thought it was filled with small rocks, and I thought it couldn’t be good for the knives.

7 Likes

Yeah…1000 of them. :grin:

8 Likes

The inlay is beautiful!

3 Likes

Are you supposed to sand it down so that it’s level? i didn’t want to risk it, but I guess I can on this one after the reed fiasco.

3 Likes

And here’s Jules rising the bar again.

8 Likes

You can do better than that. (Marion definitely can.) :smile:

3 Likes

I’ve got some ideas,

4 Likes

Well get building! :grinning:
(I think I’m going to put a little lip around the top on that one too - just to make it look more finished. And do away with the separate facing - i don’t like that as well as I thought I would.)

4 Likes

way cool. can we get a top down shot?

3 Likes

Gosh that is absolutely gorgeous! I never heard of such a thing (yeah, I live under a rock). You did a wonderful job on the inlay, I just don’t see how it can get any better. And it goes so well in your kitchen!

4 Likes

@Jules, can you give some detail on how you did your inlays? The job you did on this looks fantastic. :relaxed:

2 Likes

Super job. Looks great!

3 Likes

That really is nice!

3 Likes

Thanks guys…didn’t think that one was going to generate much interest…almost didn’t post it. :relaxed:

I’ll take a top down shot and give some inlay details right after i finish fixing dinner for hubs…he’s running late this evening.

4 Likes

This is beautiful! The cherry and walnut look great together.

4 Likes

Top down shots:

I just cut the design out of the walnut veneer, used a big piece of duct tape to keep all the pieces together, and stained it with one of those magic marker wood stain pens that I had lying around. (Good idea to grab a set of those at the hardware store.)

Then engraved the same design deeply into the cherry wood. Took a single pass with a score, or a double pass without a score. The double pass without a score was a little too deep. The single with a score was not quite deep enough. I need to fiddle with the settings a little bit.

Then I peeled each piece off of the veneer sheet and stuck it in the hole it belonged in. The Proofgrade veneer has a really strong 3M adhesive on the back of it.

I deliberately didn’t try to kerf adjust this design, so I could see how it looked. There’s a little bit of leeway, a hair thin black edge that shows around the cutouts, but I actually kind of like it. It makes the design pop.

That’s it. I put the same design on both sides of the box, so it took a while to place all of the bits. (It really helps to have a paper pick to grab the little parts on the sticky side and get them into the hole.) :slightly_smiling_face:

25 Likes

lovely, thank you. one thing to consider in re the uneven heights you mentioned earlier - many of the “real” blocks all have uneven heights to help direct the knives sliding downward.

either way i think these look really cool and i’m totally going to do it.

3 Likes

This is super in so many ways. Creative box. Cool solution to the knife holders, excellent contrast of inlay and base, and a great design well placed. Done. One tool!

From the pictures, the inlay looks fine a little proud. It certainly does not appear to be incomplete or sloppy.

I sanded my compass rose and the letter inlays down flush since I was going for the traditional look of having the gap least noticeable. You made the kerf and outline part of the design element.

Very impressed and inspired.

10 Likes

lol i think you left out a negative

5 Likes