I had been working on a shadowbox and thinking of the best way to back-light it when Greg provided inspiration. (Thanks @greg_golin!) I’m going to make a few minor design changes, but I’m really happy with how my first version turned out.
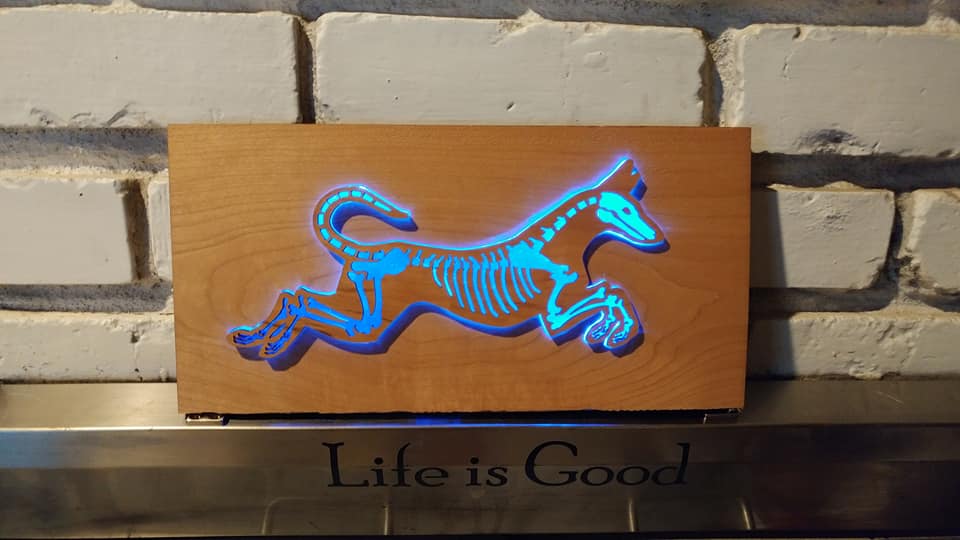
I used the light diffusing acrylic from Inventables and the 1/4" stuff cut like butter (I’m not sure how much difference it really makes compared to the regular stuff.) The front is PF Cherry and the back draftboard. (It’s a bit heavy and will try all hardwood next time.)
(Unfortunately the camera doesn’t do the LED justice makes it look all blotchy and uneven. The color is much more consistent and vibrant in person.)
Oh wow! This is so inspirational! I got some of that light diffusing stuff from Inventables as well, but haven’t done anything with it. Now I want to go make a cool sign!
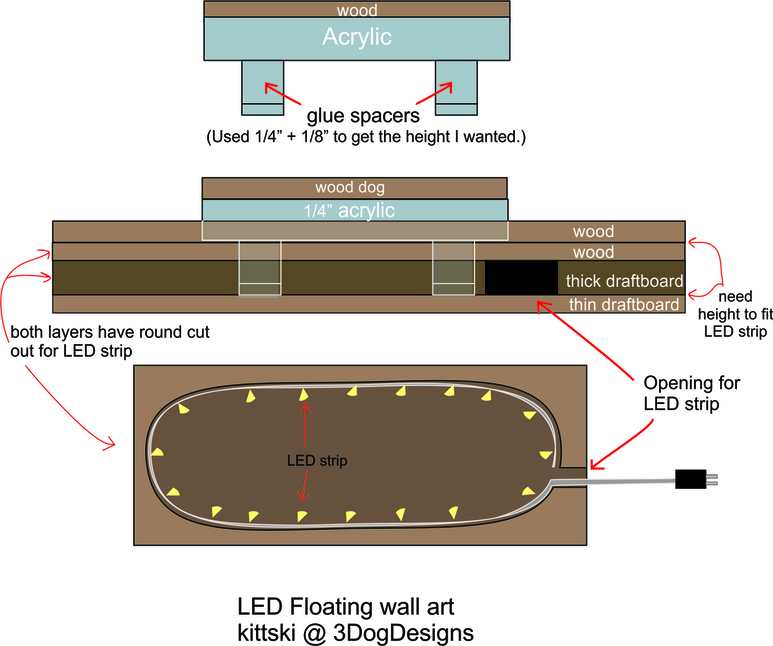
Hope this makes sense. The thick acrylic is supported by spacers glued to the back board.
Edited to add that think you can do away with the extra wood layer in the middle and just go with one layer. For whatever reason, I was convinced that the LEDs should sit upright against the wall so they would shine down on the side/edge of the acrylic instead of shining from underneath. I’m not so sure that it’s necessary now and it would be easier to just have them flat against the back board. You do have to be careful to keep them out of sight though.
Thank you so much, @kittski, for the detailed description. I took a screen shot of your diagram so I can study it further. I am very interested in LED lighting ideas and love your approach. A very successful design.
That is so impressive! I also have a sheet of the light diffusing acrylic and now I’m more excited to try something with it. Thanks for the inspiration!
Do you mind me asking, how did you do the LEDs? Was it a pre-bought strip? I’m completely ignorant when it comes to LEDs, but would like to learn more, in order to do some edge-lit acrylic.
Don’t mind sharing at all @forhorsman . For this project I used a pre-made LED strip from here
and I just bought a bunch more from here last night
This place is great as well and about one of the cheapest sources. The have some nice pre-made LEd bases as well as the LED strips. You have to sign up to see the prices, but it’s pretty easy to do. (I had forgot about this place until after I placed my order last night :-/ )
I love it! Iys beautiful and very creative. You hit so many of my hot buttons with this! Animal art, the way light travels through acrylic, and low light fixtures (great as night time illumination). I’ll be reading your explananatory posts in detail as I wait my Glowforge! Thank you for sharing.