Hi,
I can never get a precise engrave. I have measured the thickness of the wood. I still do not get the correct cut. What am i missing here?
Thanks!
Hi,
I can never get a precise engrave. I have measured the thickness of the wood. I still do not get the correct cut. What am i missing here?
Thanks!
Not seeing a problem?
Machine is rated for ~1/4" placement. Yours looks much better than that.
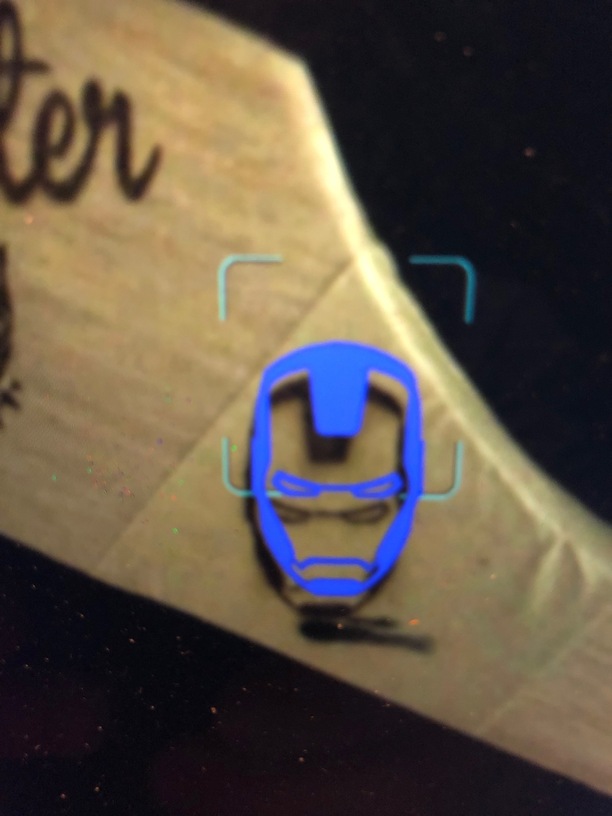
It looks like you’re not engraving on a flat surface - which makes it a touch harder! Totally doable, but not quite as point and click.
For all projects - skip measuring the wood and use the Set Focus instead
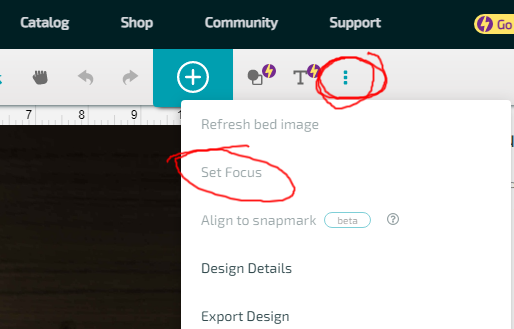
You’ll place the guideline on the center of your piece of material.
NOW, if your material is very small you may “fall off the edge” (which looks like it happened here), in which case placing something large in there that’s the same height as your material gives you another place to use that Set Focus helps a bunch.
For a slightly more sturdy option you can create a jig for your material if you’re using similarly shaped things repeatedly. For a jig you cut a hole into a similarly deep piece of material (many use layered cardboard) that you can slide your material into. There are lots of tutorials on jigs here, take a gander (there are more!):
https://community.glowforge.com/t/grid-on-the-bed-of-the-glowforge/103370
I hope some of that helps ![]()
While this is technically spec, AFAIK it hasn’t been true in a while!
There is also the machine calibration you can run if you haven’t. Most end up with sub-mm inaccuracies after that.
IMO the camera is unreliable as a measurement tool. It was a good idea, but it just can’t be as accurate as it needs to be for precisely positioning stuff. Even if you calibrate it, the very act of opening and closing the lid can change the alignment. And you won’t know it’s shifted until you ruin a piece of stock with a bad cut. If you’re putting something in the machine and you need to know exactly where the laser is going to land, you’re much better off with a positioning jig. I gave up on the camera long ago and just do a jig. It just takes a couple of extra minutes and a sheet of cardboard, and every cut is guaranteed to be correctly aligned. Done things ranging from the wooden handle of a hammer to a MacBook using the jig method and they all came out perfect.
A few things to take in here. Thanks for all the tips!
Well I consider myself very lucky in this department. I have never run the camera calibration but mine is bang on when I place any artwork. Like within a hair of where I expect it. I understand others are not so lucky however and I think a lot of that has to do with methods. Using set focus for one is the only way to go in my opinion. As long as you zoom in and watch where that red dot lands of course.
For something like this, if you don’t want to make a jig, you can mask and set the power to 1 and see if it’s landing where you wanted it to and adjust from there without ruining your board.
Mine has drifted considerably over time, I think it’s been two years since I ran it. It doesn’t matter enough for me to bother re-running the calibration process, but it’s almost 1/2" near the edges of the material. I generally just place stuff in the middle if it matters.
Wow, mine has changed at all except when I moved it (to a different room, or a different state). Do you have it on a rolling table or anything? I’m just curious as to why!
Has not been moved since the day I set it up in 2017.
The calibration has steadily drifted over time. It was perfect when I first ran it.
edit - I had shared a pic on the super secret forum, but mine was something like 2" off before they released the calibration process.
The machine is not 100% rigid. The plastic case can bend/twist a bit if what the feet are sitting on isn’t completely level. And every time you open/close the lid you’re changing the camera’s position slightly (the lid would have to close down on precisely located guide pins to prevent this). Move the machine, it’s going to take a slightly different shape in the process. The entire machine “wracks” a bit. It’s plastic after all, plastic is flexible. The camera’s geometry is such, even a fractional change in the position/angle of the camera relative to the bed will have a large effect, particularly at the extremes of the image.
My third machine has not even need the first calibration though the second one needed two but I had it for several years and this one is less than one.
This is the leftover from getting a 3" wide piece from a hair over 3" wide piece of material…
You can get good alignment for sure, but you generally can’t rely on it staying calibrated. It’s not (IMO) built to stay calibrated. The camera’s on the lid, and the lid moves. You can close it and still shift it around a little. And when the camera shifts, the alignment shifts with it.
I find it so much easier and repeatable and accurate to use a jig. I never have to worry about whether I’ve got my positioning right. A jig can never be wrong. Something expensive, like a MacBook, I want to know for certain the alignment is correct. I think it’d be a poor choice to trust the camera for this sort of thing, especially…
The table my GF resides on is almost 2" thick, perfectly flat, and level. It weighs something like 600lbs. I have climbed up on it to change a light fixture.
I still had to shim up one side of the machine early on before the calibration process was released. The frame of the machine is aluminum, which extends down to the “feet” hidden below the plastic which runs across the bottom. I still have those shims in place. I forget if they are paper or chipboard.
It was the same for me. I still have an index card folded in half under mine.
Ha! It’s folded brown paper (peeked underneath with a flashlight). I have a big roll of it that I intended to protect the rest of the bench. Haven’t seen the rest of the bench in years! ![]()
Don’t know where that roll of paper is, either.
The camera can be off but that does not affect the gantry. It will cut/engrave by the numbers. Calibration and set focus only try to get the image of the design to align with those numbers. For something like a MacBook a piece of paper scored verrry lightly will show how close that is.
The camera can be off but that does not affect the gantry.
Exactly. But if the camera is off, the image of the bed is off, and where you position your artwork will be misaligned with respect to the gantry.
The GF positions the printhead below the camera to center the gantry at startup. Because of the geometry of the camera, even if the camera’s position or angle has changed, the position error directly under the lens will be minimal (the camera can’t move very much). But the image will have more offset at distances further from center, and the size of those errors will be contingent on how much the camera has moved (or rotated) from its position the last time it was calibrated.
Don’t get me wrong, I’m not saying you can’t use the camera the way GF intended it to be used. You can. What I’m saying is that (IMO) it can’t be trusted to stay calibrated. It might, but it might not. Because the chassis of the printer (IMO) doesn’t have the right features to ensure the camera can’t move.
Unfortunately, the only way to find out the alignment has shifted is to do a test cut first, or assume it’s still aligned and ruin a piece of stock because it wasn’t. So I just don’t bother with the camera for anything but the grossest of alignments. For precision cuts/engraves, I use a jig. Because this method means never having to wonder if the camera alignment is still correct.
I often do several Set Focus to make sure the precision is the best it can be. Working with a piece of wood barely big enough to do the job I spent more than the usual time to be certain it was correct but this was what was left over…