Prusa 3D printer and Glowforge laser working together: Edge Lit Acrylic

3A95DD6F-37DE-46B5-890D-17156215DB57

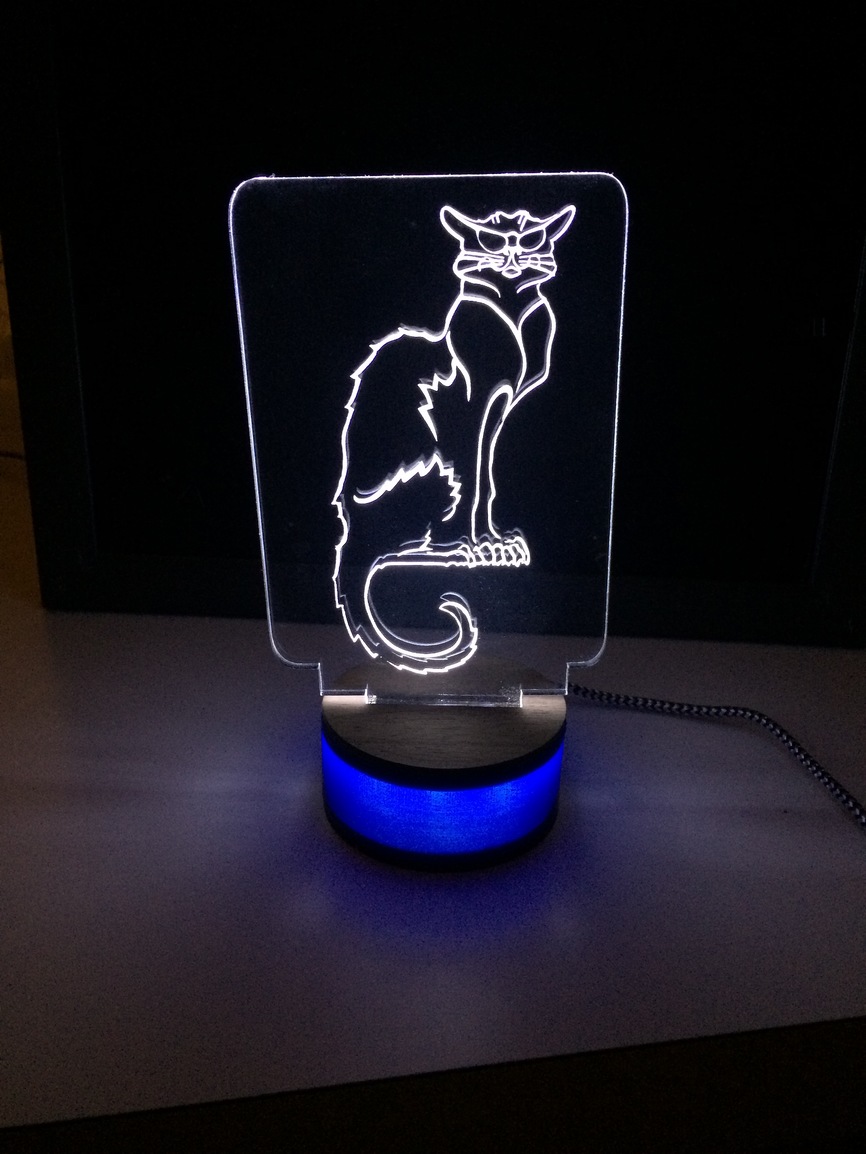
Le Chat Noir I traced from an image and tweaked by hand the vectors. It’s a hugely complicated 3color original so requires some interesting work to recreate the feel of the original with just the white. No pupils on this image gives it an eyeglasses look.

1B15E2E4-971F-410A-BF98-DA194616FA58

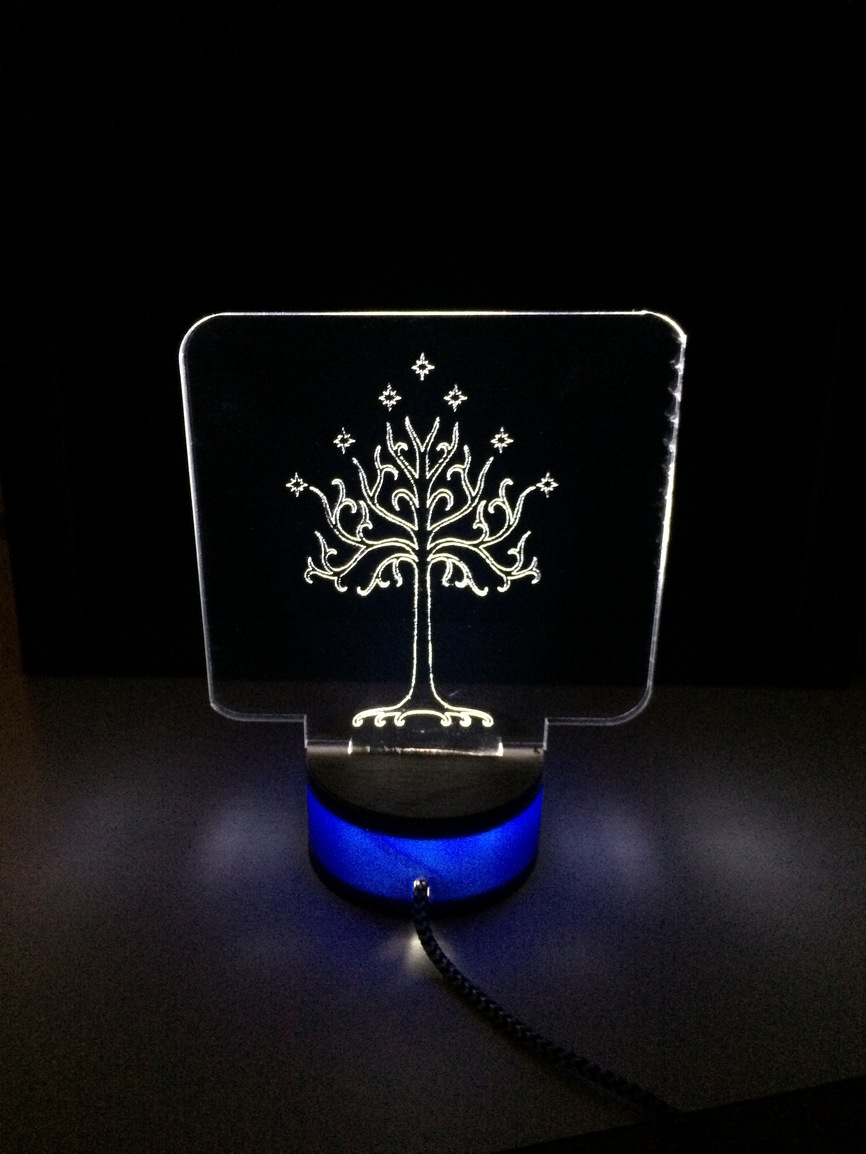
The White tree is wiki commons. I’m still trying to remember the location. Grabbed it way back when I was first doing my matchbox design and needed to do some work with it to come out in an engraved outline. Wouldn’t sell or distribute something like this.
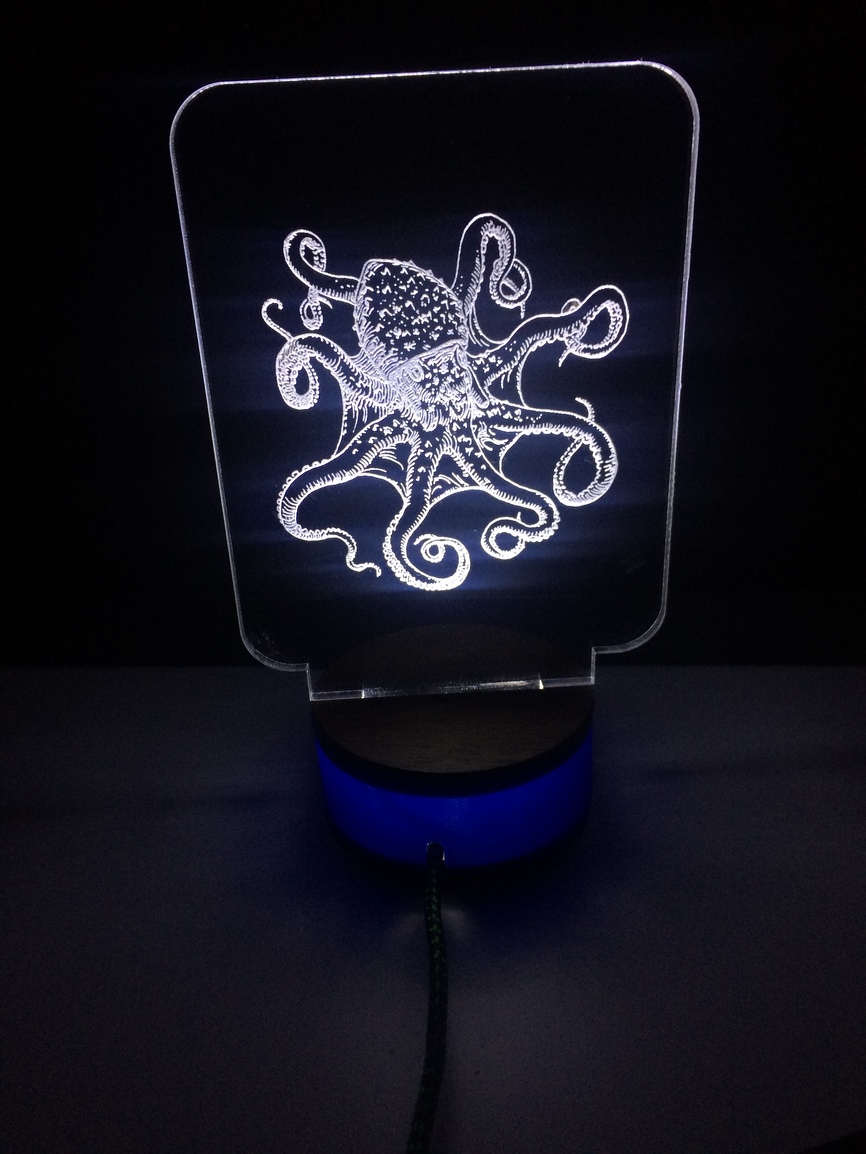
8D46E24F-E0E3-48E4-ABE2-F812E950A4E6


Octopus openclipart

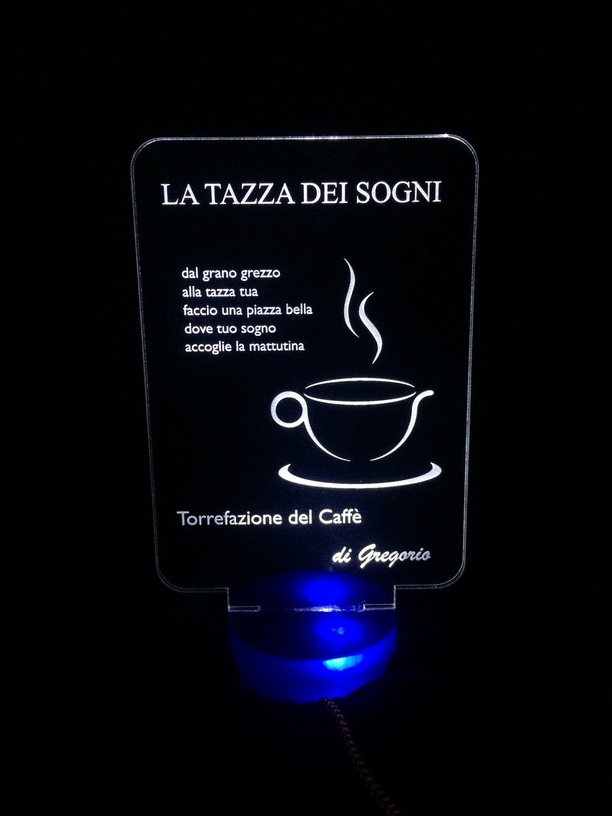
Before I got a Glowforge, I ordered a bunch of LEDs in strips and studied what it took to roll your own edge lit acrylic signs. Making some small USB powered name plates or a large Durin’s Door was a great way to use different materials and combine into one object.

I ordered a hundred USB cables from Amazon for BAMF to make some edge lit acrylic name plates as give aways but the cables didn’t make it before I left. And with the spotty connection during the day, I doubt if I would have been able to make too many LED signs.

Since I have the hardware to make these signs now, and a 3D printer, I figured I could make my own bases rather than order them. Yes, it’s nice to have on/off switches or battery powered ones, but since folks have tons of 5v wall warts or USB slots available, just going straight USB makes sense.

I had done bases out of wood before, but never took the time to make the design a bit more professional looking. Didn’t want to do finger joints.

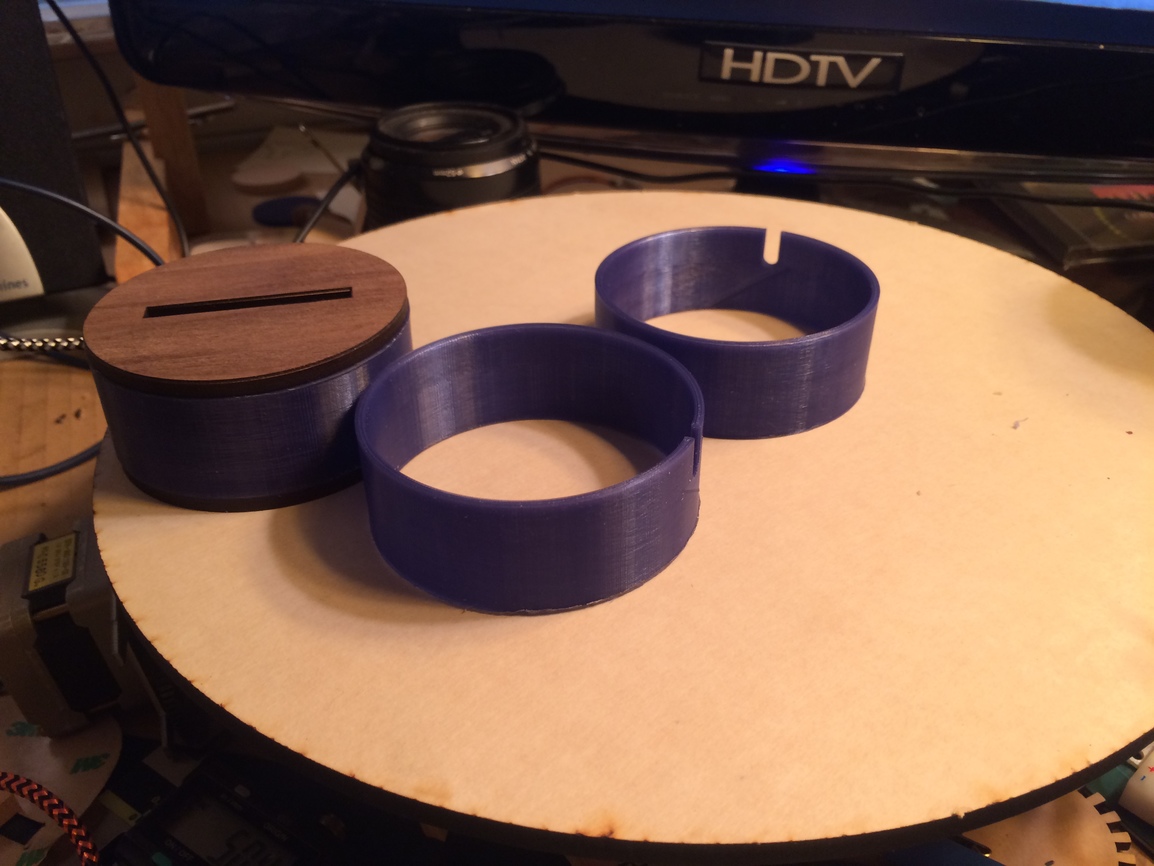
So I made the shell for the LED base on my Prusa MK2.

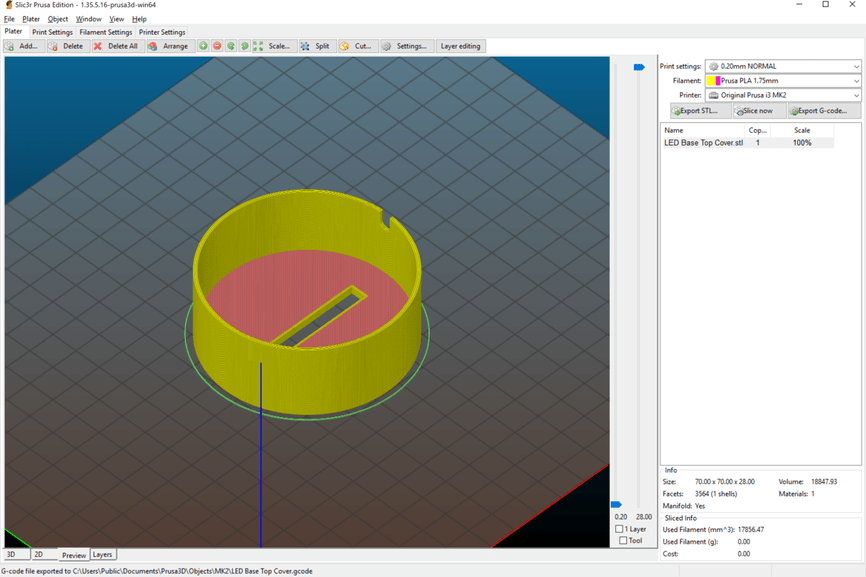
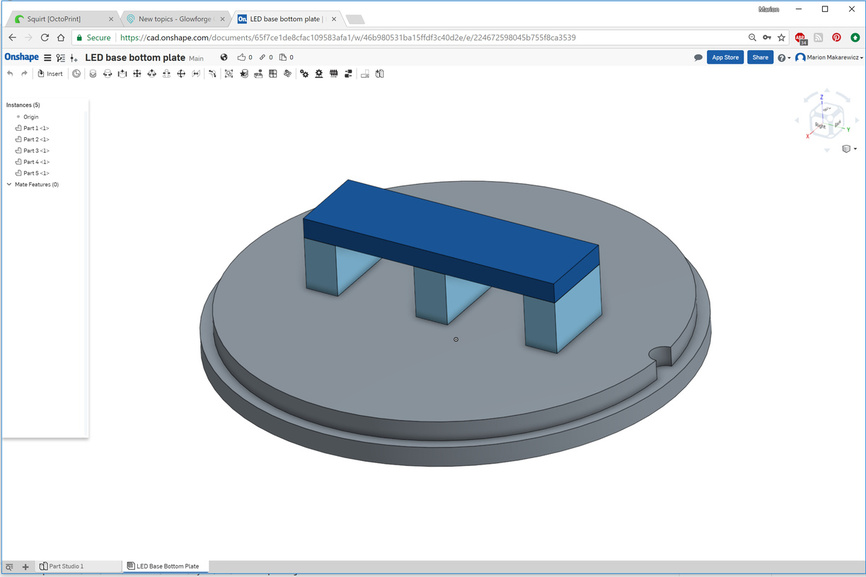
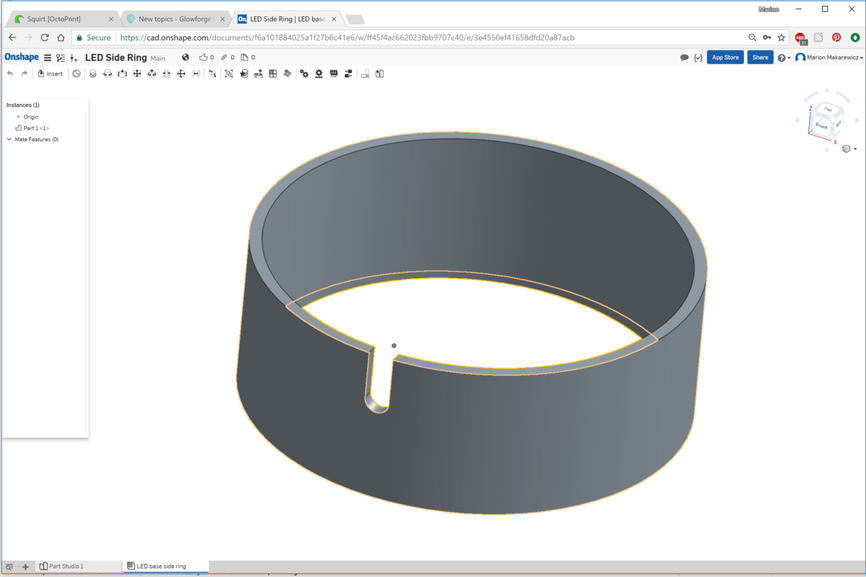
These worked fairly well, although an hour and a half for each section is a bit too much time. So I figured that I could just make the sides with the 3D printer. The ring takes less than an hour to print. Kind of like the light blue that shines through the blue PLA. Not sure if I’ll add some type of inside screen to keep the light from shining out of the side.

I can keep cranking out the rings and cut the tops and bottoms on the laser to speed things up. I use the medium draftboard with a smaller piece that goes inside the lager piece and that allows for a snap fit to the 3D printed side.

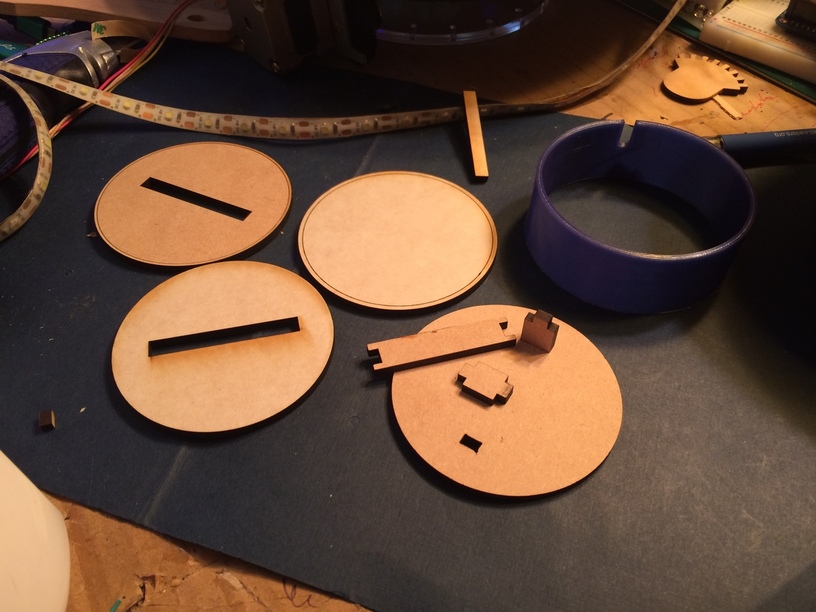
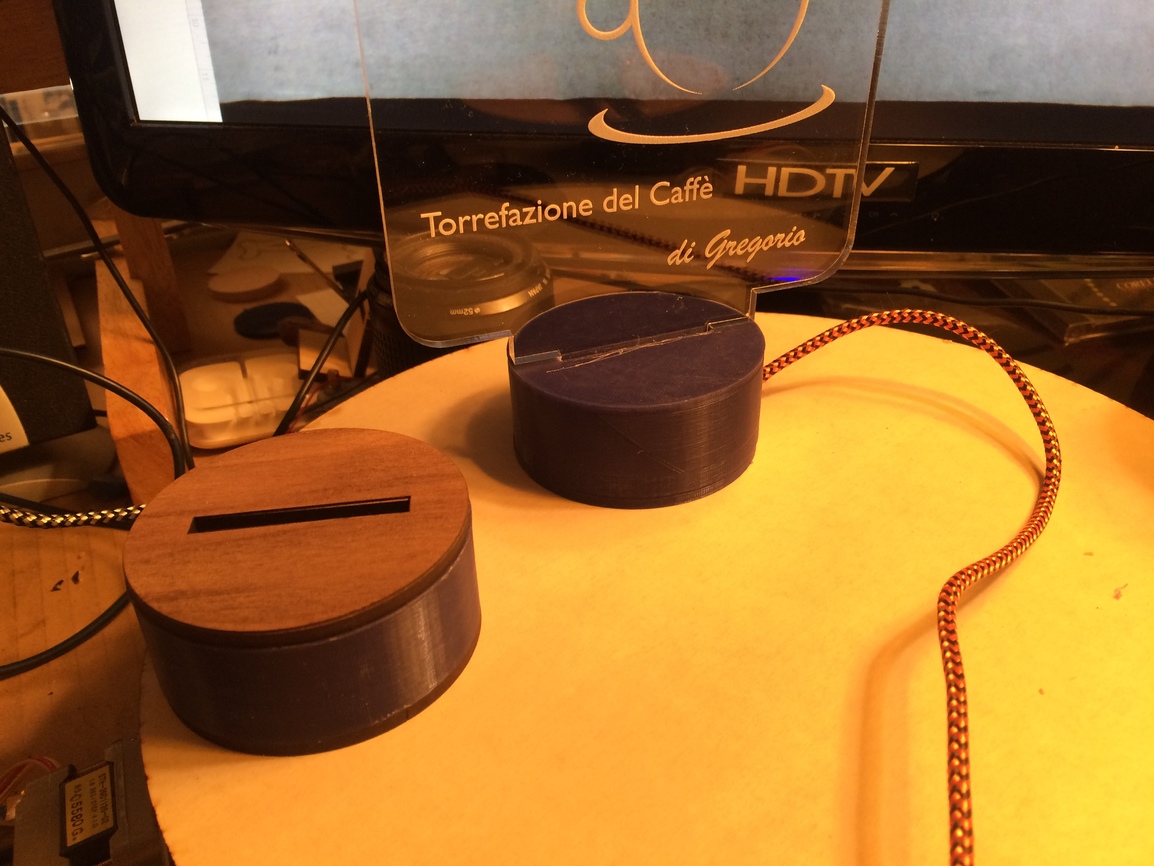
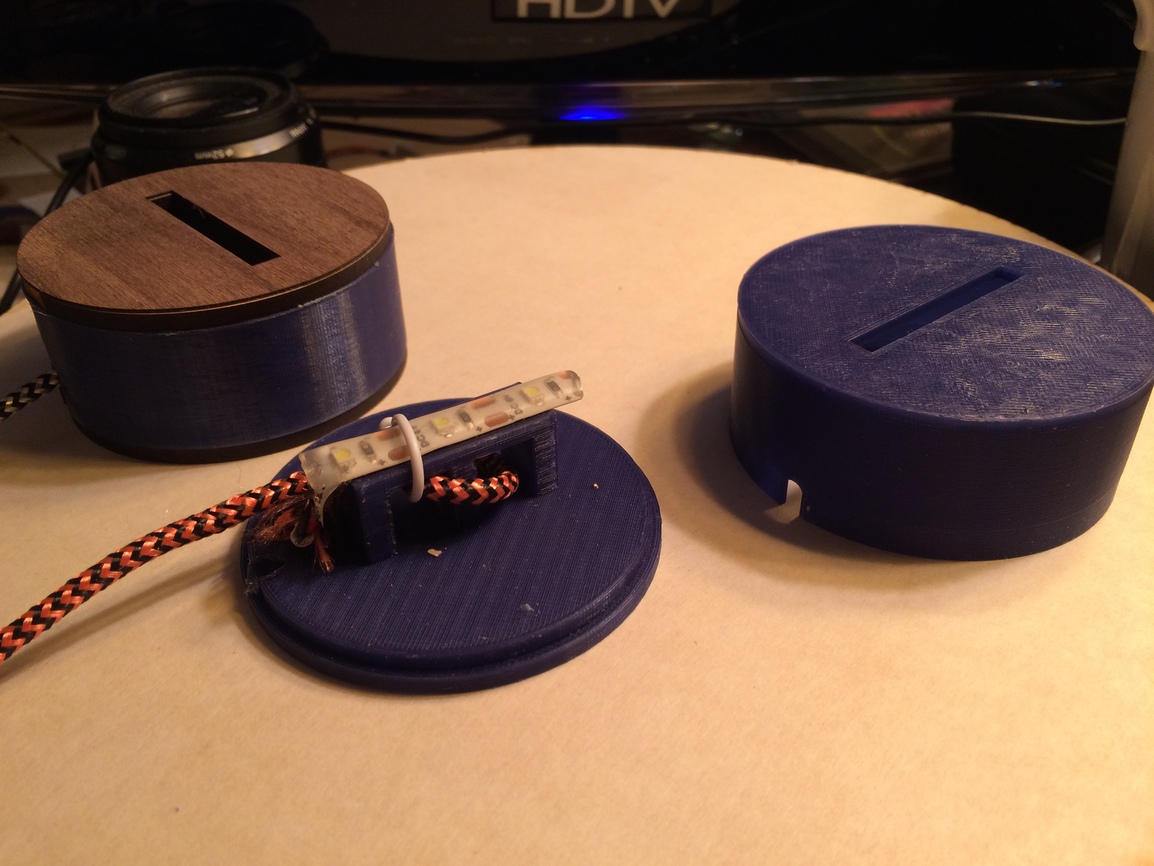
Here are the parts minus the walnut veneer top skin to place to make it look a little more polished.

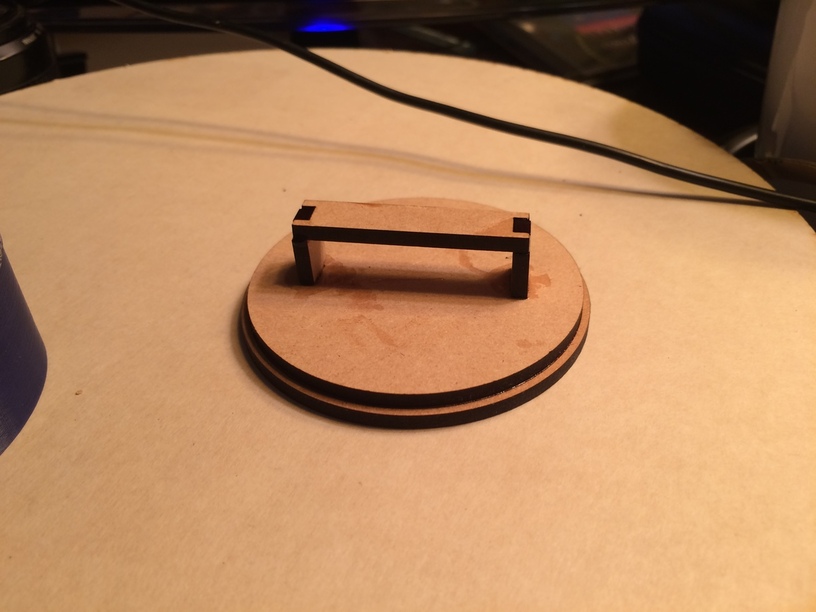
This is the bottom that snaps into the ring. The LED strips have an adhesive backing that allows it to be afixed to the bench to raise the lights slightly up.

74ED8E8F-EC91-462E-9077-5147B84760F5C2A6CAD5-27C6-4CF1-8F23-0AC9A3A74DA93F2B800B-02D9-4B91-A735-3A2F2CEAD31F

EdgeLitShapesFile

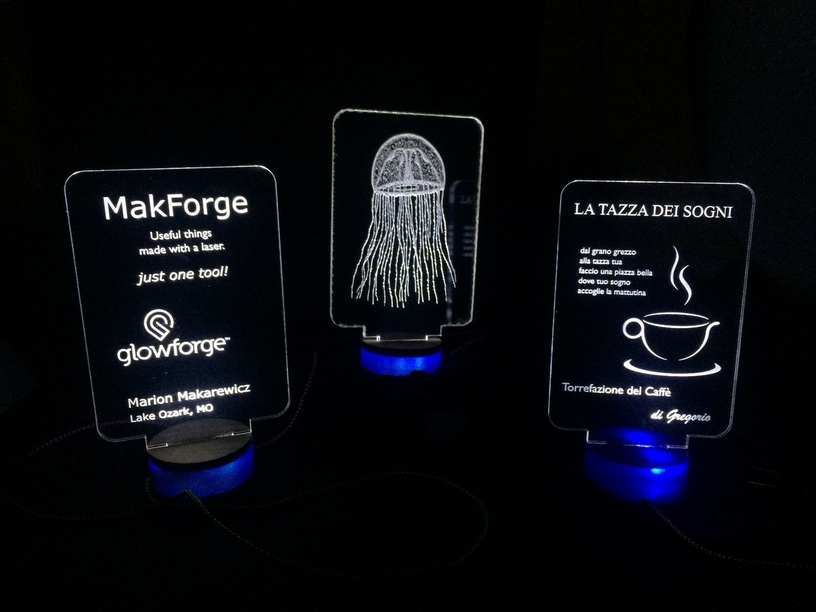
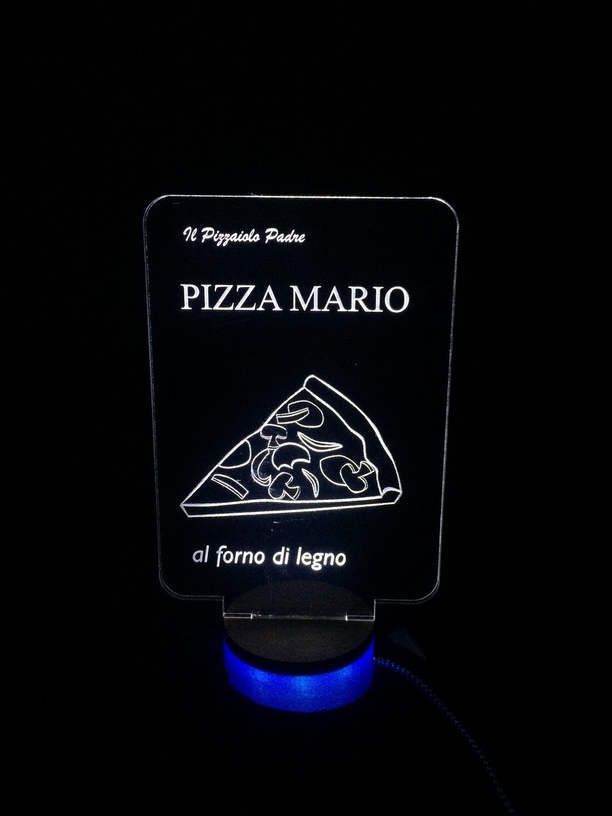
Graphics are from openclipart. I like the jelly fish. One problem is that I used a scrap of acrylic without masking to this sign so you can see the flashback round the perimeter. These are still in the proof testing stage, but seem to work. Need to tweak the layout a bit. Also will post more details as to parts and files.

3d files:

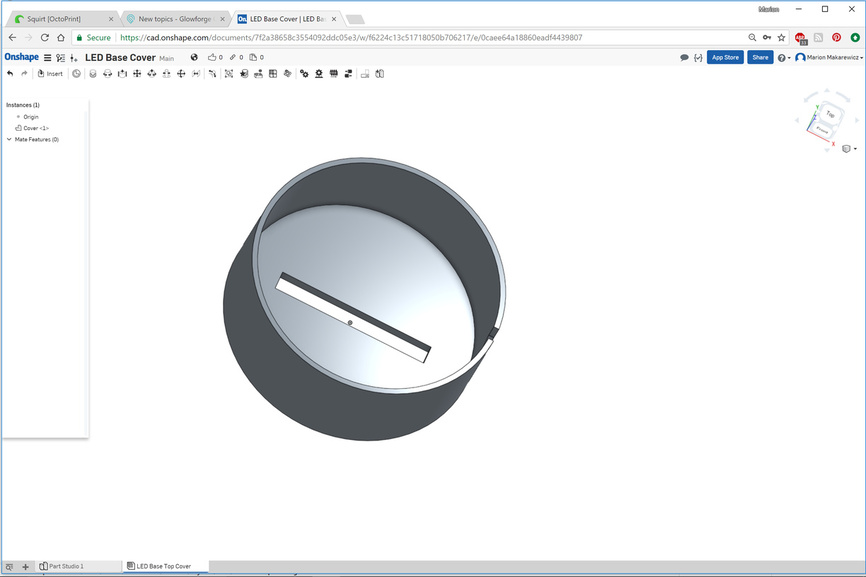
Here’s the OnShape Link. You can find the other parts too. All my stuff is available since I have a free account.

Here are three STLs. Top cover and bottom plate go together and make a complete base. The side ring is for when you want to do the top and bottom plates with the Glowforge. The slot thickness for the acrylic is made for Chemcast .205-.21". Glowforge Proofgrade thick acrylic is slightly thicker, I think around 5.75mm.

LEDBaseSTLs.zip (145.0 KB)

Now I should go back and do this all with variables and parameters so you can customize the file easier. Or not.

83 Likes

Nice! I’ve been trying to think of good 3D Printing + Glowforge projects. I’ve got a few 3D printers sitting idle since I got the GF. Not that I don’t have plenty of 3D printed things I want to make, but I’ve been tied up designing things for the GF.

I’d love to find more combined method projects. Even better would be 3D Printer + Glowforge + CNC projects. :slight_smile:

Nice work here. Although I guess technically it make the “Just one tool!” statement untrue. :slight_smile:

5 Likes

looks awesome, can you post the stl for the ring as well I wouldn’t mind making some of these on my Rostock + glowforge if it ever shows up

2 Likes

Another amazingly informative post!
And great work too, the glowing bases work really well.

I might have to steal your jellyfish idea

3 Likes

Tonight is full of great builds and I’ve been slacking.

I’m blown away by the possibilities created by bringing the base in-house. The base could become as much of the art as the acrylic.

Dang! I’m going to have to order a short reel of LEDs and get experimenting, yeah, right, right after I get caught up with everything else.

5 Likes

Wow! Great design and execution!

2 Likes

Now that’s what I call using your tools effectively and efficiently! And if at some point you wanted them to be all wood you could cover the printed ring with PG veneer.

3 Likes

These are great! Since we don’t have a 3D printer … I will be trying out the LED stand shared by @kittski … who also posted the link to the strip sets below.

Last night I ordered ten of the .5 M strip sets from:

Also ten of the adapters:

I waited until we received our Golden ticket to spend money on supplies and materials. Seklema mat, everything sold in the Glowforge shop except the leather (for now), glues, lights, clamps, etc., etc.

12 Likes

You will have a blast, now that you’re all stocked up with everything you need. Wait…what am I saying?..we’ll never have everything we’ll need! There will always be something else to lure us in. :slightly_smiling_face: There are tons of posts about LEDs and edge lit things…some of them mine…but do you perhaps have a link to @kittski’s LED stand? I did a search but I didn’t have enough info. to narrow it down. I may have seen it when it was posted, but don’t remember.

1 Like

Had looked quickly earlier this morning without success … here it is now! There is a second post on down further with the file. Thank you again, @kittski .

3 Likes

Thanks for sharing all that detail! I love edge-lit signs, but the same old bases are getting boring. Great inspiration to take it to the next level!

2 Likes

Nice!

If it were something you were going to build repeatedly and wanted to cut down production time, you could also make a silicone mold for the base with the top part and slot all built in as one piece, then you could cast resin copies in any color, in multitudes of materials very quickly.

Or, cut the rings from standard size hollow tubes like acrylic or ABS, then laser the tops to fit.

6 Likes

Long term dream is to get into plastic recycling for parts like this using an injection mold or other type of setup. I’m am enthralled by Dave Hakkens at Precious Plastic and his goals. One of the winter shop products is building the plastic shredder. I have a lead on a water jet and laser cutting steel shop close by to get the parts of the shredder cut. The first project would be to make HDPE mallet heads, faced with leather on one side and some other type of medium density surface. Everyone needs a shop mallet, but they don’t know it, or two or three depending on the amount of persuading needed.

9 Likes

Ok. Updated OP to offer the STLs. Getting them to snap fit is a challenge, in that your 3D printer settings and precision will be different from mine. Yes, it should not have error in the final print, but getting mine set up within machinists’ tolerances is a lot of energy that in the end isn’t needed for my uses.

Really nice pairing!

great step by step tutorial, thanks :slight_smile:

Thanks for sharing your process. Looks like the bases are holding up well - plus, they look great!

1 Like

Thanks. Just added a few more pics of other designs on top post. Making a wider base now for bigger signs.

Wow! Great project and write up! Now I have to fire up my 3d printer and get to work :sunglasses:

@marmak3261 - wow, that is seriously the coolest idea ever. Thank you for sharing it! I have a couple of friends who might be really excited about recycling plastics like this. I’m going to have to ignore my GF for a bit and go learn more about this process. :slight_smile:

1 Like