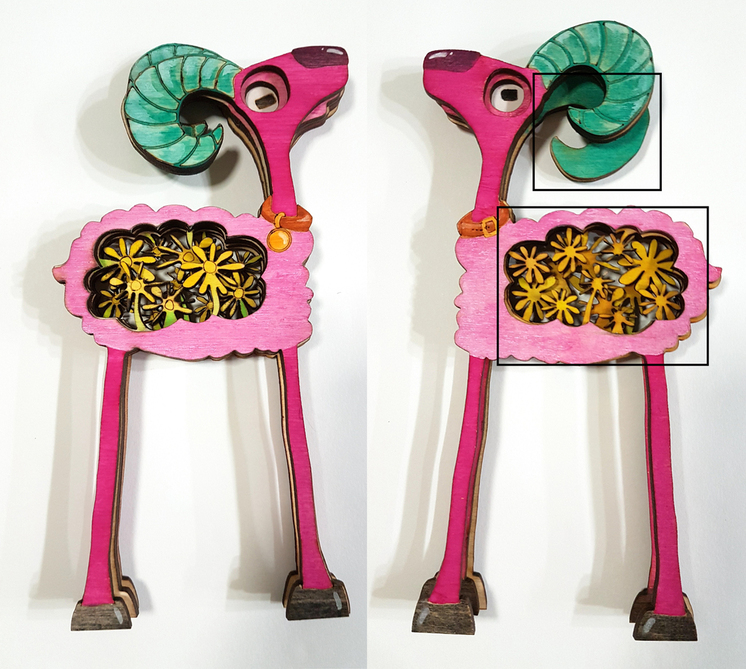
I was working on painting another art toy and realized that the cameras in the Glowforge could make scoring both the front and back possible. On this toy, the horns and flowers show on both the front and back. I originally decided that the back would just be less detailed than the front, but perhaps the cameras will allow me to line up a design on the back after the front is cut? Anyone have any experience with this on a detailed cut?
20 Likes
correct. eventually the plan is to have the process be automatic, but…
you could easily do it yourself, though; for asymmetric designs you could cut two out, engrave the fronts, leave the material in your bed but flip and swap the cutouts, and re-run your design.
2 Likes
So eventually it should be able to automatically find the object that fits the design and align itself, but now you have to manually line up the design with the object on the bed? Watching the video of Dan making the chore token, it seems like it would still be exceedingly easier to line up on the Glowforge than on the laser I have access to now.
3 Likes
Agreed-- should be doable, but using a jig as @jrnelson suggests will make it much easier. I’ve used the method with great success duplicating one of @Jules’ designs:
4 Likes
There is a tutorial for how to do this listed in the Matrix.
4 Likes
I’m not sure I’m following you. I only need one of each piece. Why would I need to cut two? Can I not just cut, remove excess material, flip the cut piece, line up the design, and engrave the back?
1 Like
Thanks for the link. I’m still new to the forums and don’t know where everything is yet. The author is banking on his shape being reversible so the design will line up. My ram is not reversible. When it’s flipped, it’s a completely different shape and will not fit in the hole from the previous cut. Am I missing something?
this answers your previous post. in your case, i would consider making two complete toys, with one flipped in your design file (or in the GF UI if that’s a thing)
1 Like
I’m just trying to understand why. Is it too difficult to manually line it up in the software? I understand if I was using my laser at school that doesn’t allow me to see the material in the cut bed, but I was hoping the Glowforge’s cameras would facilitate lining up the design with the previously cut piece.
I’m the author, (hi!), and you would need to cut out a rectangle around the odd shape as well.
Yours is a special case, given the shape.
- Do the engraving on the first side.
- Cut the rectangle.
- Turn the cutout rectangle over without moving the surrounding material. (the rectangular hole becomes your jig.)
- Engrave the second side.
- Cut the shape out of the rectangular piece.
The secret in that case is going to be to have all of the engraving properly aligned on top of each other around a center axis in the vector file that you create. The file itself is going to look a mess, just like the example in the tutorial does.
But it works very well for aligning double sided engraving. You’re only off by a hair at the most. 
4 Likes
you can definitely use the glowforge cameras to do what you want to do without having to use your cut out as a jig - if that’s an issue for you, or if you wish to do a single piece. there have been more than a few times where people using the cameras for precision work have been a bit disappointed; using the jig / cutout guarantees the result you want.
3 Likes
Please correct me if I’m wrong, but if you’re going to use the camera for visual alignment, the best is placing your piece in the center of the bed.
3 Likes
Yes, directly under the wide camera is best but everywhere is much better than it was a month ago.
2 Likes
Thank you all for the explanations, tips, and instructions. I now understand that the cameras may not work as well as I was hoping, but will certainly give it a shot. If it doesn’t work well, then I’ll know exactly how to make it work with a jig. Thanks again!
6 Likes
Another way of doing this would be to use scrap or cardboard to cut the jig for the other side to lay in. This also allows you to keep the backside engraving separate and visible and more easily placed. You would need the flipped, mirrored shape as a separate color path and then place your back side image on that object. Cut out the shape from the cardboard, and then put the flipped piece of wood in the spot and then do the engrave. Really the same process that @jules did, but allowing for less materials use.
Another thing is to just forget thinking that there is a front or back side to the piece. Make two pieces at a time, one mirrored and swap them out for each other and flip. I have done this in engraving the sides of my stamp box.
3 Likes
Using a cheaper material for the jig is a great idea and avoids lining up the front and back when flipped in the same spot. Ultimately it may not matter much with this project as I’ll likely want to cut multiples anyway. It was just something I was concerned about and may become an issue in the future particularly if I’m short on material.
3 Likes
The flowers are easy. Since you have more than one layer (not sure if two or three) just engrave one side of first layer and the other side of the last layer. In other words flip the image of the last flower layer and then do your cut and engrave. It does matter if you cut it mirrored or not - the non-flower areas are covered up by the other layers.
If the back horn is two layers thick then you can do the same thing. Mirror the layer and do your engrave and cut then when you put the two pieces together they will be engraved on both surfaces.
1 Like
It is difficult to tell - how many layers of wood is that?
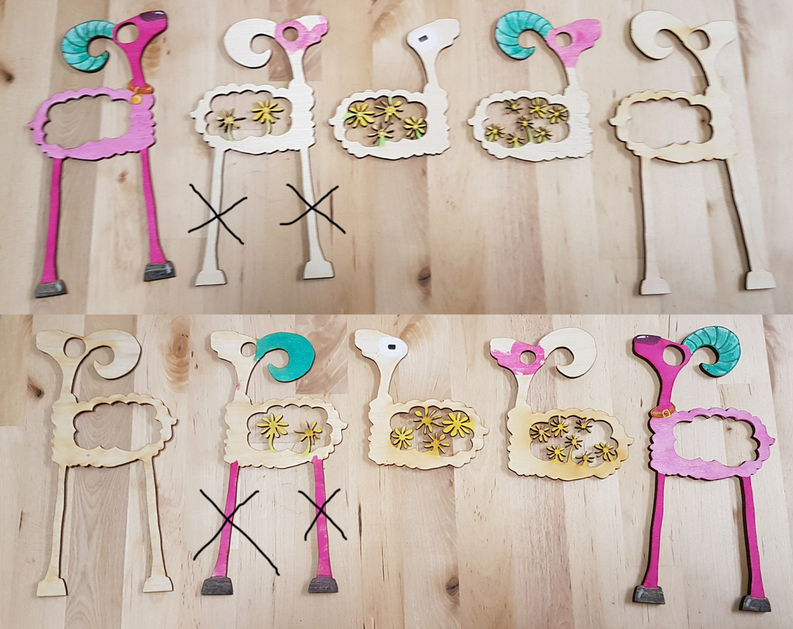
There are 5 layers. This is by far the most complex design I’ve made so far because so many pieces are visible on both the front and back. Even after lots of planning, I neglected to realize that the second piece shouldn’t have legs. I’ll fix that before cutting on my Glowforge. The top shows the front of each piece and the bottom is the backs. If there is paint on both sides, it needs to be flipped to be engraved on both sides. The only ones that are completely obstructed on one side are the first and the last piece. These can be cut without flipping.
12 Likes
If you would like to post (or PM me) the file for one of your pieces that get engraved on both sides, I could try it for you by simply manually positioning in the UI. I have found that the software as it stands today (and they are continually improving it) has a slight offset for camera positioning, but it’s pretty reproducible. So I can usually get the cutting/engraving pretty close to where I want it. This would be without the jig.
2 Likes