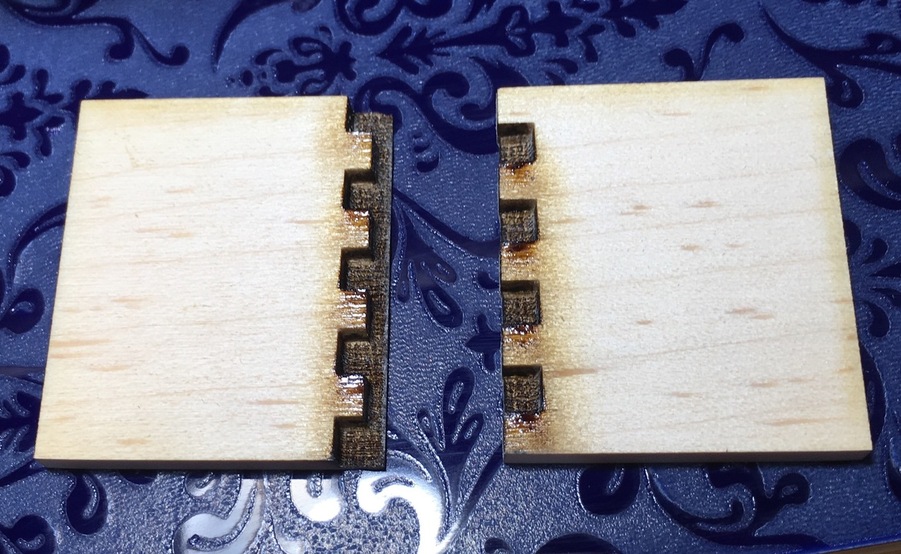
The tricky part is getting your engrave settings dialed in to make a pocket that very nearly comes all the way through your wood. There’s also some variation in the depth of the pockets that makes for a “wavy” bottom, which shows up on close examination of the joint from the side. This could probably be beaten with a cleanup pass or maybe a clever gradient for each pocket or perhaps multiple lower power passes.
Actually all you might need is a way to clean the pockets, the waviness may be just accumulated gunk. Q-tip with ammonia or something? Certainly getting rid of the fingers and just doing a concealed butt joint would get some of the benefits of alignment that you get in finger joints with the ease of assembly of a finger setup – but I digress, this thread is about the noble finger joint!
As a proof of concept, it’s not so bad, but would need work to be truly dialed in.
I also wonder how well this would do on a less uniform species of wood, probably be really tough to get the engrave right.
That is sort of where I started from not caring for the finger results I was seeing in most cases. That “waviness” is the different strengths of the wood on a fine scale with considerable differences between species, and you will find it at the bottom of any deep engrave… to get it clean and flat takes either sanding or cutting with a scalpel wood carving tool.
As for dialing it in, I have found a 10 to 20% variation, depending on the species. Cuts that are 95% to 110% of the way through along the same cut line based solely on wood grain I find commonplace and “dialing it in” amounts to finding the point that the least amount of cutting is 99.5% or in deep engraves the point that the greatest amount of cutting that maxes out at 95%, but just when I think I have it I find a case more extreme in the direction I do not want…
I have one I want to try, but I’m still a few days away from being back with my GF. I was thinking of engraving horizontal rectangles of random varying lengths, with heights that match the finger width, extending out from the fingered edge…or maybe a not-so-random pattern, for a sort of Aztec look.
It varies by species and with most of these examples I sand the edges down to remove the char. I tend to make my fingers just a bit (0.02”) too long, and then sand them flat once I assemble the joint.
There are some where I didn’t like the one with the small holes in the fingers. You can see that the finger edges are much darker, they weren’t sanded. Walnut doesn’t char too much so it’s just a nice dark edge.
As for thickness, this is all 1/8", so it’s not that unusual.
Trying to learn Inkscape and followed your writeup with no trouble. Thank you.
But I ran into a problem trying to use Path -> Union with a box side with fingers generated in Boxes.py with an ellipse path. Using your route to fingers for a box side works with Union with the ellipse.
How to Union the Boxes.py path with an ellipse?
Here is an example zip file that shows the problem: Path Union Fail Question.zip (2.9 KB)
Boxes.py makes boxes that have a problem in inkscape. While all the lines are combined into an object, they are not connected. so no amount of Boolean activity will yield results you would expect.
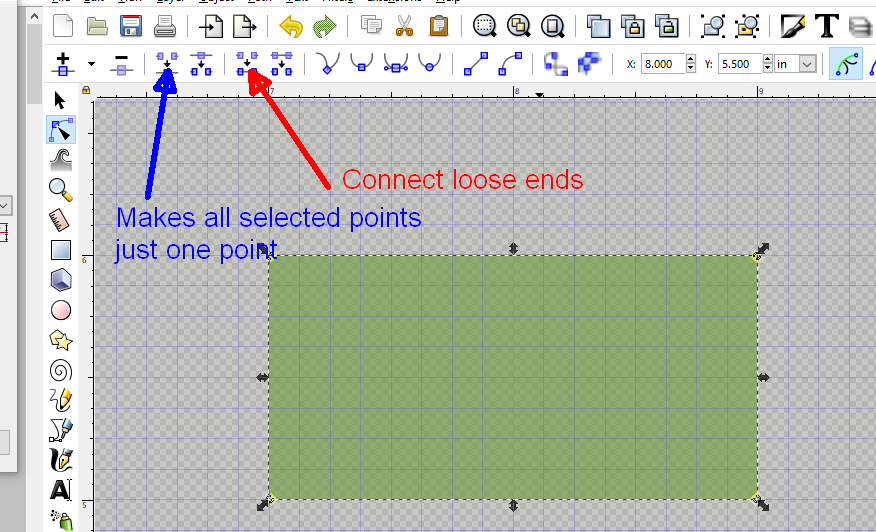
After much effort of going to each end point and connecting it with the one you would hope it connected to I found a better if imperfect solution and that is to make sure that you have a colored fill on and go into node edit and select ALL the nodes. Then you hit the red arrow button…
And it will draw a line from every node to its neighbor closing off an area that you can Boolean in any of the usual ways. This will create certain oddities as most of those lines cross each other and it may make connections you did not want. the button just to the right of it will remove the line between two picked nodes.
You could choose the Blue arrow but if you pick all the nodes in the drawing it will make them all one node! so you have to pick through one pair at a time that can get very tedious with a lot od teeth.
For the example I zipped, Red arrow method worked without oddities. The fill was exact even though CTRL A (All nodes) initially did not show some nodes on corners.
The Red arrow method also worked for the example sent. The fill was again perfect and no other editing of nodes necessary before Union.
Thank you for figuring this thing out. For a change it wasn’t Pilot Error on my part that was fouling up Unions.
That happens when you have more than one node in the same spot. The blue arrow would merge nodes on top of each other (in most cases) and you’d get them back.
Be careful in inkscape performing node operations with anything that is really detailed. A box like this isn’t likely to give you trouble, but more complicated shapes with lots of nodes close to each other can go really sideways as Inkscape guesses which nodes should be paired to which.
This is true with stroke to path and inset/outset as well. Just give your design a thorough inspection afterward if precision will be important to your final design. Extra modes and unexpected tiny curves can happen.
The issue there is non-linear issues with the geometry represented in the node handles on curves that tiny differences make for huge results that can become close enough to infinite to crash the computer as it zooms by the biggest number the computer can handle.
I have managed three different approaches depending on circumstances. The first is to try to eliminate the crossed lines as it is the points very near each other that cause most of the problems. In that case the union command will eliminate such duplication of area caused by the solution I laid out above.
Where six icons to the right of that red arrow forces a straight line between two selected nodes that nonlinear issue is eliminated, but obviously also gets rid of curves you might want if used too broadly. However if most of the design works out except for a few wild loops, selecting those loops and making them straight lines will often solve that problem.
Thirdly if an offset starts making wild results at the slightest movement I have found that with greater movement that critical distance is past and you get closer to the result you wish, which is very counter intuitive but has worked for me. Further wherever you move that offset point to the computer will try and offset the design through that point. Sometimes there are many wildly different results very near to where you have placed that point so the results will look very crazy as the slightest move will supply that very different result. If you move that point anywhere near the design, and especially where there are few such possibilities you will get a much more stable result even if it is near the center of the design rather than the corner where it first appears.
I use them to keep boxes closed. The leather wrapped layered boxes are a good example.
I know that @rbtdanforth does a lot of magnet enclosures too. I think someone made a box with magnet corners but can’t recall offhand. I’d love to see what you come up with.


 just wondering what cutting settings did you use for such tick wood? I’ve tried ones and got only charcoal edges