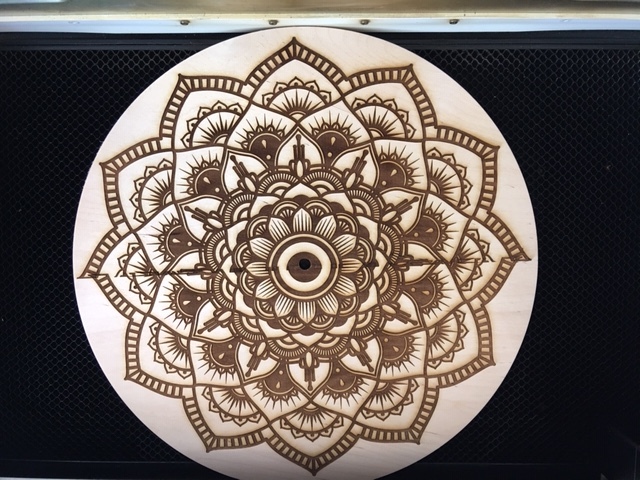
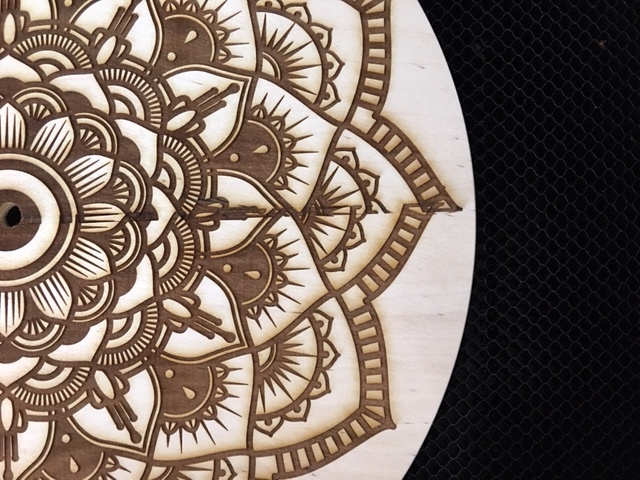
I wanted to make a clock but the piece was too big for the bed, so since I spent the money on the GF Pro I said to myself “this is the perfect time to try it out”. I read several posts on the forums about how to divide the image up so that GF could process the various parts onto a larger piece of wood. I engraved the top part (telling GF to ignore the bottom image), then carefully lined up the second image to the already engraved top half using the onscreen image. each time when it went to process the image it would appear slightly larger and misaligned from where I had it placed. After several attempts of correcting this I decided to try the engraving thinking it might just be some glitch on the imaging after processing and in fact it really was lined up to where I thought it would be.
This is the result…
Question - How do you actually line up 2 images so they actually engrave in the correct alignment if you can’t rely on the image of the GF bed?


?
First, you will want to get the bed Calibrated which you can find here;
Then you need to Set Focus as you can read about here;
Doing that should get your image much closer to WYSIWYG. In addition, by putting the whole image in one file lined up correctly with different upper and lower colors and holding the work in a fixed horizontal direction you can use the Arrow keys or Shift Arrow to move the work in a vertical direction only that will help a lot. Making sure to use the focus on the same place so the perspective is the same. I often do this several times to make sure .
As a last resort do a test run that can abort at top speed and power of one to double check that alignment. It might even be a good idea to make a small mark off to the sides to run that test.
Part of perfect alignment is material placement, so some people have used jigs or created guidelines. Here is a post that might be helpful. There are other discussions in the forum regarding passthrough alignment. Near perfect alignment passthrough projects
I don’t think any technique is good enough for art but what I do on practical cuts is to ignore the camera altogether.
I just set up my files for split every so many inches, mark the stock with a fine (.5mm) mechanical pencil and then simply index the material the same amount as the break in the file.
Actually doing that recalibration now. Just been using GF for a couple of weeks now. There is a lot of info on the different boards to weed through. Going to set focus next when the calibration finishes. Are there any other posts I should read to ensure the GF is running at it’s optimum level?
The Matrix is a good start;
Though that might take a bit it is worth it.
Whatever your software choice there is plenty there as well by putting the name as a search. I had never touched Inkscape before getting the Glowforge but dove into it while waiting for it arrival.
I would also look for threads about Head Fans and cleaning and magnets. If you are going to use any you want them shielded and of course Bed Pins to hold material otherwise.
Set Focus is something you do prior to every print - it replaces entering in the height manually and it updates the camera image to the exact height of the object you’ve placed in there (I’m clarifying because your comment makes it sound like you thought it was a one time thing like calibration)
Hello, @epconrad, please forgive me for my delayed response. I am so sorry your print didn’t turn out as expected! Have you had a chance to try the awesome tips that @rbtdanforth suggested? Also, here’s a great post from a customer describing their Passthrough technique, this may be helpful if you haven’t seen it already. Please let me know if you are still having issues getting your prints to turn out beautifully and we will look into this further. Thanks!
Thanks. I followed the advice and all turned out good.
I’m so glad it worked out for you. I will be closing this thread now. If you are still experiencing any trouble, feel free to write into support@gloworge.com or open a new thread.