I’ve got pdf patterns I got before I owned a GF and now I’m looking to turn those patterns into laser-able patterns. Does anyone have any idea how I can go about doing that? I’m still pretty new to using vector programs so this may end up being simpler than I imagine. Many of these patterns have a water mark that I don’t care to have engraved on my pieces as well as have some larger bits broken up over multiple pages. These patterns were intended to be printed on paper, cut, and taped together.
Disclaimer: I have purchased my intended patterns directly from their creators and have an okay for commercial/selling use. I don’t plan on sharing these patterns, just wanna know how how to use them with my GF (if I can).
4 Likes
Tbh the “answer” will be dependent on what you’re starting with. What file type are these patterns in now?
I put answer in air quotes because there are lots of ways to approach almost every conversion. There’s no one way to do it, most people will have slightly different workflows.
4 Likes
It’ll depend on whether those PDFs contain vector, raster or both types of data and whether you want to cut/score, engrave or both.
GF takes PDFs nicely. My go to program for dismantling PDFs and seeing exactly what’s in them is Adobe Illustrator.
5 Likes
One could open it in Gimp and use that to clean watermarks (there are many ways to include them so a bit of looking is needed) Then turn masks to paths and export the paths as SVGs. There are details steps in other posts so a search here on “Gimp” should help.
5 Likes
See this is the problem with ambiguous requests for help like this, now we’re all sitting here guessing and spinning our wheels, probably offering conflicting advice that isn’t of much help. We’re kind of dead in the water until OP comes back with more details.
3 Likes
Sorry everyone, I work funny hours. Anyways I have no idea on how to even tell if something is rastered. I look at it in adobe acrobat reader and it says it’s a pdf and I can turn it into a different type of pattern. Opening the pattern in GIMP I cant select any of the lines. I’m assuming at this point my best bet would be to open the patterns one page at a time and copy the lines manually? I really don’t know much about these type of programs yet.
2 Likes
Doing some more investigation within GIMP, the little magic wand tool seems to be able to select or highlight each piece rather easily, but I honestly don’t know what that does. I can copy that and it creates a sort of copy?
3 Likes
When I try just uploading the pattern into the GF design app it says “The mask(s) have been rendered along with your design in case you prefer to cut them out separately. For now, edit the affected shapes with a path subtraction tool and they will upload successfully.” Looking in GIMP, I cant seem to find anything like that.
3 Likes
So, what editing software are you familiar with?
Sounds like you know gimp a bit, are you familiar with any vector programs like illustrator or inkscape or affinity designer?
Once we know where you’re coming from, we can probably give advice specific to what you know.
if you’re a blank slate, it comes down to preference. I like Inkscape and can speak to that, but other people are quite good with the others and can offer specific workflows there.
Let us know and we’ll get to the bottom of this. 
3 Likes
I’m a blank slate. I’ve got Inkscape and GIMP downloaded but haven’t really ever explored either program much. They’re rather daunting for someone who doesn’t know what they’re looking at. I’d like to use Inkscape more since they seem to be more user-friendly in regards to GF.
2 Likes
One of the trickiest things here is that this can require a fairly deep knowledge of your software to convert files like this.
Generally the process is really simple and only requires some basic tricks, but going from “I have a file that I want to convert” to “ah, I just have to do the following 5 things in this order” requires a little practice and experience. I hit you up in DM about the specific file in question, I know it’s not your design to upload to the forum so if you want someone to take a look at it you’ll probably prefer to send it directly like that.
If you don’t feel comfortable even doing that, a screenshot might help… but often it will come down to looking closely at the original file and figuring out what condition the file is in to start with, then devising a plan for how to accomplish what you’re trying to do. A screenshot alone might not give us enough to work with in that regard.
3 Likes
Wonderful, thank you so much! I’ll check my DMs.
2 Likes
Hmm, ok so this file has a few challenges.
So the first thing you would do is get your pdf and import it into inkscape. You just drag it to the inkscape window and choose which page you’re importing. Of course, you have to do it a few times to get your whole design in there, but let’s just start with one page.
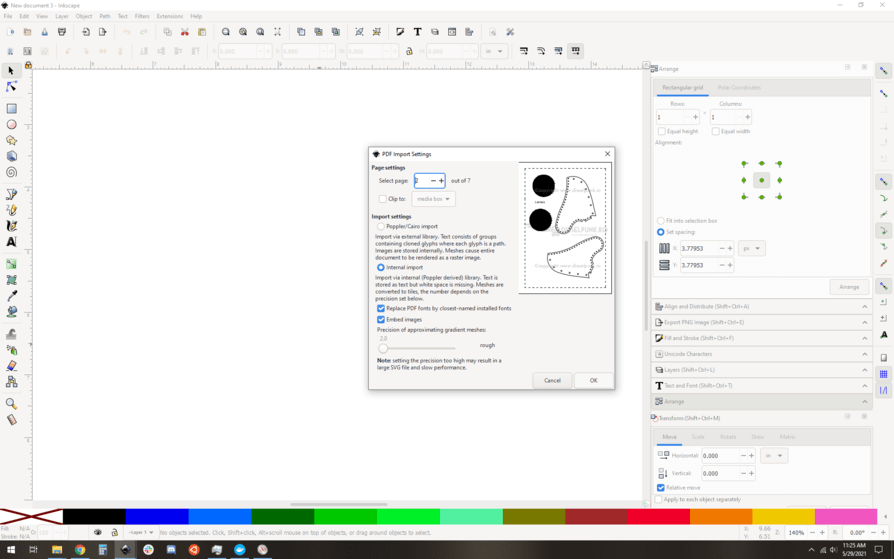
Import that, it thinks for a minute (first warning sign, the longer this takes the more complicated the file is). Great, here we go:
The trick here is that you’re looking at a big group of items. in order to get at the individual pieces of the design, you have to either enter the group or ungroup the items. I am going to ungroup (control-shift-g) because we’re just doing rough surgery. Groups can be inside groups, the key is to look at the bottom of the screen when you have an item selected. It’ll say something like “one group of 45 items selected”. When you ungroup it, it’ll say something like “45 items of type X selected”, what we want is to dig down until we get to paths or images so we can work on them.
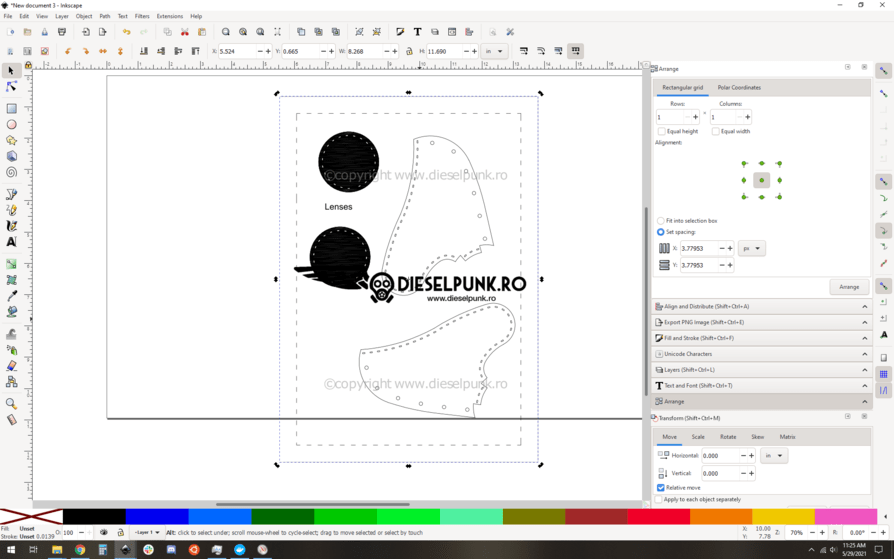
it was pretty easy to ungroup then select the water marks and remove them:
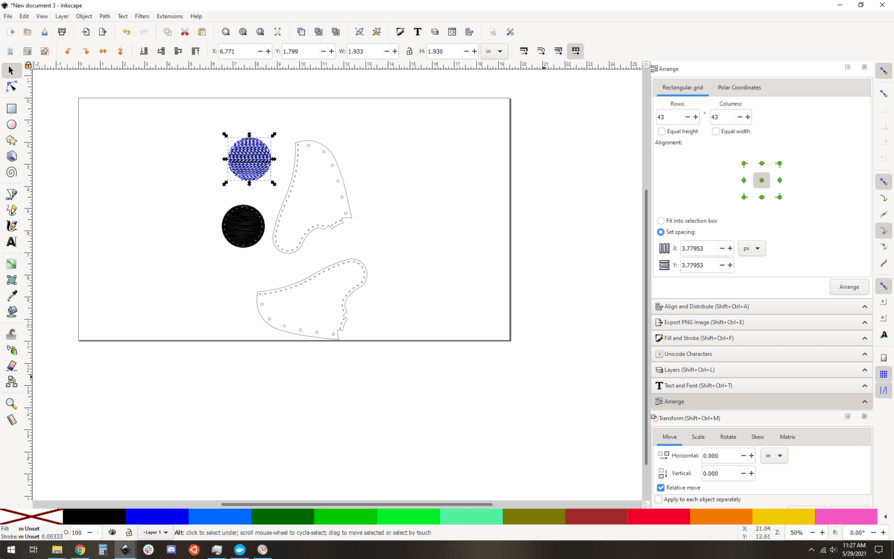
The tough parts come now. Those lenses are so weird, they aren’t one filled circle, they are a ton of weird sliver shapes. When I say a ton, I mean it, it was over a thousand parts. So odd. Luckily there’s a trick for that, an item called “select same”. I was able to right click on one of the black slivers and “select same fill and stroke”, which then selected all of them… and hit delete.
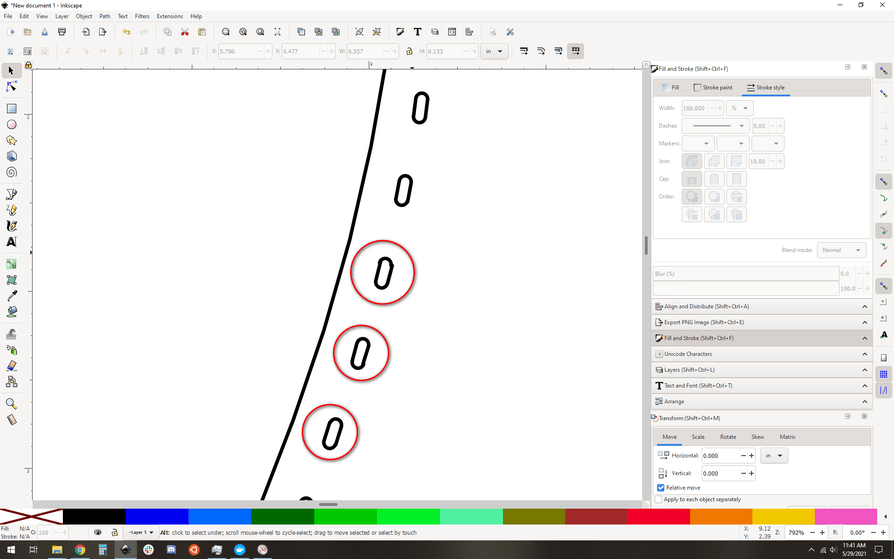
Oh heck yes, looks so good! but… is it? I dug deep and zoomed in on those stich holes. Turned out they were collections of grouped tiny line segments. That’s not good. Ideally they’d be little ovals, but they are actually segments. OK, that may not be a problem, let’s look.
Zooming in, I see a host of problems. Lots of the ovals are misaligned. Take a close look at the ovals circled in red.
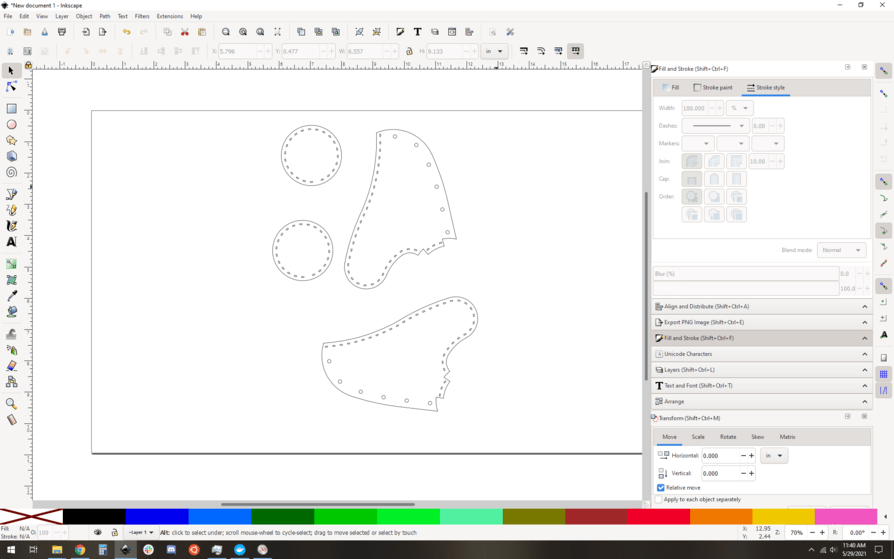
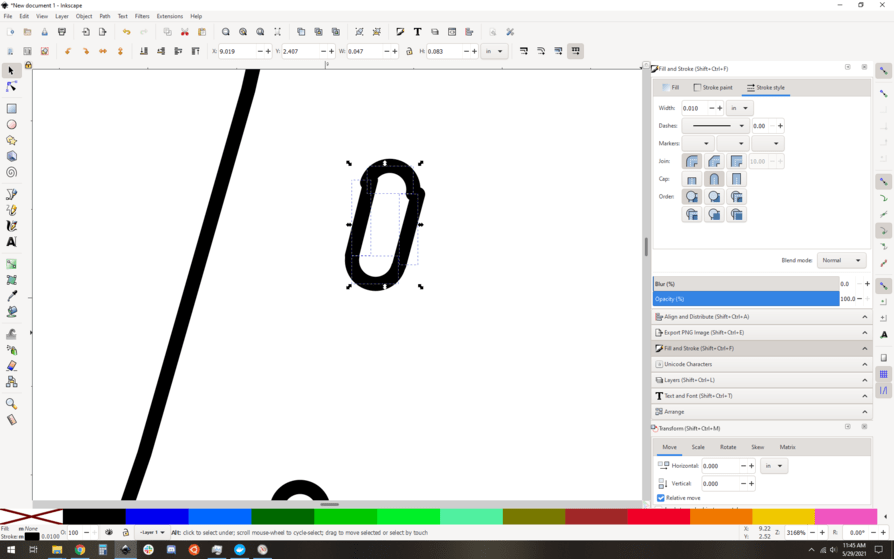
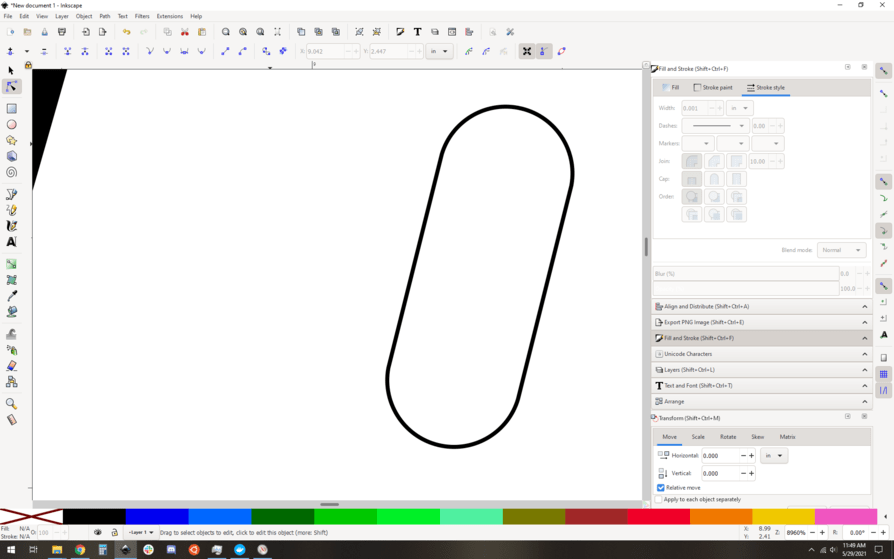
Now this is where vector files differ from what you’re used to. Lines in vector programs are just “described”, they aren’t actually drawn. So this file basically contains instructions for how to draw the line, not the actual drawn line itself. That means we can change the appearance of the lines. What I want to do is make the lines super thin and make sure they “end” abruptly, without rounded end caps.
We go from this, where the line is 0.01" thick and has rounded end caps (look on the style dialog on the right):
to this, where the lines are 0.001" thick and have a square end cap:
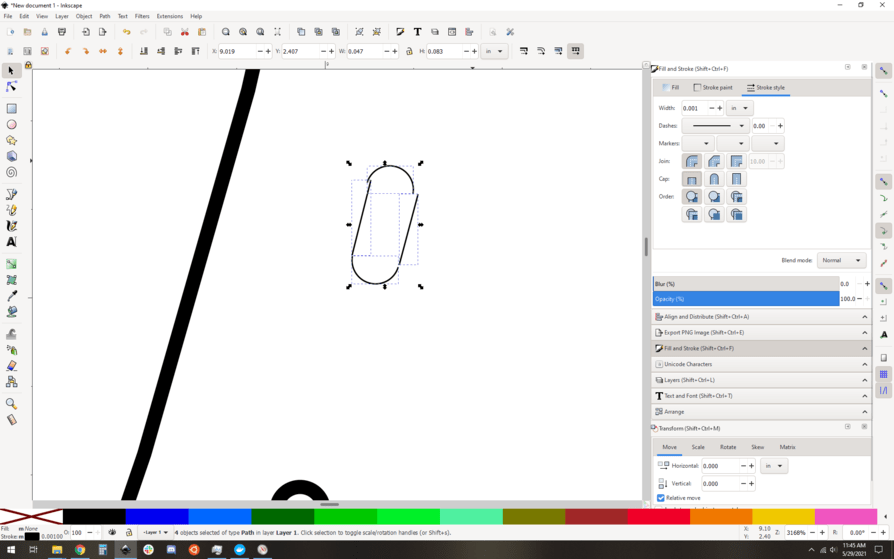
Then I unselect everything to make it a bit more clear:
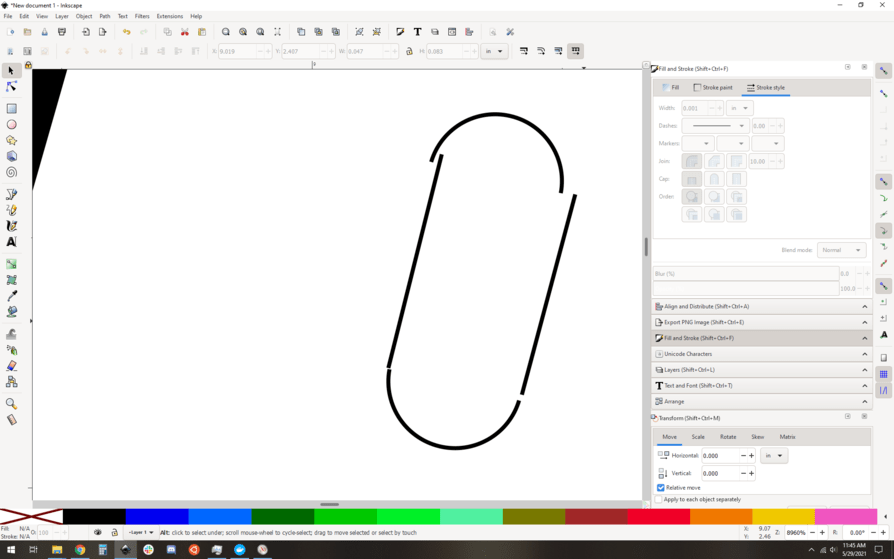
And now you see the problem. The laser’s going to try to cut that shape, which isn’t a clean oval. It’s pretty unlikely that the hole will cut out all the way, and if it does, it’ll be really wonky.
You can repair this manually, but each stitch hole will be a new adventure to see if it’s correct and then manually editing the paths to line them up if they aren’t. It’s not hard, but it would be a major time sink and boring as heck. One hole like this takes seconds, but you know how many holes there are.
So, what now? It’s not too much fun to fix this stuff manually. There are ways to use pattern on path to add stitch holes, but that’s a bit of a level 2 skillset thing. If you want to see a tip on how to do this from the de facto leather champ on the forum:
I don’t know what to advise here. If it were me, I would probably abandon this design and go looking for a better plague mask that was maybe designed to be laser cut. Most likely the paths in that would be cleaner and optimized for lasering.
Anyway. If you do intend to go down the self-repair path, then once you get all your stitch holes adjusted and any other path issues in the file are also addressed, you’d want to take all your pieces and align them carefully to fit in your material and set the outer shapes to cut after the inner shapes via colors.
If you want more reading on path editing (key skill for this sort of work), check out:
So yeah, nothing too complex here, but it does require a little experience. Maybe shelve this project for now and come back once you’ve got your legs under you? There’s no shame in that, I know I sure did that when I was learning inkscape.
7 Likes
That is a tremendous help! Thank you so much! I’ll do some fiddling with it on my weekend, and at the very least use this to get more familiar with the program. I cannot thank you enough for your help here!
4 Likes
From what evansd2 is showing, it is very different than I had imagined. A ranked array of daises is a pattern, but then so is the cut-out lines of a piece of clothing and it is apparently the latter you are looking at. ![]()
I think of Inkscape and Gimp as like two halves of a single program. One deals easily with rasters and the other deals with vectors and between the two is especially interesting ![]()
Here are a few places to look
Using Gimp to get a better trace in Inkscape - Glowforge Tips and Tricks - Glowforge Owners Forum
Inkscape trace in Gimp ![]() - Everything Else - Glowforge Owners Forum
- Everything Else - Glowforge Owners Forum
Doing the offset thing in Gimp - Glowforge Tips and Tricks - Glowforge Owners Forum
3d Engraving help - Problems and Support - Glowforge Owners Forum
3 Likes
Thanks for the help! I’ll check those out. Not gonna lie, its all still confusing to me, but im sure i’ll figure it out eventually.
1 Like
What an great in-depth explanation. I’m curious, could it be printed out and use the GF camera to take a picture, select the things you want cut, engraved etc. and then try?
Scanning makes a raster, yeah? I don’t think it does centerline trace?
I’ve considered this as well, though have not tried it as of yet. I’ve got my weekend coming up so I’ll try at that point and get back to you. I don’t expect it to be that easy, but if for some reason that works then all the better.
As @evansd2 said, I think the camera only does engraving.
I’ve also put contacting the seller and seeing if they have a laser friendly version available or if they are working on one. They’re good patterns and everyone that has bought one, or received one as a gift has loved them so I’d be fine for paying for it again, lol.
So here’s a question. Things have been slow at work so i’ve been reading through the tutorials on inkscape. Would I be able to follow the steps the steps above to get rid of the watermarks and then do a bitmap trace? Not sure if a bitmap would work or not. Just a thought.