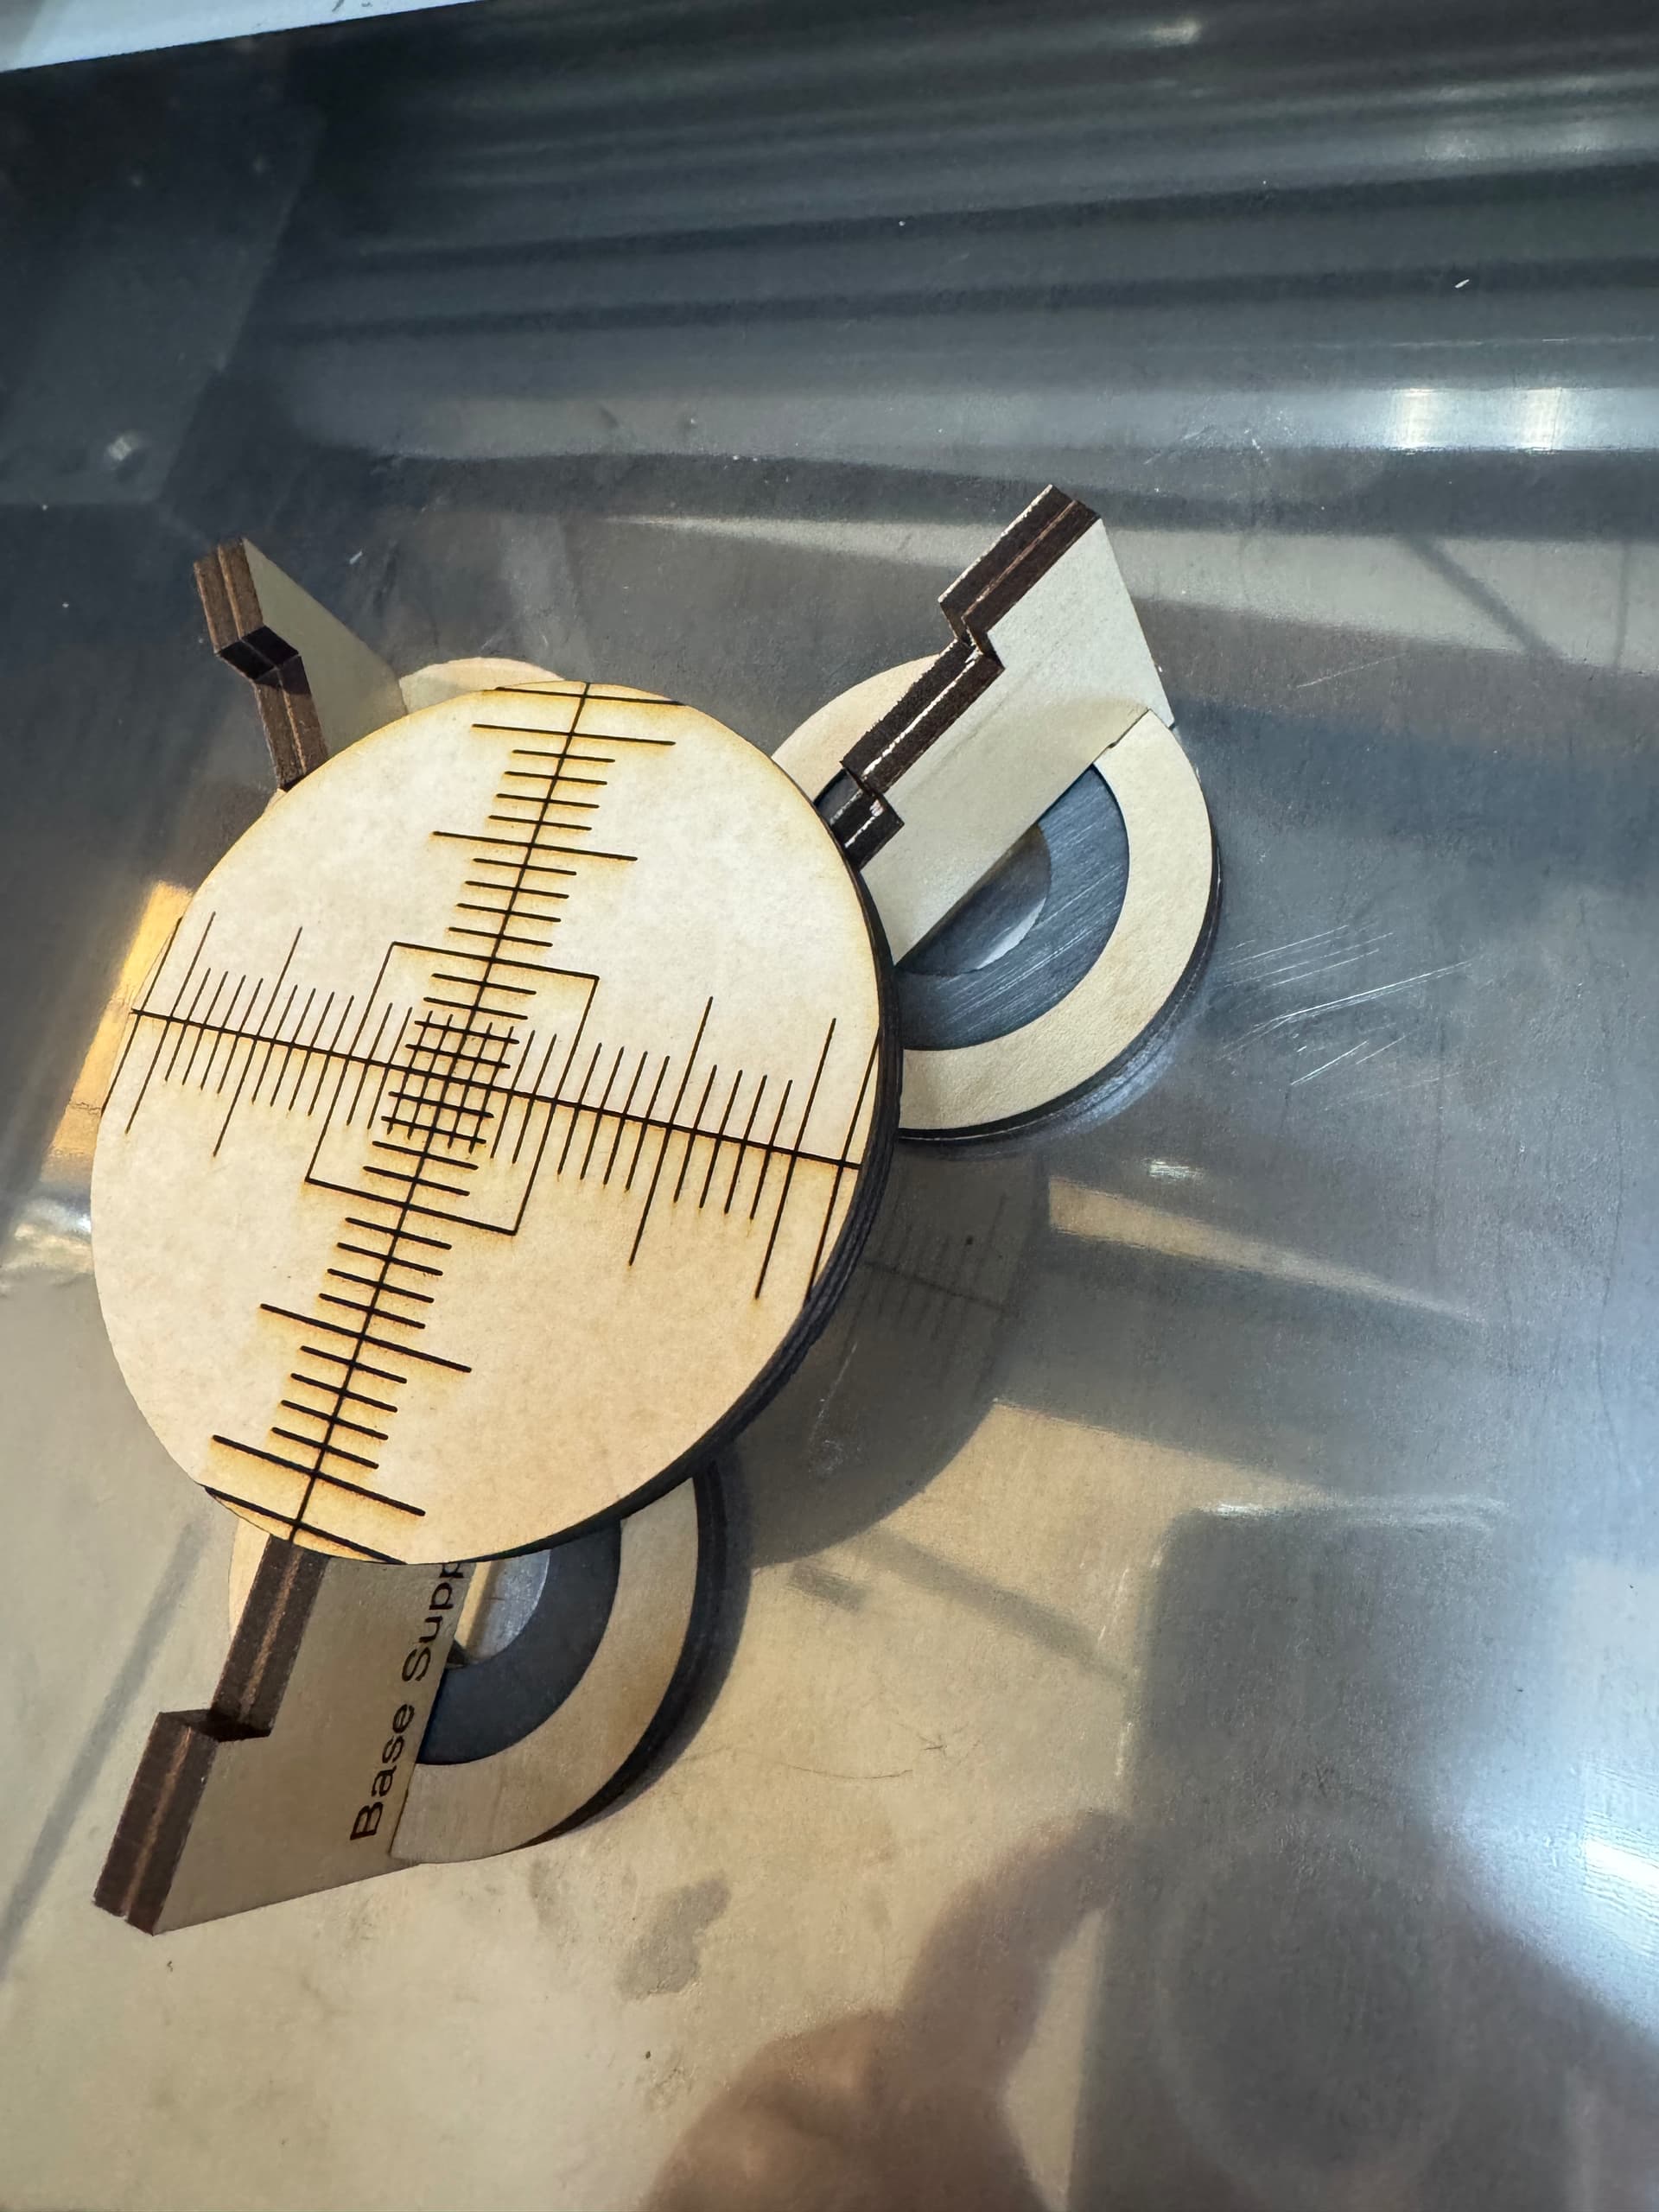
I’m going to do some engraving on a piece that will cause me to remove the crumb tray. I planned to make an alignment crosshairs on a piece of proof grade maple veneer because it’s thin and I had it handy. The idea is to lay the veneer over the piece to be engraved to help me zero in on alignment by making a couple of X’s overlying the crosshairs once I have the piece jigged up.
I’ve been trying to engrave or score the attached crosshairs file (made in Linearity Curve, if that helps) on the veneer, but both proof grade engrave and proof grade score settings don’t even mark the masking tape-like surface of the veneer. I wonder if the 1 point stroke width I used in Linearity Curve is the issue, or should I just modify the engrave or score settings to put more heat into the veneer? Thoughts?
Change the settings, and ensure your optics are clean. You can’t engrave paths, so you must be using score or cut.
GF UI does not recognize stroke-width (which is just a path with a width applied). A 1000pt stroke width would be treated exactly the same as a 1pt stroke width - which is what yours are.
Thanks, I had just cleaned the optics two days ago.
The stroke width note is very useful.
I’ll try some different settings today. Present score settings are 126 speed, 2 power, 1 pass. Doubling power seems like a big step, but 2 times nothing still isn’t much, so I’ll try 4.
There are better ways to do jig making, in some ways you’re taking the least accurate aspects of using your Glowforge and combining them.
In no way is this a criticism — your workflow “makes sense”, it feels like it’s on the right track — but I think there may be a more direct solution for you. If you upload a picture of your item to be engraved, tell us its dimensions and describe exactly what you’re trying to do I bet we can help you find a simpler workflow with better accuracy.
2-Power is VERY low. 1 is the minimum and I’m not sure even produces a beam.
But the suggestion above regarding making a jig is a good one..
Another thing I should mention regarding stroke - the color makes no difference either. In fact, using different colors is how the design is broken into individual steps in the GF UI.
On the stroke width again - I had Inkscape open so I just created two rectangles, and set one to 1000pt stroke width, the other to 1pt. No fill. In Inkscape:
Evans, I REALLY appreciate the critique! This is my first time doing something “out of the ordinary”. I will try to get more details posted up tonight. I just figured out I am going to need to redesign my fixture to move the engraving surface higher, so that’s the first thing to do. I used a simple fixture design posted elsewhere on this board, but didn’t make them tall enough on one side.
I love that you’re pushing the limits of the machine. I think some of the most interesting posts over the years have been by people who said “how about I try this…”.
Looking forward to more details about your project.
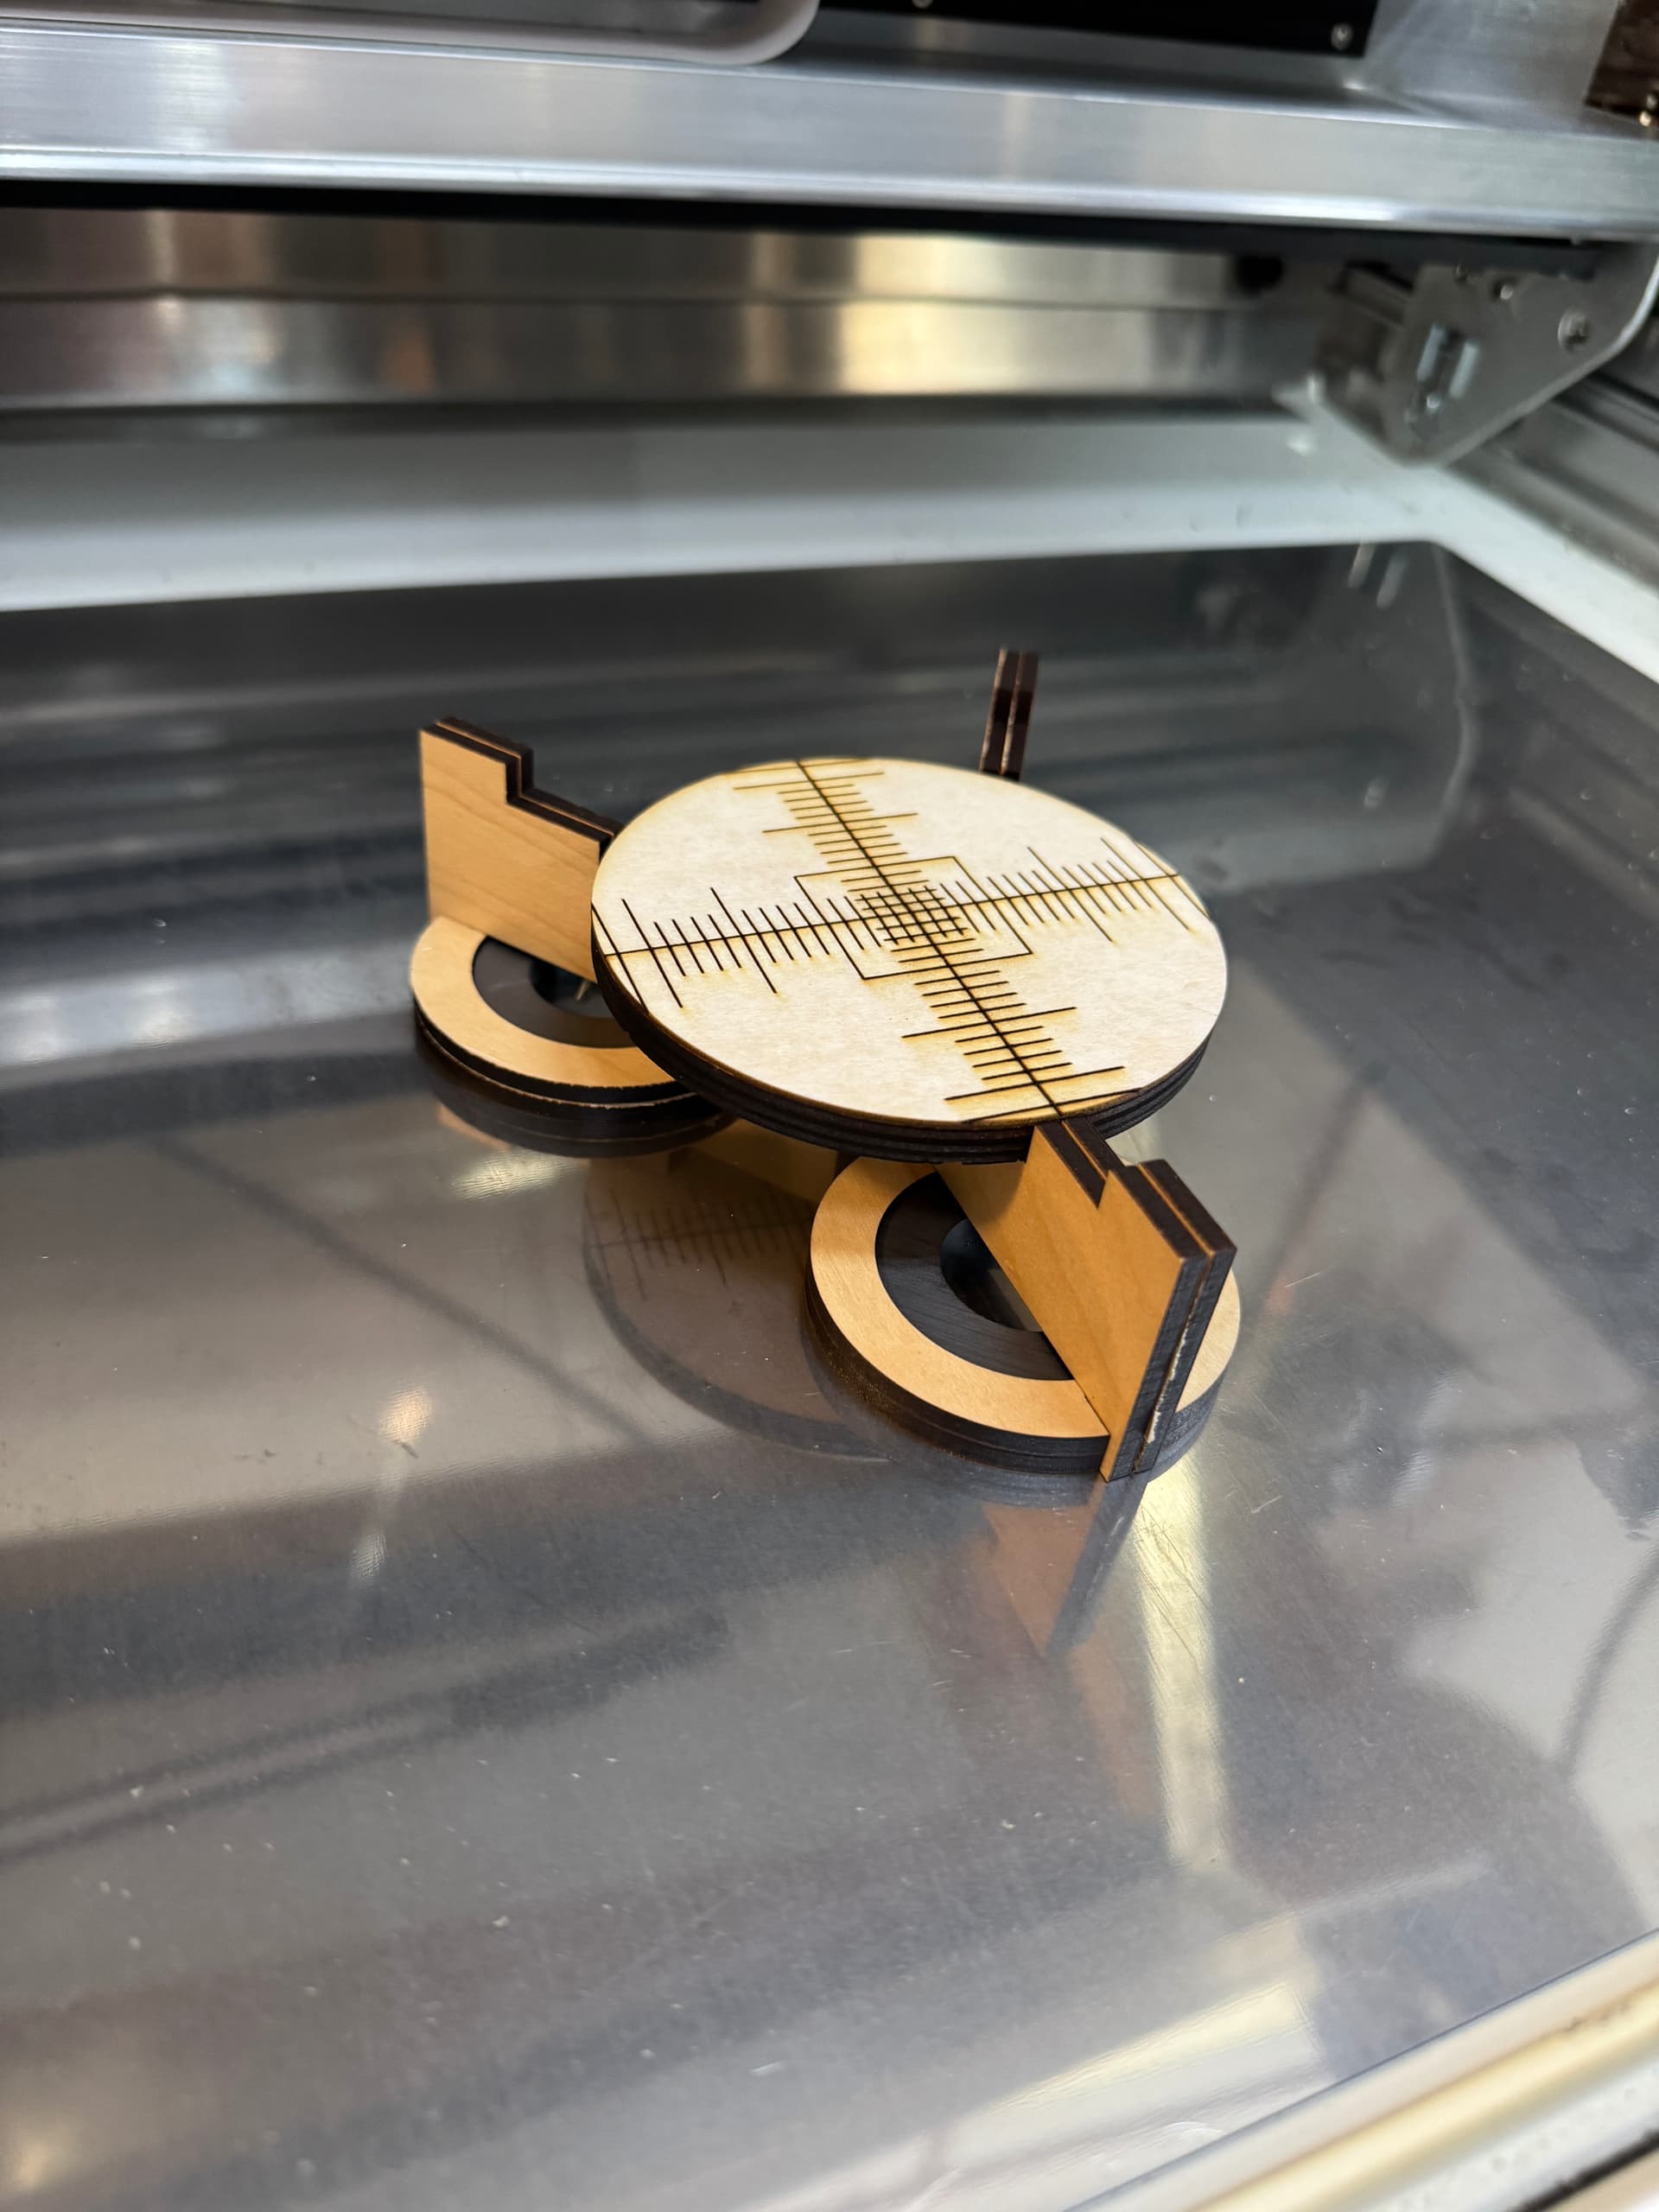
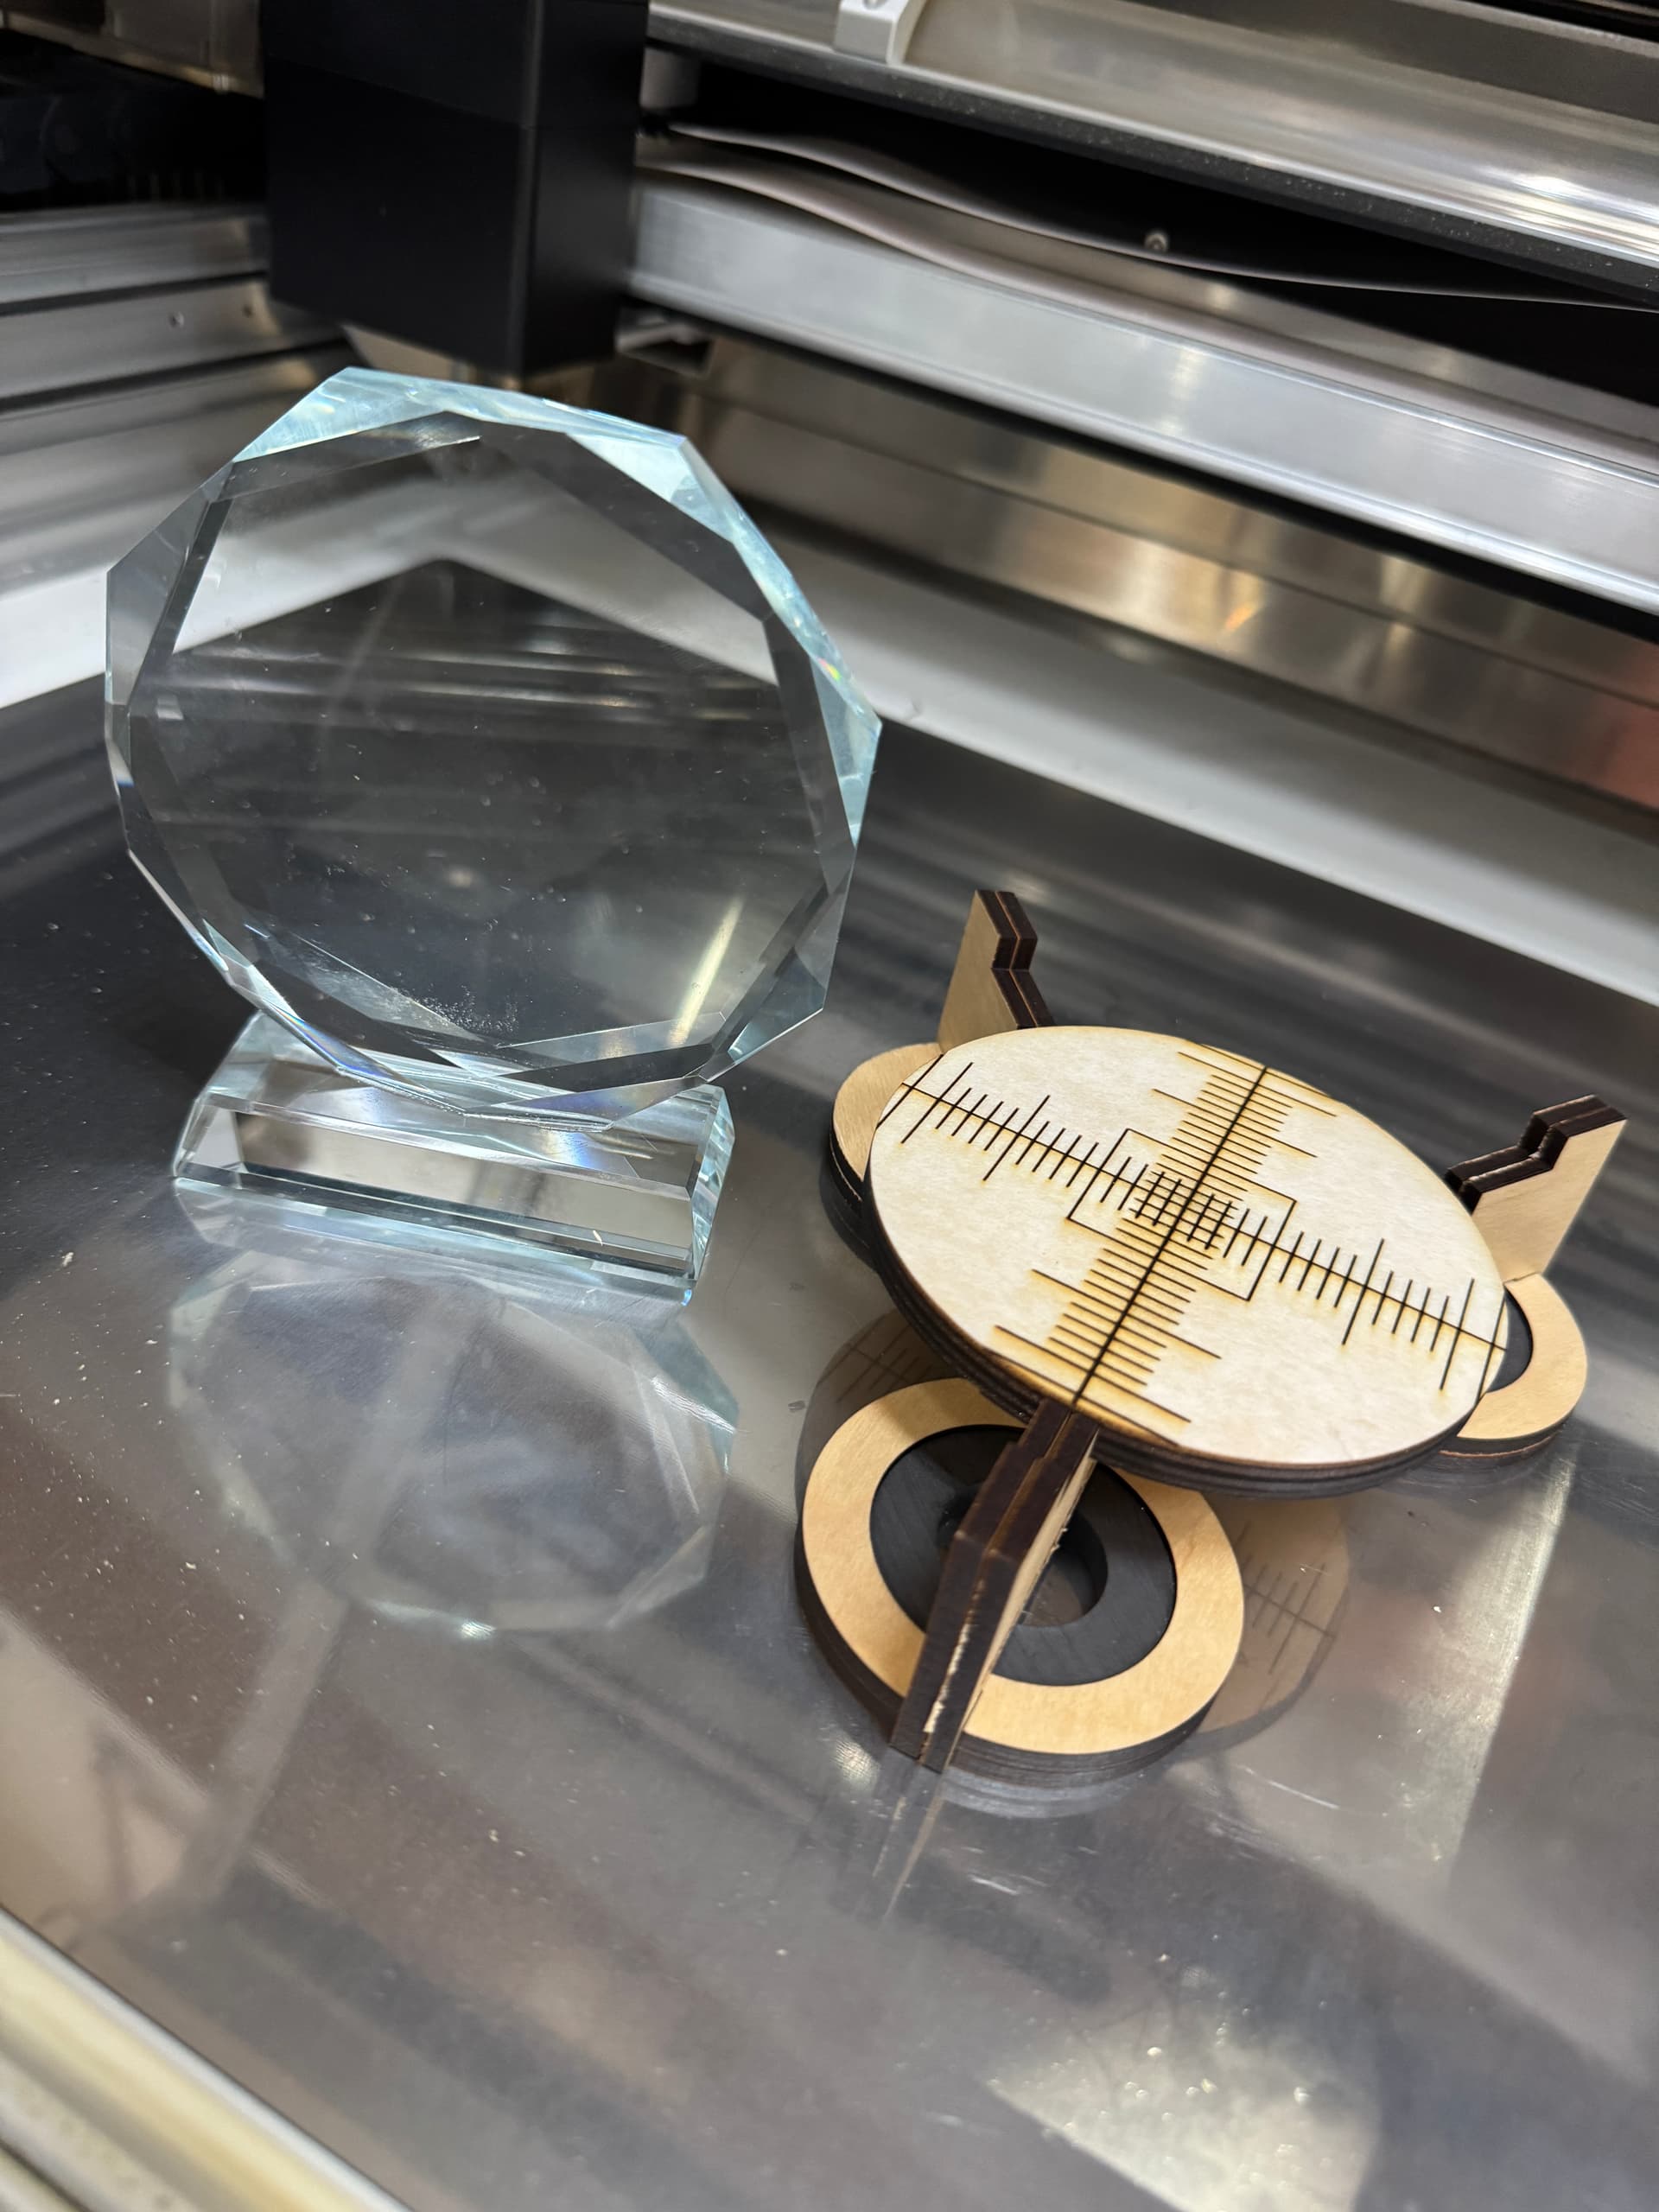
So here’s what I’m trying to do. The goal is to engrave on the flat surface of the crystal award in the middle pic. I already know to drape a wet paper towel over it for the engrave. From another post, full power, 850 speed, 340 LPI was suggested for glass. I’m all ears though on both settings and setup.
You can see what I was trying to do in the other two pics. The round disc with the crosshairs is the same size as the engraving area on the glass piece. I was planning to set it up in my holding jigs (which I now know are too short) and then to practice getting centered on it. I seem to have the least positioning error in the center of my work area. If there are better ways to correctly center a workpiece, jump on in!
OK here’s what I’d do in a nutshell – I’d use an edge jig. I’m going to go through the process for your award, but this is also documented and illustrated the #23 on the FAQ:
Anyway, here we go:
Phase 1: image prep.
Get a ruler, set it horizontally with the base of your award, and then take a very head-on photo of the award+ruler from above.
Import the image into your favorite vector editor.
Scale the image in the vector editor to be correct, use the ruler to do so. If the ruler is 12 long, make it 12” long in the vector editor and now you have a very accurate scale image. Take your time and get it right, the more accurate you are the better.
Draw a path around the outline of your award. Again, be accurate.
Align the engraving to your award path.
Now you have a vector outline of your award and a properly placed engraving.
Phase two: Jigging.
In this case, I’d use an edge jig, it’s the simplest way to do an odd shape like this.
Apply tape across the base of your award. Use your ruler to carefully mark the center of the tape right on the edge with a little line.
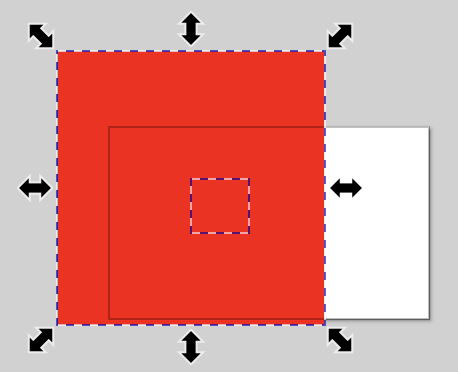
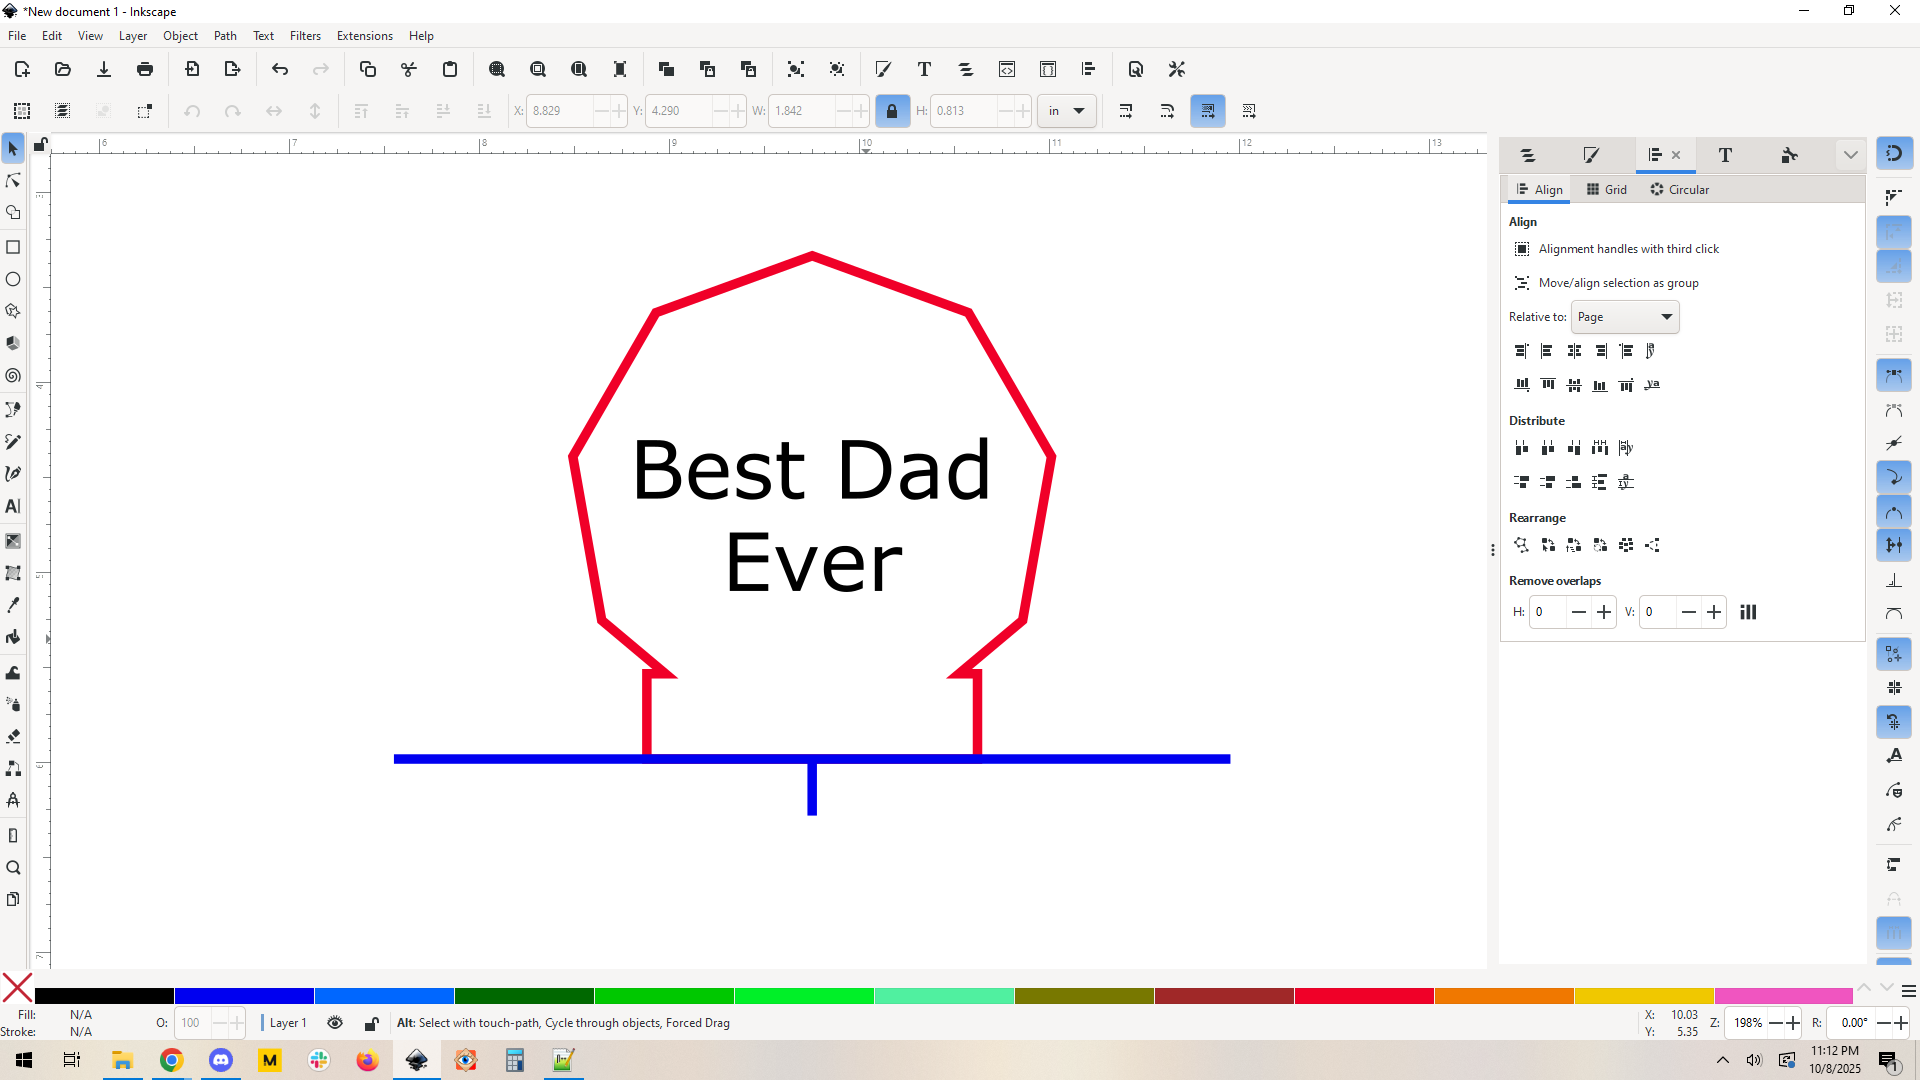
Go back to your vector and draw a line across the bottom of your vector outline of your award. This line needs to be a different color from the main outline. This line should be long – too long, you want it to be plenty wide to cut your jig in the next section. Align everything on center to your vector outline.
Draw a short line at 90 degrees to your new and snap it to the center of the line from the previous step. You should have a small “T”, with your small like pointing away from your award outline. This “T” is your jig.
This is basically what you’ll have – engraving in black, outline in red, jig in blue:
This is a case where you need to address two issues: the height without a crumb tray and ensuring that the jig doesn’t move once it’s set.
You need the jig material to be high enough so that it hits your award. This doesn’t need to be complex. I like 2x4’s if you can believe it – The tray is about 1.3” tall and 2x4s are 1.5” tall, it works well. I’ll proceed with that.
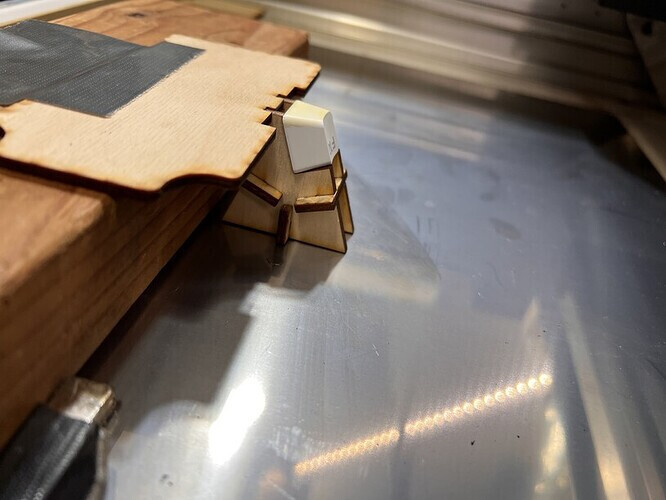
Take a short length of 2x4 and tape a piece of cardboard to it. You want the cardboard to overhang the edge of the 2x4 by at least an inch, just to make it easy to cut without missing. It doesn’t need to be a huge piece of cardboard here, 3” wide would be plenty.
The jig can’t move once you set it, so find a way to secure it. You can use doublesided tape, but my favorite lately? Hot glue. I just hot glue the 2x4 right to the meta base of the glowforge. Fun hot glue trick: a tiny bit of rubbing alcohol will make hot glue pop right off of a hard surface, so it’s easy to take it out later.
Now you have a “ledge” of cardboard off to the side of your glowforge. Use Set Focus on the cardboard. Import your jig + art into the glowforge UI, and align it to the cardboard so that the jig “T” is in the cardboard. You’re going to cut the edge of that cardboard right off and then the “T” will make a little cut into the cardboard. Remove the offcut. and do not move the jig.
Jig’s done. Here’s an example of this type of jig with an overhang on a 2x4. I used scrap mdf for this one, it uses notches to secure and align my weird keycap holder instead of a true edge jig, and I’m using magnets to hold the 2x4 in place (this was before I thought of hot glue) but the idea is the same:
You’ve got a small problem: your award is clear so set focus will struggle. Luckily you have the center mark tape on the award, unluckily it’s not the same height as the face of the plaque. You’ll need to put an additional small piece of white tape on your award someplace where you won’t be engraving, so you can set focus on that.
Carefully insert your award in the glowforge, on the risers you made.you want to slide it right up to that cardboard and align the small center mark on the award tape to the small “T” cut on the jig, Take your time and get it right, in the end the award should be butted right up against the cardboard, centerline to T mark.
At this point the physical setup is complete. Go over to the glowforge interface, and turn everything off (this way you won’t accidentally miss a step and recut the jig which would probably be bad)
Now turn your engrave on and use set focus on a part of the white tape. Be sure you see the red laser dot hit the white tape. If it doesn’t, adjust your set focus until it does hit it.
The camera alignment will look wrong, ignore it. You’ll want to tweak the position in the glowforge UI or open the glowforge to move the award to “look right”. This is a trick, don’t fall for it. The jig is exactly where the laser will hit, trust the process.
That’s it. This is a lot of words, but really the process is very fast with a tiny bit of practice. You already have those fancy risers, go ahead and use them but tbh crumpled aluminum foil works really well too – you just crumple it u, then press your item into it. Instantly makes a custom height support. I think @shop posted that once?
If you have questions just ask away, but this is pretty detailed.
I would just make a jig. A circle the size of the award with my artwork centered in the circle. Cut the circle and ignore the engrave. Put in the award. Focus on the award but IGNORE THE CAMERA VIEW. Ignore the cut and enable the engrave. Because of the thickness of the award, you must make sure the jig material is within focus range.
Edit - never mind, @evansd2 beat me to it and has you covered - especially since I thought the award was two pieces and you just were just dealing with a circle.
I never use set focus on glass/transparent, and there are other materials where the automated system fails - hence I made this some time ago, and use manual.
In the case of irregular objects where I had the tray removed (shot glasses, spice jars), I would use scraps of material to get the object propped to the desired height, which the little tool can help you determine. Remove the object, take a few measurements, repeat in my design app to build the jig. Then I would cut a piece of shipping box to create a repeatable “locator” that fits squarely against the front corner. I actually always used the right, but most people would say the left would be better.
So my jigs for shot glasses and spice jars are two pieces - and each has an accompanying file with the rough outline of the shape which is set to ignore, used simply for aligning the actual image(s) to be engraved.
The precise locating of the outline was determined by putting a piece of masking on the object and hitting it with a small target (I just use the camera calibration X in a O) roughly located using the camera - and in order to make that quick and simple, I usually make my jigs so the surface of the object is relatively close to the center of the machine under the camera.
Yeah, this mostly works but it’s trial and error as you zero in on your target. Depending on your accuracy needs you might need to do this multiple times, and if you overpower your test engrave on the masking you will damage your underlying material, ruining the job. And on top of all that you’re still relying on camera accuracy which is exactly what we’re trying to avoid by using a jig in the first place.
Even when camera accuracy is enough I stopped doing it this way once I hit on my process as described above because it never misses. It’s always one iteration, there is no guessing, it works and is as accurate as you are with your measurement. It’s very easy to get to within a millimeter — I’d say I’m usually under half of one — with no guessing and no iterative tests.
As for using a height ruler versus set focus… Set focus works really well and you’re going to be doing a set focus no matter what. Even if you set your material height in your step settings it still runs a set focus routine when you hit print. A small piece of tape on the clear engraved object works great as a set focus target. In the end using a ruler saves you no time1 and is less convenient to me than just using set focus.
1 In fact it can cost you time. If you’re engraving on a clear surface then set focus might fail. Best case scenario it fails set focus and tells you that it failed, forcing you to try to run the job multiple times until it succeeds at a set focus. Worst case scenario it gets the wrong idea about the height and now your focus is incorrect. If you didn’t manually set the material height in your settings, this can ruin your job and your material. I haven’t used a ruler or caliper to determine material height in a long time — the only time I would reach for it now would be in a case where I have multiple different materials at different heights in the same job.