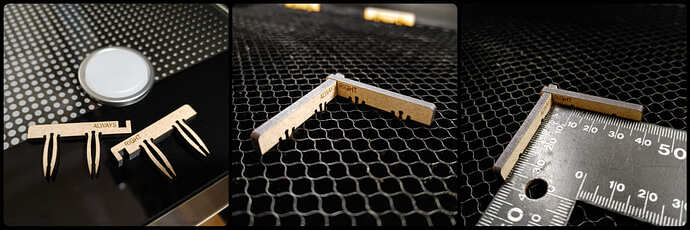
After posting my Straddler Pins last night, I came to realize that they’re more useful as “fence” guides for keeping things straight than as hold-down pins. That got me thinking how hard of a time I have with squaring up material on the bed before lasing. I found that the Straddlers do a decent job of making a corner when placed perpendicularly, but that it’s possible to misalign them if you’re in a hurry/not paying attention. So I modified the design to make the “Always Right”. When locked together, this pair of pieces will always give you a right angle fence stop to push your material up against.
The interlock between the two pieces is very snug, so much so that I don’t recommend separating them once they’re together. I also found that interlocking them before inserting them into the honeycomb is easiest. This may indicate that I have the notches slightly off, so I may upload a revised version later if I find this one problematic in use. I actually put a dot of wood glue in the notch, interlocked the pair (lay them top-down on a hard surface and push firmly), then inserted them into the honeycomb to dry. Edit: superglue works great as well.
As with the Straddlers, I made these out of proofgrade draftboard. Here are my preferred settings:
Engrave: 1000/65/1x/270 [zooms/pews/passes/LPI]
Cut: 183/100/2x [zooms/pews/passes] (I feel like this method chars less than full power/1 pass)
With these settings, creation time is approximately 1 minute 47 seconds per pair.
The SVG file has the text in vector format, but I also left the font version hidden in case you want to change font or add the name of your spouse/in-law/person in your life who’s always right. ![]() Font is Ariel Condensed, which I thought most people likely have access to. If you decide to rasterize the text and engrave on vary power, a similar depth can be achieved with color hex code #8c8c8c.
Font is Ariel Condensed, which I thought most people likely have access to. If you decide to rasterize the text and engrave on vary power, a similar depth can be achieved with color hex code #8c8c8c.
Lastly, a few tips:
-
These can be a bit tight in the material after cutting, but I’ve found that tipping the material up an inch or two and dropping it back on the honeycomb helps knock them loose.
-
First insertion into the honeycomb may be snug, and a little material might shear off. This guarantees a tight fit and shouldn’t happen after the first time.
-
When removing the interlocked pair from the honeycomb, I recommend using two hands and grasping each side between its respective pins, then pulling straight up. If you try to rock the interlocked pair, you’re likely to snap the pins.
-
The finished piece does not seem to fit as well/stay as square if assembled backwards, so be sure to assemble with the text facing the inside corner. Unless that doesn’t fit your particular honeycomb well, then try reversing it. Every machine is a bit different, as others have pointed out.
Hope everyone finds this helpful!
Edit: v2 Uploaded 8/13/2021 4:13pm PDT
Made some slight adjustments to the position of the notches and removed an unnecessary curved corner (didn’t affect stability, but wasn’t meant to be there). Also, straightened edges on top side of pins. The two pieces still fit together snugly, and the whole thing goes in straighter/more easily in the honeycomb (previously, one of the arms would slant slightly). Still doesn’t work quite properly if assembled backwards, so heed tip #4 above.


