Harlequin Pen

After the last few posts, some of you may be wondering “Hey T.Rob, is there anything you do on the lathe that doesn’t involve the Glowforge?” Yes. But not today.

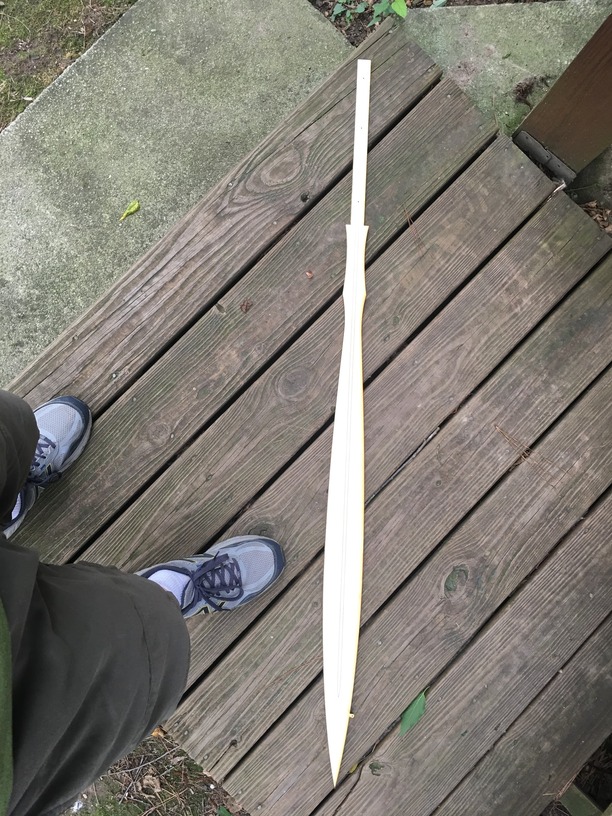
This project can be done with traditional tools or power tools, but the :glowforge: reduces the time from days to a few hours.

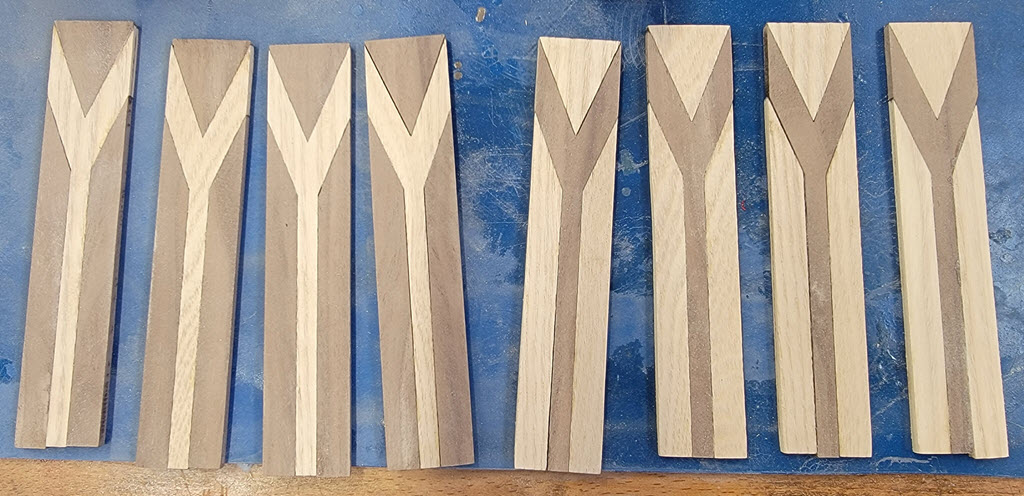
“Wait, the Glowforge did that?” Yes. Well, the first steps, anyway. The project began with some thin stock (1/8") walnut and maple. I drew a simple cut outline that I hoped would prove interesting, then cut out 4 copies each from the maple and walnut. The light and dark pieces were then swapped out to make the layers.

Here the pieces are in dry-fit:

Each of the layers was assembled with Super Glue, then sanded to get the excess glue off the faces and flush up the maple and walnut which were ever so slightly different thicknesses. (That 1/8" is nominal.)

The next phase of glue-up puts to test the old adage that you can never have too many clamps. In hindsight I was at least one short because that triangle piece at the top of should have been more firmly seated. Lesson learned. I actually have another 3 dozen clamps so I will do that next time for sure. This stage was done with Tite-Bond 3 wood glue instead of super glue

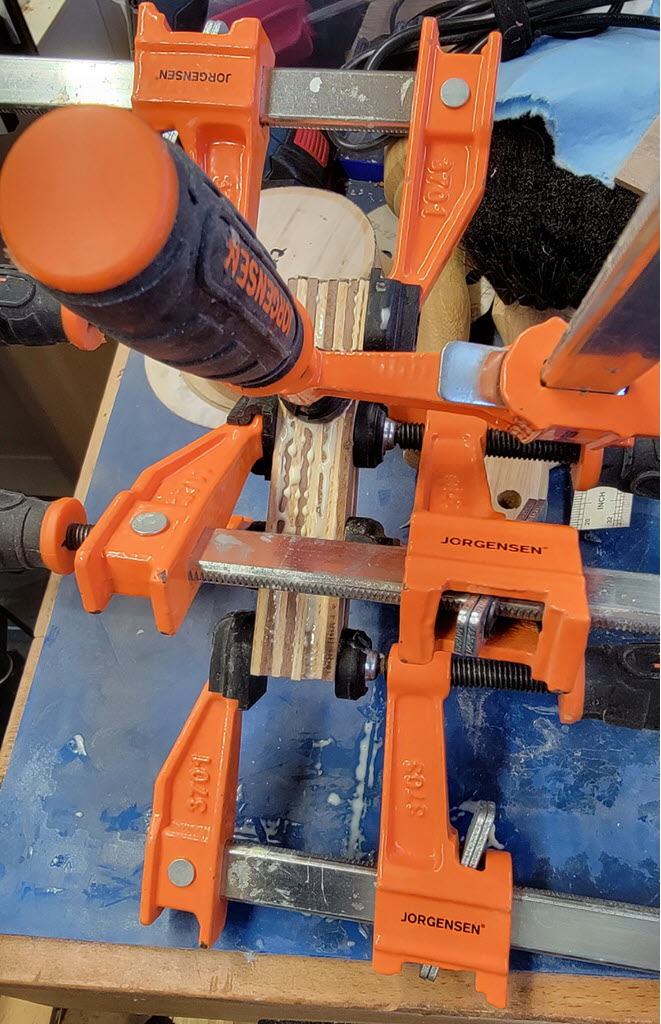
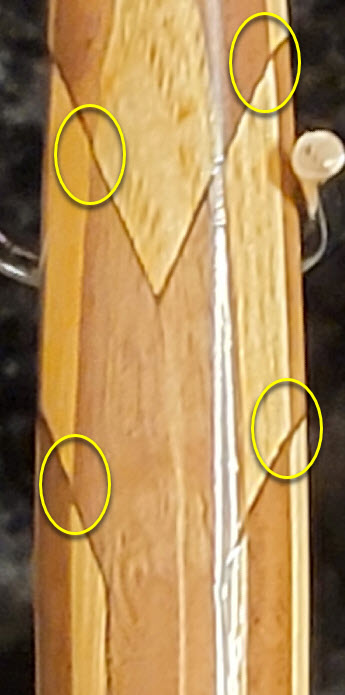
I had to suppress my OCD tendencies and ignore the slight misalignment of the seams in the resulting blank. The edges were sanded to expose bare wood because the kerf line has too much residual oil to make a strong glue joint. In some cases the sanding left large gaps. The outer layers will be entirely cut away so I put the layers with large kerf gaps on the outside.

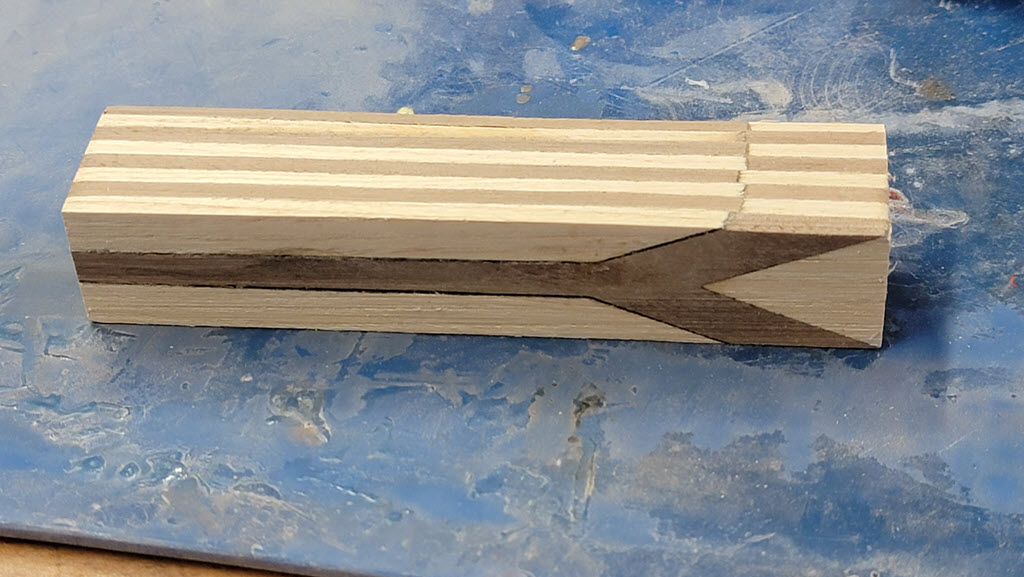
The resulting blank is ugly but square (enough) at 1" x 1.13" to find center and drill.

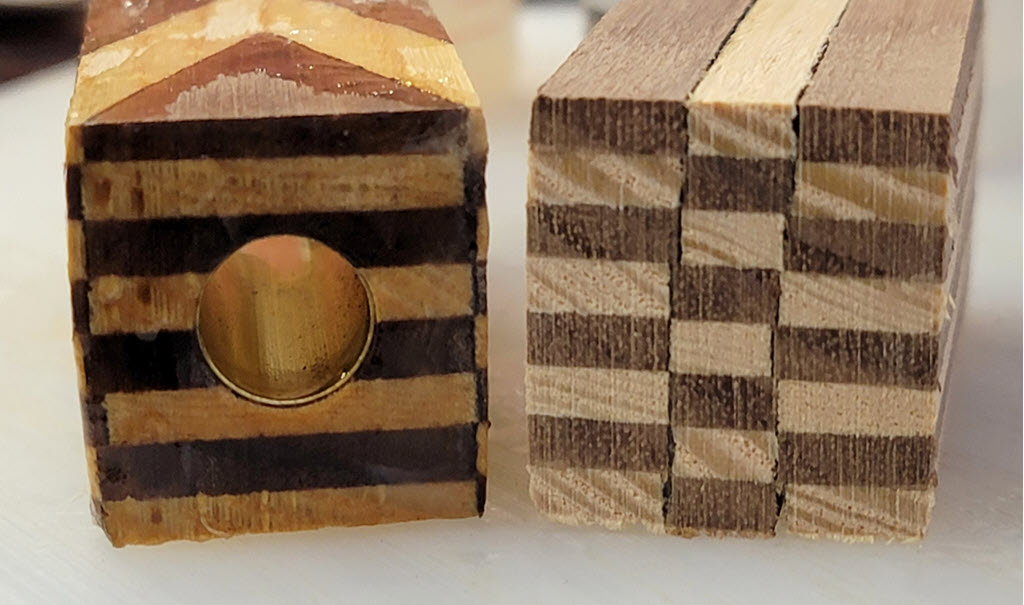
Here are the top and bottom of the blank after cutting it to size and gluing in the brass pen tube from the kit. Some thin super glue is added on all sides to fill in any gaps and hopefully strengthen any weak glue joints.

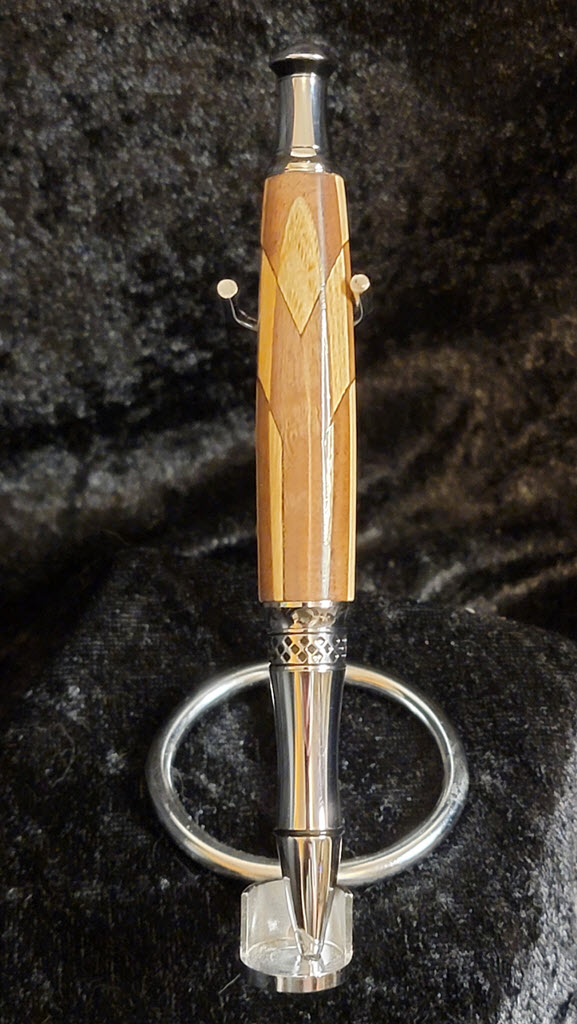
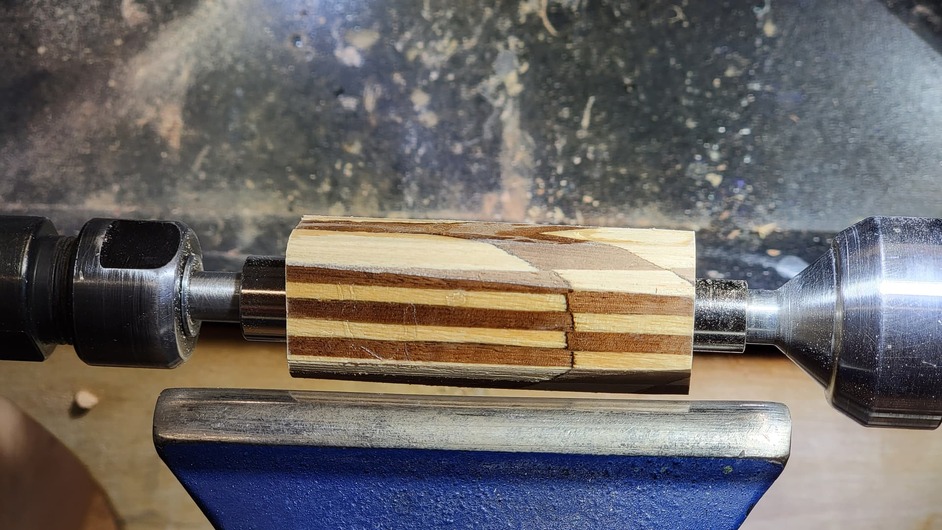
The last step is to turn the pen on the lathe. On either end are bushings the exact size of the tip and cap pieces from the kit. Once the ends are flush with the bushings you can make the barrel any shape you want. This can include beads to help grip, ripples, concave bulges, or anything the turner finds interesting. In this case I knew the pattern would be busy so I went for a smooth taper and let the wood do all the talking.

So, there you have it. Some maple, some walnut, some light amplification by stimulated emission of radiation, and voila! The harlequin pen.

42 Likes

Ah, this is really nice.

strong glue joint

Suggestion for next time: offset each layer by a set amount, so the lasered joints never line up from layer to layer. That way the wood faces glue up and the lasered joints don’t need to be nearly so strong.

I use this technique to make strong layered boxes even with segmented individual layers. An example:

And an extreme example:

10 Likes

Very nice outcome using your library of skills and tools.

10 Likes

Nice use of the laser!

6 Likes

Those are visually striking and extremely well done. Great work!

Great suggestion and I can see where this technique would come into play in the boxes from the example. The main difference though is that the offset factors into the design of the boxes, whereas in my case the design requires that there be no offset between layers. In fact, lining up the layers and keeping them from drifting in glue-up is the hardest part of the whole thing.

Why? Because when the workpiece is rounded on the lathe, the seam on the layer below and the one on the layer above must be aligned in order to continue the line of the design around the barrel.

In the photo below, enlarged to show 4 such cross-layer seams, the lines separating light and dark almost form a continuous intersection. If anything, I want more precision in alignment to make those lines crisper.

I do offset the glue joint onto the face of the adjacent layer when I make a bowl out of segmented rings. I haven’t shown any of that here because I haven’t done any lately, and because the wood thickness in those projects is usually more appropriate for the table saw than for the laser.

That said, plenty of pen makers use segmenting in which the layers are built vertically along the pen’s length rather than horizontally as I’ve done here. This is similar in orientation to your boxes and offsetting glue joints is the perfect solution for that style of project.

After cutting the pen blank to final size, the shiny finish is more super glue. I start with 5 - 7 layers of thin so that it soaks into the blank and adds some stabilization to the wood. That is followed up with medium viscosity which builds thickness quickly. Then final sanding, paste polish, and wax.

Of course, now that you have piqued my interest, I’m considering a project featuring segmented rings, stacked vertically. It would take only 30 or so rings. Made of 8-12 tiny triangles each. Which, of course, I’d offset the glue joints and make a brick-style pattern.

Hmmm…please excuse me. I think I hear Inkscape calling me. :wink:

18 Likes

Appreciate the walk thru. Nice results.

3 Likes

I love the pattern and the metal parts of the pen really complement it! Thanks for sharing the detailed process pics.

2 Likes

As for alignment use registration pins and you can get it perfectly aligned every time. Just add 2 or 3 “ears” to your layers with a registration hole, glue it up with the pins in place, then cut/sand/lathe the ears off when you’re making the final design. I use brass rods for registration and remove them once the glue is set, but you can use anything that’s handy — nails, dowels, even laser cut wooden pegs. I used this technique on a sword blade here:

There are two registration holes in the handle, and one “ear” is visible in the lower right of the blade near the tip:

In your case it might be simpler to extend the length of the blanks, you can trim or turn the excess length ( and the registration holes therein) away later in your process.

Also might be worth trying to remove the cut residue chemically instead of physically. Instead of sanding, perhaps use an alcohol wipe to clean the edges prior to gluing? I’ve never done any strength tests with before and after cleaning, but it might be worth a quick test to see if it helps. 2 copies of a quick test butt joint piece, clean one and not the other, glue em up, and then intentionally break them to see if there is a difference?

You have to scroll down to see where I broke a test butt joint here but I only tested it with a “dirty” edge.

6 Likes

This looks really nice!

3 Likes

What I normally do for a simple design like this is to cut keyhole grooves along all four sides and registration pins from thicker stock. Or sometimes I enclose the layers in the stock from which they were cut but that only works when there are very few kerfs in any axis. In this case I didn’t do either because I was just testing the design and didn’t plan on assembling it. Then when it was done I liked it so much I decided to do the assembly anyway.

But pins can be incorporated into the design if they are made of soft metal or wood that I can turn away on the lathe. What I have done in the past is to make the holes slightly smaller than the dowel pins, then the char is removed when I drill to size. What I dislike about this is that the pins are in only one axis, or two if I drill and pin from the side after assembly. I have tried rounding the blank, then pinning along 5 or more axes, then drilling for the center tube last. But after having cut away all the waste, any slight misalignment of the drill bit can ruin the blank. It’s doable, but not for the lazy. Which I am.

Will DEFINITELY give this a try. Thanks for the suggestion! The charred edges actually present two issues in a project like this. The first is, of course, adhesion of the glue. The second is that they make the border lines thicker. So even if the glue joint were stronger, I’d still want to remove the char. The trick is to do so without changing the profile, which I can usually manage with fine sandpaper. But your idea might give me both requirements. I will play with it and see.

That sword is freaking awesome!

6 Likes

I’ve been wanting to try something like this for a while now! Not just with hardwoods, but I think you could do some really cool stuff with Baltic birch layers!

So far I’ve only played with it in my head, 'cause Mom’s in the hospital and I’ve been spending my days there. Also our new cat is mostly hanging out in the laundry room, which is also my Glowforge room, and she has methodically pushed all my stacks of materials and scraps into one giant pile on the floor, so right now I can’t even REACH my Glowforge.

@evansd2’s swords are most definitely awesome. He’s done a number of them. :slight_smile:

8 Likes

Can you make a video? I’d watch!

3 Likes

I’ve been considering such a thing ever since I made this…it hasn’t happened yet - but I continue to think about doing it!

3 Likes

Well I could, but I don’t know why anyone would want to watch me make a video.

Yeah, I know. Sorry. Couldn’t resist a straight line like that. Short answer - no. But the thought is appreciated. Thanks!

The longer answer boils down to massive demands on my time due to family illnesses and work right now. The side projects are my therapy. Taking some pix along the way doesn’t convert the therapy to work. Making videos, with all of the attention to lighting, sound, editing and such, crosses that threshold for me. Right now, anyway.

As the owner of a lathe and someone accustomed to spinning the pen blank at about 3k rpms, I remember reading that post and being very impressed with what you achieved using a bolt for a mandrel and hand power tools.

I propose that you get a couple of skate-wheel bearings and work out a pattern that will support the Makita on one side and the bolt-end on the other, then Velcro the trigger on for turning. Not because this DIY lathe will provide a better result, though. My theory is that once you invest in the design and execution of the stand, you won’t want to waste the sunk cost and it’ll push you past the thinking stage. :wink:

5 Likes

Verrrrry Interesting . A few years back this would have been something I would try. Hopefully some of my students will pick up on it.

3 Likes

Really enjoyed reading your process. Combining woods makes this so beautiful.

2 Likes

Wow. I’m very impressed.

2 Likes

Quite ingeniuos. What do you do about the char on the cut surfaces? Do you need to clean it off or does the super glue work with it on?

2 Likes

I have been sanding it off. But that can leave larger gaps so @evansd2 suggested chemical cleaning. I have denatured alcohol and acetone in the shop so will give those a try.

I am also modeling up a blank based on the same pattern but with an offset at each level. Hopefully I’ll have that in Tinkercad by night’s end.

1 Like

I’ve also read putting the pieces in a container with iodized salt and shaking it will remove the char.

2 Likes