After searching the forums for how to address the fact that the Glowforge can’t handle very long running engraving jobs, I found that the recommended solution is to break the image into smaller engraving jobs. I found it frustrating that this was the official advice from Glowforge and that they didn’t have a built in way to do this, so I developed a tool to break any image up into tiles. I posted about the tool in the forum a few weeks ago.
The problem is that the Glowforge seems to introduce a seam into the engraving job, despite the tiles lining up perfectly. I had a suspicion about what was causing the seams and after closer investigation, it seems to be due to interpolation artifacts introduced by adding extra edge pixels.
If I’m correct, the simplest fix would be for the Glowforge to leverage the image-rendering property on the SVG image tag to switch between bilinear interpolation (“optimizeQuality”, the default) and nearest neighbor sampling (a valid implementation of “optimizeSpeed”, or the only valid implementation of the CSS option of “pixelated”).
A much more involved solution, but more versatile option, would be to implement SVG patterns.
I’ll add, I believe this is why my engraves across passthrough steps all have what appears to be a “skipped” line, even though microscopic examination reveals the laser is indeed firing along those lines. Details of which have been posted in various passthrough threads, but I highlighted them again in the OPs post, linked above.
After searching the forums for how to address the fact that the Glowforge can’t handle very long running engraving jobs, I found that the recommended solution is to break the image into smaller engraving jobs.
Even so, there may still be good reasons to break up an engraving and this doesn’t address the reported issue. Glowforge seems to introduce a seam into perfectly aligned raster images. Is this a know issue? Are there plans to address it?
Thanks for bringing that to my attention! I’m going to investigate if that page needs updating.
That doesn’t ring any bells.
I’d want to start by looking at some example prints.
There are a couple of different ways of aligning things. Can you say more about how the raster images were aligned? Are you referring to passthrough prints?
If you have example files you can share, or if you have prints that I could check into the logs, I’d be happy to take a look.
I can usually find what I’m looking for with an approximate date and time of the print, especially when I also have photos of the print result.
The raw SVG is provided in the linked post and discusses the issue (earlier in the post is a bit more discussion as well). There are 5 different versions of essentially the same image. If they were numbered 1-5 from left to right, the first, second and fourth are a 2 pixel x 2 pixel image with a simple black/white checker pattern. Each are embedded in the SVG with an image tag using a different image-rendering property (optimizeQuality, optimizeSpeed and pixelated). Glowforge treats them all the same and appears to use bilinear interpolation when sampling subpixel values.
The far right image is the same 2x2 pixel image, but represented with 4 separate 1 pixel images. You can see that the Glowforge engraves it very differently than the others due to the interpolation differences. This issue will affect any raster image that is broken up into tiles because the interpolation of the edge pixels on each tile will be engraved differently by the Glowforge. The linked case is particularly extreme because all 4 pixels are edge pixels and a single pixel is blown up to 1inch in size. In an image that is a normal size, this could present itself as a seam along the inner edges of the tiles. I don’t have a pass through slot, but if the process of splitting the image involves rasterizing into separate images, I imagine this would affect that as well.
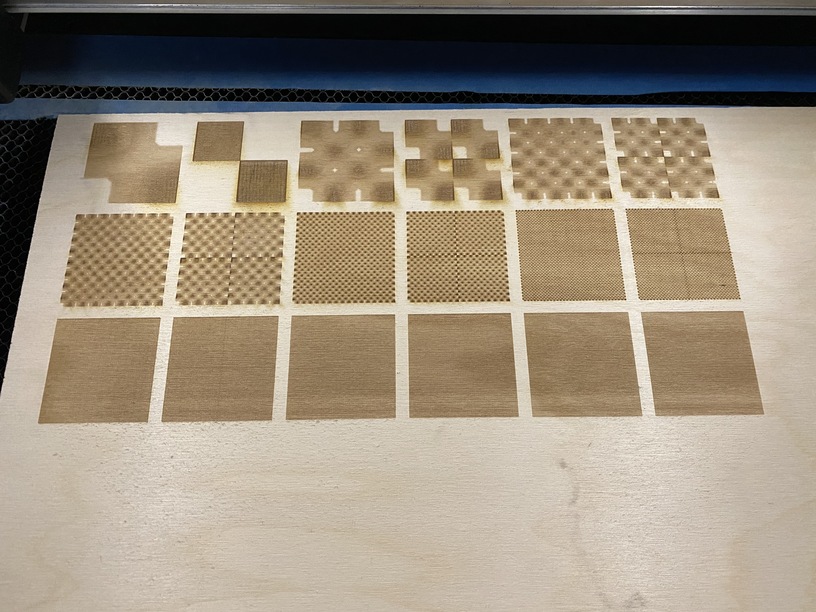
Here is another test that I performed yesterday. Each pair of images from left to right, top to bottom represent a raster image and a comparable image made up of 4 separate image tiles. They get incrementally larger by powers of two. So, the first pair is a 2 pixel x 2 pixel image, and 4 1 pixel images. The next pair is a 4 pixel x 4 pixel image followed by 4 2 pixel x 2 pixel images and so on up until 512 pixel x 512 pixel followed by 4 256 pixel x 256 pixel tiles. Each image is 2 inches x 2 inches, so each tile is 1 inch x 1 inch. So, that means the DPI of each image increases incrementally. You can see as we approach a normal DPI, the artifacts along the seams get smaller and smaller, but still exist. Furthermore, I performed this test in two different ways:
This one was engraved in a single job by using an image tag that includes the 2nd SVG (to avoid breaking it into jobs in the Glowforge UI). It was engraved using 225 lines per inch. You’ll notice that the seam isn’t noticeable once the DPI of the image exceeds the lines per inch. My guess here is it’s a combination of the pixels being tiny and how the samples line up (i.e. those edge samples may not be sampled in a portion of the pixel that are lighter than they should be, or the pixels may not be sampled at all) as well as a different interpolation algorithm at play. It is strange to me that the interpolation of the 1 pixel x 1 pixel tiles are different than in #2, so there seems to be a couple different places that implement subpixel interpolation differently.
Another version of the SVG with image-rendering set to pixelated demonstrates how the seam artifacts disappear when viewed in Chrome or Inkscape due to the use of nearest neighbor sampling rather than bilinear interpolation.
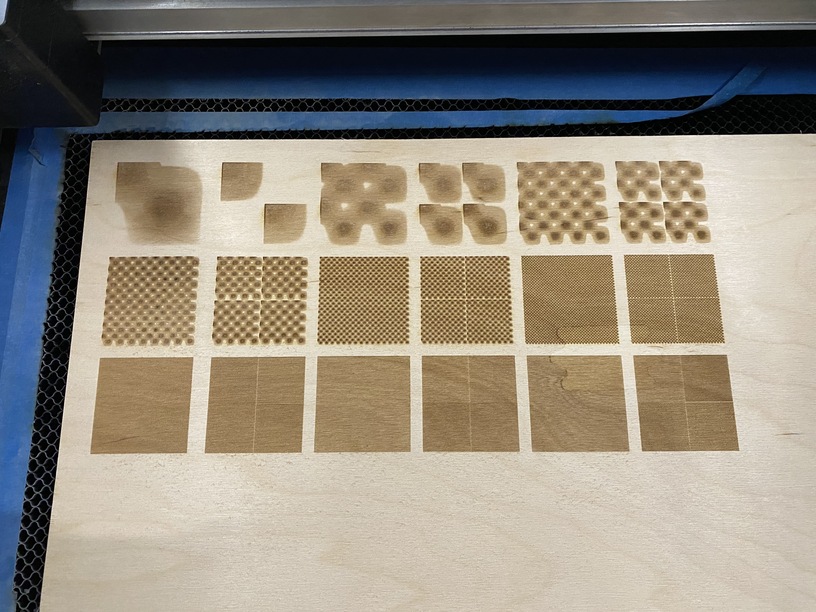
I performed the engravings as separate jobs (each whole image and each tile is performed as a separate job in the Glowforge UI, so each pair is 5 different jobs). This was a painful process, as the Glowforge UI really bogs down with so many jobs. The separate jobs seems to make sampling those edge pixels much more likely, so the issue is obvious in all pairs, even when the DPI exceeds the LPI. It may also be the different interpolation algorithm that seems to make edge pixels transition to white regardless of the pixel value. It also occurred to me that this could be a physical limitation, such as it’s difficult for the acceleration/deceleration of the machine to not affect the engraving at the extents of the engraving job, but there doesn’t seem to be much of a difference between the horizontal vs vertical seams so it seems to me that the interpolation differences are the main problem.
Another version of the SVG with image-rendering set to pixelated demonstrates how the seam artifacts disappear when viewed in Chrome or Inkscape due to the use of nearest neighbor sampling rather than bilinear interpolation.
