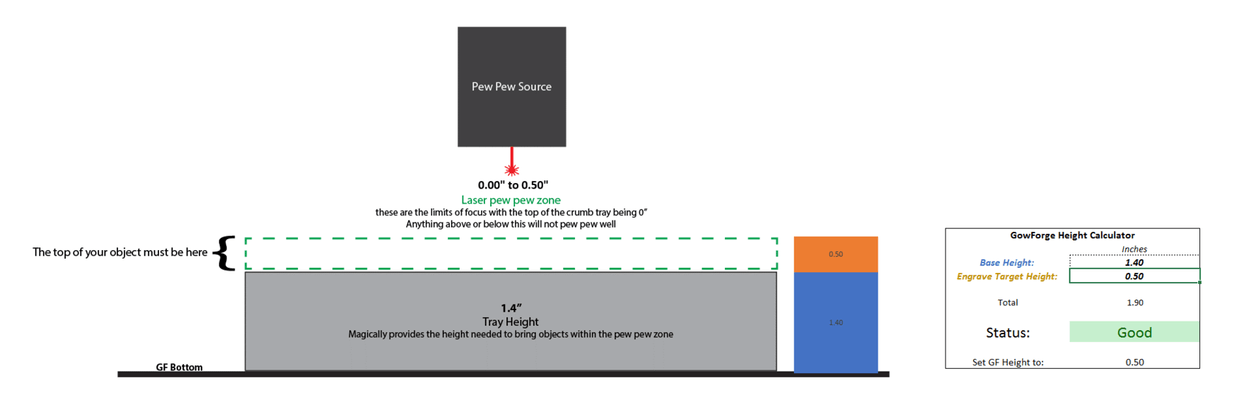
After seeing a couple of people talking about the correct way to do this I made a calculator to simplify the process and hopefully demonstrate the goal.
All you need to do is add the height of your object and the base you want to use and it will tell you if it will work or not and the setting to use in the GF, if it won’t work it will tell you why. If you don’t have a base in mind just put 0 and it will give you the minimum needed.
Ah this is great. I had to make one myself so I didn’t have to mentally mangle the math. One suggestion: I’d allow for modification of the tray height variable. I know mine is quite lower than 1.4”
These are the most official numbers I can find, they don’t necessarily correlate directly with performance though. Like I would say it would easily cut through 1/2 material if you cut one side and flip it. And I think we’ve seen at least 1 person post a straight up cut through 1/2 wood, but with a good amount of char.
This is really only to make visualizing engraving without the tray easier.
Correct! Though it should have come through as protected, so you would need to click enable to see the formulas.
Are you on a forever machine? They should all be within a couple of hundredth of 1.4 apparently. If you’re on a beta machine I didn’t even think of that! Good catch.
Is this ready to go into the Matrix? (Anybody try it out yet?) (Let me know if you don’t want it listed there and I’ll remove it, but i’m going to go ahead and list it due to personal time constraints these days.)
Original specs only ever claimed to cut through 1/4" material. 1/2" using a flip and re-cut procedure that is not yet released. So far the units can easily get through more than 1/4" in most materials.
Thickness: Varies by material. Can cut some 1/2" (13 mm) hardwood and acrylic; for best results, 1/4" (6 mm) or thinner materials are recommended.
I have actually never seen anything marketed saying that you must flip and re-cut to cut 1/2". That might have been discussed, but as for an outsider, deciding to buy, the marketing copy says it can cut 1/2." (I guess technically they don’t tell HOW it can cut through 1/2")
I was working off of the original specs from memory. Said 1/4" by flipping materials such as wood and using some fancy camera alignment cutting 1/2". That was back in Sept 2015. Looks like they have updated some of the verbage.
The new language you quote would be accurate. Says “some” 1/2". It can certainly do some woods that thick. The thicker you cut the less of a straight edge you will get and possibly more charring due to the slow laser speed.
Ah, makes sense, because I didn’t purchase until Oct of 2016. I bet it was already updated to this current language by then, because that was one thing I remember appealing to me when I was making my decision.
I didn’t get a Pro for the pass through for larger material, but I did assume that the basic could do 1/2" with a flip over and I got that from early marketing. It was a selling point for me. Still am happy with 1/4" and know that it can do 1/2" of certain materials. So I’m good with it.
Thank you! This made my setup supper easy. It would be nice if something like this was baked into the UI software… Now, how do I buy you a virtual beer for this?
Yep. Thanks. One change. The maximum focus height was increased a couple months ago from 0.433" to 0.5". Might want to update the equations and the Good/Bad indicator.
I need to cut/engrave the top of a box that is 1.899" thick. The main part of my tray measures 1.37" with the sides measuring 1.5" if i subtract the tray from my material thickness im left with .529" which is too thick" but my opject is under the advertised 2" Im confused as to what to put in for material thickness & dont want to be out of focus as i only have one of the object i am attempting to use. Any help is appreciated!