After my last cardstock post (Adding My Own Cardstock Settings to the Mix) I decided that what I needed to do was to do some more testing on various papers so I have a place to start from whenever I want to cut paper. I drew up a test pattern, printed some templates using papers I found around the house and in my office, and Glowforged every single one of them. Before I go into the details though here’s the list of settings I would personally start with now that I’ve done all this…
TL;DR List of Settings
Glowforge Basic
Speed 500, Material Thickness 0.01in
Paper is placed directly on the tray and held down with magnets.
Cutting
- 20lb Copy Paper - Power 15
- 24lb Copy Paper - Power 25
- 32lb Copy Paper - Power 25
- 65lb Cardstock - Power 45 to 55
- 110lb Cardstock - Power 55 to 65
Deep Scoring for Hand Tearing
- 32lb Copy Paper - Power 15
- 65lb Cardstock - Power 25
- 110lb Cardstock - Power 35
Light Scoring for Hand Folding
- 65lb / 110lb Cardstock - Power 5
Short version of caveat: I picked these settings because they’re about the lowest power that do what needs to be done. These probably can / need to be fine tuned for individual projects, and there are always material differences, but hopefully this will at least give you a place to start. Also remember that these are not official settings and cutting paper can be finicky so do this at your own risk.
Materials / Methodology
The five types of paper I had on hand were:
- cheap Staples copy paper (20lb)
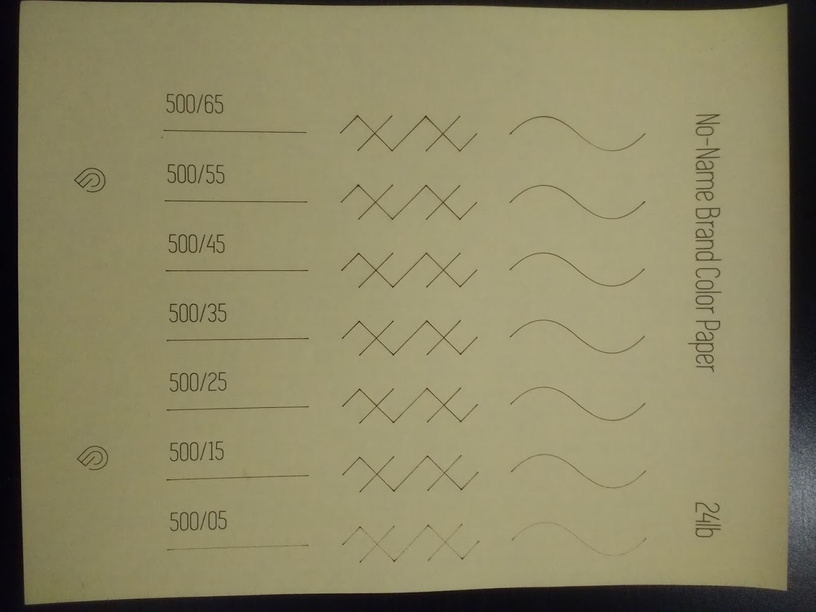
- slightly better generic brand color copy paper (24lb)
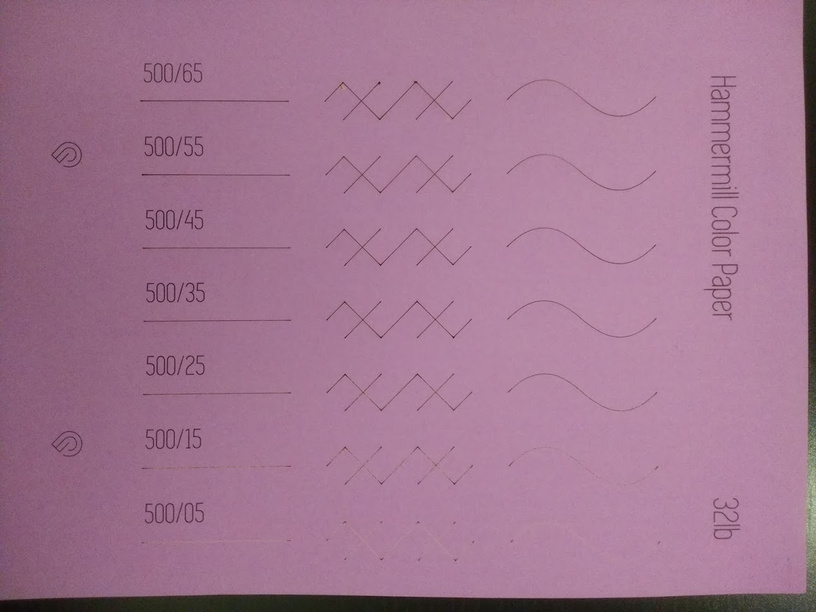
- “premium” Hammermill copy paper (32lb)
- cardstock from the Michael’s scrapbooking section (65lb)
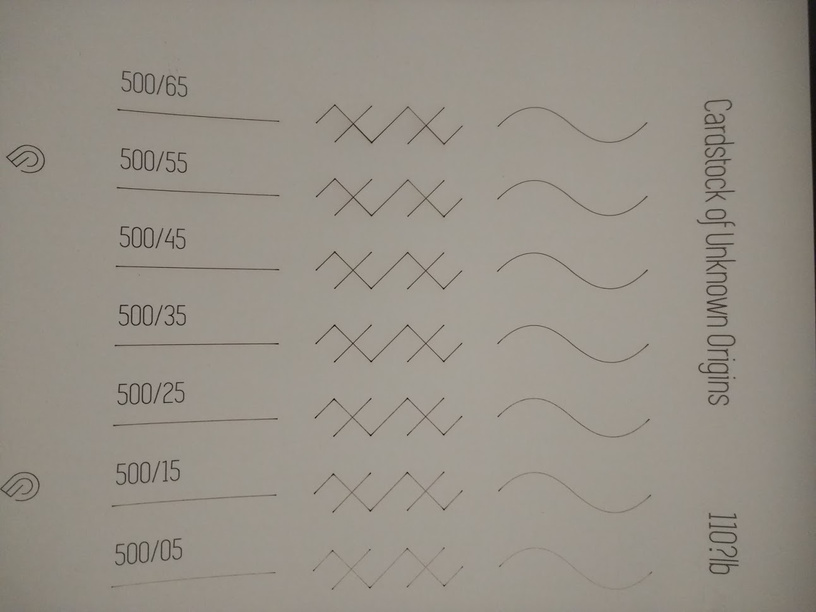
- random cardstock under my desk (110lb)
I am 100% certain of the 20 and 65 pound papers. The other copy papers came from my office (so I had those numbers from memory) and the thick cardstock had neither packaging nor label, but it seemed identical to some 110lb scrap I had left from my last post.
The file that I used for testing was this:
![]()
It has some basic straight lines, curves, 90 degree angles, and crossings so I can test out all the basic stuff. No etching tests just yet; will probably do that test with cardstock at some point next month.
The testing itself was pretty easy. I just printed the text and snapmarks on to each sheet of paper, and then the test patterns (using power settings from 65 down to 5 and speed 500) on them afterwards. I used this range because I knew 65 cuts thick cardstock so anything above that is a waste, and I had room for 7 test patterns. I kept the speed at 500 because paper is very flammable and I don’t want a fire in my house. 
The paper was placed directly on to the crumb tray and held down by magnets, so I just used a material thickness of 0.01in. These settings would probably need to be changed if the paper was placed on top of something else (like a sticky mat or whatever).
Once I printed them all out I started judging each setting on three criteria: cut depth (did it actually cut through), corners (how badly did not having the laser at full speed burn everything), and the back (is there lots of backsplash / how do scores look from the back).
Here are the detailed results:
Results in Like a Fancy Table
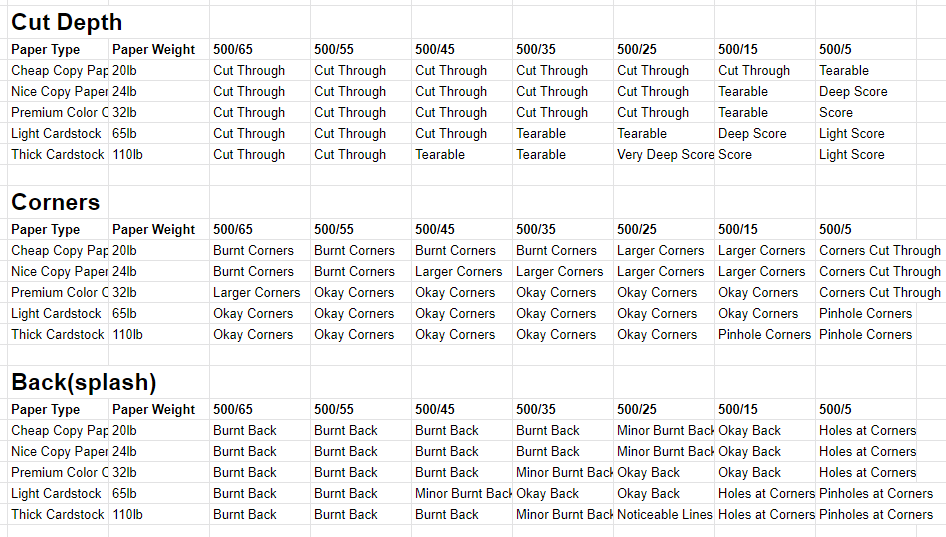
Here’s what I mean in those boxes…
Cut Depth
- Cut Through - the laser cut through the paper
- Tearable - the laser cut through partially but did not separate the paper, so it can be easily torn apart by hand
- Deep Score - the laser did not actually cut through but it burnt away lots of material / light shines through the score
- Light Score - the laser cut through less than half the paper’s thickness, it’s a nice little groove, perfect for folding along
Corners
- Burnt Corners - there was visible burning at / around corners on the front of the paper
- Larger Corners - the corners were very noticeably large
- Okay Corners - the corners were slightly bigger, which isn’t perfect, but good enough especially if you’re cutting away material so you don’t really notice the difference between the cut line and the corner circle
- Corners Cut Through - for scoring settings only, this means that the corners (and maybe area around it) were noticeably cut all the way through
- Pinhole Corners - for scoring settings only, this means that the corners did cut through but it is a very tiny hole (probably smaller than a pin, actually)
Back
- Burnt Back - lots of splashing, area around cuts are burnt
- Minor Burnt Back - it’s almost perfect, but not quite
- Okay Back - no burning on the back, meaning the setting’s high enough to burn through but not too high that heat reflected back
- Noticeable Lines - it’s not cut through but you can see strong evidence of cutting from the back
Everything else in the Back category means that you can’t really see evidence of the cuts on the back other than the corners.
Some Random Parting Thoughts
High speed gives pretty bad corners. I think I may give lower speed very low power (maybe 350/1 or something) a shot. However if I was just cutting things out of a piece of cardstock I wouldn’t worry too much. At the lowest settings that still cut through the corners aren’t that bad.
The crossings performed really well. I thought they’d be like the corners but even with the scores it came out very nicely.
The settings I put at the top are basically what I personally would use to start a project now that I’ve done all this. They will very definitely need to be tweaked for optimal performance, and possibly color of paper (I noticed that I got more backsplash from the 110lb white paper compared to the 65lb gray, on the same setting). But for cutting simple geometry shapes or whatever these should work fine.
Multiple Sheets of Paper
One additional thing I tested was a stack of 2 sheets of 20lb copy paper. 500/35 cuts through both sheets nicely, 500/25 didn’t get through the bottom sheet. It’s a little late (and a little freezing) now for me to do more, but I do want to run some tests on larger stacks of copy paper. 3+ sheets, at least. That’s because it takes a while for snapmarks to align, so if I can print and cut multiple things at once it’ll save me a lot of time.
That’s About It?
Thanks for reading through all this. Please do let me know if you have other ideas or if you use one of these settings and it turns out horribly or something. Oh, I also have photos. They aren’t great because my living room lighting isn’t great and it’s hard to see how things cut through with only a photo but I’ll post them up as replies to this thing since they will probably be helpful.