I really was caught unprepared to physically receive a Glowforge. I was ready in terms of design ideas, workflow and materials but other than putting the exhaust hose out a window, I didn’t really picture what I was going to do. Luckily the few weeks before I had transformed the basement office into a work room and had picked up the table and gave a few thoughts to the window situation.
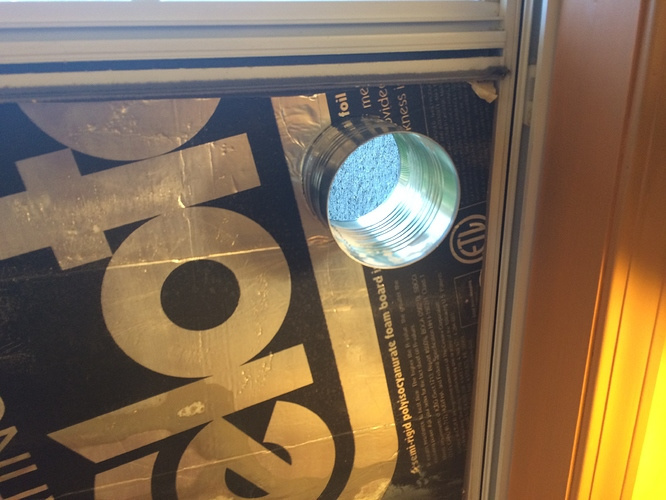
I procured a piece of Celotex from a parishioner and used a 28 oz. tomato can to pierce the two layers of Celotex and hooked the hose to vent out of the window. So that took care of the quick solution. Over time the spring in the hose loosened where it connected to the can and I needed to find a way to clamp it down tighter. But I wanted a disconnect too.

With zero temperatures, I needed to disconnect the exhaust hose overnight to keep the cold out of the room and out of the Glowforge since I didn’t have any in line dampers or check valve.
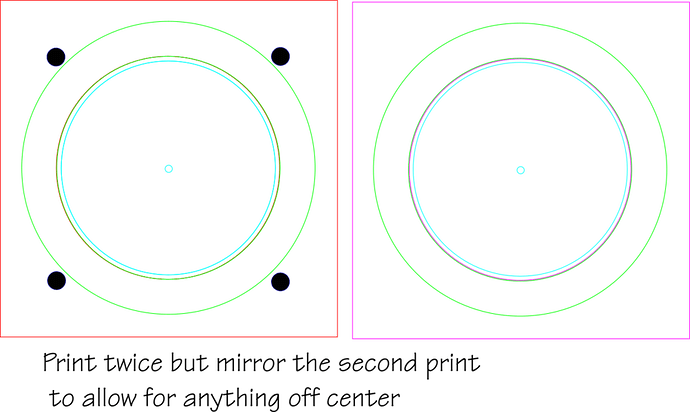
I knew what I wanted to do, but couldn’t find the neodymium magnets I had purchased a few months ago on sale. Finally found them so I spent a little time designing this project: This might help folks think through their venting situation if only to show them what they shouldn’t do!
This file will serve for several operations.
- Engrave the pockets for the rare earth magnets. Mine were 8mm diameter and 3mm thick. I put a shallow pocket in one flange as a test. It worked out perfect to press fit the magnets in. I scored around the engraving hole to define it even more precisely, not sure if necessary.
- Cut the inner circle for the can to go through. The center hole in the wood of the surface flange with the magnets is made to press fit into the can lip/ring. The center hole in the backing flange (without the magnet holes) is cut slightly smaller so as not to go past the lip/ring of the can. You need to cut a can in half to get it to fit.
- Glue the surface and back plates together positioned on the can. I found that gluing them off the can caused the wood to swell just enough and glue to seep out that I had to do some sanding and cleaning out for them to fit back onto the can.
- Epoxy the magnets in. Make sure you clean off the char before using the epoxy or you will learn how to make black epoxy that doesn’t come off your hands. Also, most important, make sure you put the magnets in correctly to insure that polarity is correct on all four magnets for the mating flange.
Here’s something that might have worked, but didn’t take care of backflow.
Here are some photos that explain some of the issues I worked with.
Here is what a normal person might buy.
But then you have the outside issue to take care of with the back flow installed damper installed. I also don’t want to impede the airflow at all as it exits, even with a free swinging damper. Maybe that should not be a concern.
Here are the two plates assembled and glued. Note the messy surface of the plates. I didn’t mask the plywood I used and then the epoxy and char can make a mess. Note to self: clean the char edges thoroughly before attempting to glue anything. Note the leather gaskets I cut. It works pretty good as a mating surface. I put some udder balm on the gaskets to give them a little more resiliency and make a better seal.
The window plate is installed.
And the two ends are mated. I need another hose clamp or a zip tie to keep the hose fastened tight to the coupler. I think I have a zip tie somewhere at the office big enough. Or I could buy a hose clamp. Hose clamps are my preferred method because you have control over how tight the connection is.
Or you can get one of these:
Here is the coupler in action. It didn’t hold very well. Somehow I had put in one of the magnets the wrong way and was getting three pair sticking and one pair repelling. I had tried so hard to keep them straight, but they kept jumping around. So I used some binder clamps until I had time to come back and turn that one magnet over.
And here is the final fit. I used some silicone to adhere the back plate to the Celotex and seal any gaps.
Final thing was make a plug to put in when the hose is disconnected. A store bought plug costs money.
I thought about a nice ring bolt to put through that would be pretty sturdy. I could have just used a coat hanger and a piece of wood.
But I decided to use cable (23 cents for a foot of it) and ferrules to make it sturdier. The top and bottom are off wood cut out from the cutouts of the surface and back plates. The center is the two cutouts from the Celotex from inserting the tin can.
Here it is working pretty well. Haven’t checked for air gaps or anything, but it feels pretty tight right now. I probably should neaten up the duct tape wrapping the Celotex for cosmetic purposes.
It is probably better than the insulation in my house, which is minimal. The Celotex over the windows is always warmer than the walls of the office.
Improvements: I need bigger magnets or more of them. They do hold ok and keep the seal pretty tight, but a slight knock on the hose might disconnect it. Also, I engraved the recesses for the magnets in one surface plate deeper than the other, not thinking about the thickness of the leather so the magnets don’t quite touch. That’s ok because it puts force all the way around on the leather, but it does decrease the holding power slightly because the magnets are separate. I might dig them out of the deeper holes and re-epoxy them a little more.
Here is the connection. The slight blue tint is the leather and at the top you can catch the glint of a magnet and the space between it and its counterpart.
Will see how it works for keeping cold out when disconnected with the plug in, and keeping the exhausted vented when coupled.


