Custom Inkscape, Illustrator, CorelDraw and Affinity Designer Color Palettes for ordering operations in GFUI

Continuing the discussion from Space Invaders or Mitral Valve Leaflets, you decide:

I have always been curious about how the Glowforge defaults the order of operations. I have tested it in terms of position in the workspace and order of creation in the design. Nothings seemed to click right, but I had a sneaking suspicion that it was dermined by color. The Glowforge catalog designs always load in the same order, though you can drag and change them in the workspace, so I figured there must be some way of doing this.

I played around with the colors and how the loaded and then noted that black was first. I used the RGB values of 0 and 255 to get base colors, which I normally do for my operations and opened the files in the GFUI to see how the order was determined. Black is first and White is last. Cut first and then loads the engraves.

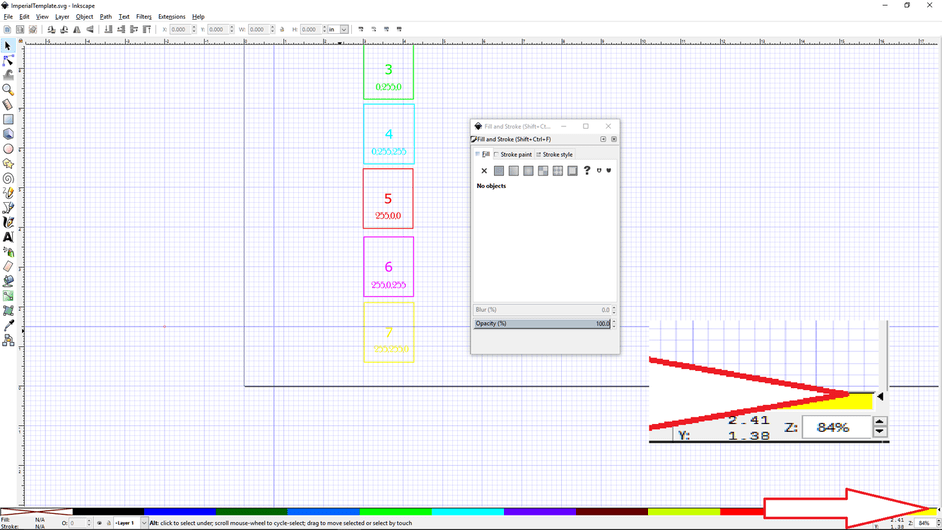
I had a little help from @tim1724 who graciously worked up a full chart of 26 colors to do an in depth test of how the numbering works: according to ascending hexadecimal integers.

That helped spur me on to do a little digging in how Inkscape makes colors. I found the file location and analyzed the palette files. They use the GIMP color palette file description. I came up with a palette than I think is fairly discernable with some descriptive names.starting with a number and ordering them. They appear left to right on the palette.

Color perception is highly individualized, so feel free to roll your own. This is what my tired old eyes can work with. It also gives enough swatches that I can do just about any complicated design.

So make file and save it as text naming it something appropriate like “Glowforge” with the extension *.gpl. Stick the following text into it.

GIMP Palette
Name: Glowforge
#
  0   0   0	1 black (#000000)
  0   0 255	2 dark blue (#0000ffff)
  0 100   0	3 dark green (#006400ff)
  0 100 255	4 navy blue (#0064ffff)
  0 255   0	5 bright green (#00ff00ff)
  0 255 255	6 aqua blue (#00ffffff)
100   0   0	7 brown (#640000ff)
100   0 255	8 purple (#6400ffff)
100 255   0	9 lime green (#64ff00ff)
255   0   0	10 red (#ff0000ff)
255   0 255	11 magenta (#ff00ffff)
255 100   0	12 orange (#ff6400ff)
255 255   0	13 yellow (ffff00ff)

[Edit: fixed the orange hex code]

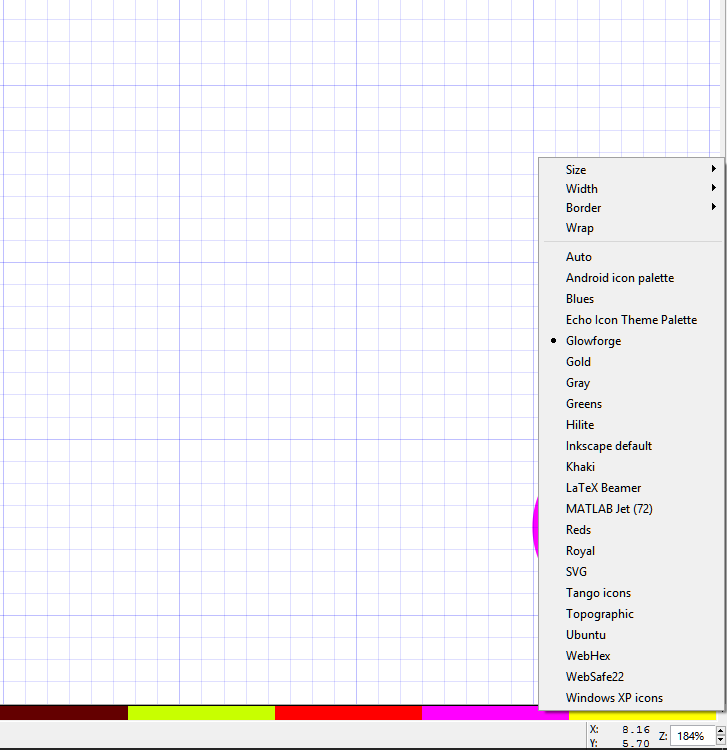
Copy the file into the palettes directory of your Inkscape install.

To activate the palette, you have to find the secret little arrow in Inkscape that hangs out at the lower right at the end of the color palette ribbon at the bottom. Note the red arrow in the screenshot.

The palette selections will appear. If everything works right, you’ll have a custom Glowforge color palette.

This is going to speed up my design work immensely. I’ll probably just stick with the most visible for me of blue, lime green, brown, red, magenta.

As always the usual disclaimer: this is being helpful but not authorative. I welcome corrections, suggestions, and improvements.

Things may change, but at the moment this is working.

And here is a file to play with in the Glowforge Interface to test it.

Ok, it should be good to go now.

152 Likes

Another thread that blows my mind!

6 Likes

Thanks for the information, but you made us old guys hurt our brain trying to figure out how to make and install that file.:smiley:

7 Likes

I barely understand this stuff. I know that everything is a file. In Inkscape, the files are very accessible directly to edit, unlike the proprietary programs that hide that stuff from you. What we are doing is simply making a numeric description of colors and putting it in the form of a file that Inkscape can read. The GFUI must have some part of its programming that reorders the different colored objects according to a certain scheme. That allows the catalog files to order their cuts automatically for best effect.

I did this on Windows 10. You might run into permission problems poking around in the install directory. You’ll have to allow it as administrator.

This is the simplest format to make. Use a Notepad to make the file and save as plain text with the extension .gpl.

I guess this would make a good video tutorial!

5 Likes

It is even more complex for us mac users, had to dig into the package contents, and copy one of the existing files and paste the new information into that file.
Making a .txt file on my mac, well I do not have an app that will do that, even the text edit app wanted to make it a .rtf file, Inkscape doesn’t like that.
For you Mac users, right click on the Inkscape app icon in finder and choose show package contents, on my machine the file is located in

/Applications/Inkscape.app/Contents/Resources/share/inkscape/palettes (place the file here)

I cannot link the gpl file to the board, so if any other Mac user wants the file send me an email and I will send it to you.

5 Likes

The Mac text editor will save plain text files, and can can default to them. Or you can install TextWrangler for free. :wink:

3 Likes

Is the mac text editor a developer tool? I did a search for it on my computer and do not have it.
All I have TextEdit and it will not save plain text files.
I will try the TextWrangler, thanks.

TextEdit will in fact save plain text files. You just have to make sure there is no formatting in the document. Go to Format… and choose Make Plain Text, then Save will allow you to save as .txt.

2 Likes

I just recreated the same thing for Illustrator. Thanks for the data @marmak3261! Here is the swatches file:

Glowforge.ai (85.7 KB)

Here’s where I think it goes on a Mac (sorry Windows users, I don’t have a machine to test but I’m sure smart folks out there will figure out where to put it); I’m using Illustrator CS5 on Mac OS 10.10.5 so your procedure might be different:

  1. Save the file to your hard drive.
  2. In the Finder, hold down the Option key while choosing the Go menu. Choose Library (it doesn’t show up if you are not holding down the Option key).
  3. Navigate to Library > Application Support > Adobe > Adobe Illustrator CS5 > en_US > Swatches
  4. Drag the Glowforge.ai file into the above Swatches folder.
  5. Restart Illustrator. If you go to Window > Swatch Libraries > User Defined, you should see the Glowforge swatch library in there.
48 Likes

Thanks @marmak3261! I just used your post to create a CorelDRAW version. I guess @cynd11 and I think alike.

Glowforge.zip (428 Bytes)

EDIT: To use this palette, download the zip file and extracted the contents. Copy the glowforge.xml file to My Documents\My Palettes (this file should already exist even though you don’t have any custom palettes). Then, in CorelDRAW, open the Color Palette Manager (Window --> Dockers --> Color Palette Manager), open the My Palettes section, and double clicked on the Glowforge palette.

12 Likes

Way to jump in @cynd11 and @johnwills! Good collaboration here!

3 Likes

@johnwills, where do we put the file in Corel Draw? :confused:

1 Like

When I created the palette, it defaulted to saving in a folder called “My Palettes” within My Documents. I’d try putting it there. Create the folder if it doesn’t exist. Then, in CorelDRAW, open the color palette manager (Window --> Dockers --> Color Palette Manager). From within the Color Palette Manager, choose the icon across the top for Open a Palette and then navigate to where you saved this file. If that doesn’t work, let me know. I need to move this palette from my desktop computer where I created it onto my notebook computer later today. I’ll try to follow these steps. If they don’t work, I’ll update this.

3 Likes

Actually, it’s slightly easier than I described. I just loaded it on my notebook. I downloaded the zip file and extracted the contents. I copied the glowforge.xml file to My Documents\My Palettes (this file existed even though I didn’t previously have any custom palettes). I then looked in the My Palettes section of the Color Palette Manager and double clicked on the Glowforge palette.

2 Likes

SO I can help out with the mac.

no need for a text editor.
copy the text provided by @marmak3261 in the first post. select and press command-C usually
open a terminal window
at the prompt type:
cat > /Applications/Inkscape.app/Contents/Resources/share/inkscape/palettes/GFPalette.gpl
press return if you did not
press command-V to paste or select paste from the edit menu
press control-D to close the file
you can close the terminal window now

I would reccomend doing this while inkscape is closed.
you can use any name you want ending .gpl if you don’t like GFPalette.gpl.

The > is of course very important in the cat command if you are having trouble since it tell the bash shell to write to the file named after.
If you have a permission problem you can try the sudo in front of the cat command. it will prompt you for your password and then should be able to write where you normally cannot even places you probably shouldn’t.

I unfortunately cannot reboot at the moment to finish the XQuartz install to test this beyond getting a text file out there. so if anyone else cares to verify that this is successful and I didn’t miss anything I suspect others would be appreciative.

7 Likes

Custom Palette for Affinity Designer
Glowforge.zip (367 Bytes)

Unzip the file
For Windows workstations, copy/move Glowforge.csv to c:\Program Files\Affinity\Affinity Designer\Resources\Pantone\

You will probably need to give administrator approval to copy the file to this location.

For MAC workstations, hopefully the instructions are recognizably similar

14 Likes

CLI rocks! so much easier!

Also for Inkscape users: As the tool tip states on the palette ribbon, clicking on the palette sets the fill color by default. You need to press Shift+click on the swatch to set the stroke.

1 Like

Yep, looks like it’s pretty much identical. Here’s a screenshot including the file path.

3 Likes

That is so awesome, thank you so much. I was literally about whether the colors derived the order of operations yesterday.

These instructions will work for Linux as well. The one change will be the part after “cat >”. For my version of Ubuntu, “cat > ~/.config/inkscape/pallettes/GFPallette.gpl” should work.

Open Inkscape and press “shift + ctrl + p” and see where “user config:” points to and add “/pallettes/GFPallette.gpl” after that. BTW, “The ~ (tilde character) shorthand command refers to that particular user’s home directory.” -source: Wikipedia

Or, use any of the kajillion Linux editors that can save plain text files.

3 Likes